Category Archives: 322monday21

Design- Thinking

The Technologist Module provided by eCampus Ontario is a powerful page. The whole premise of the page is designed to talk about how inclusion and technology can go hand in hand. When any reader scrolls through this site; they would be overwhelmed with information about how technology serves a purpose in our education. That purpose is not to prepare our future citizens for a robotic dystopian takeover; but to in-turn address specific learning needs. The module out lines, Design-Thinking, which is the primary focus of my pow town. Design-Thinking, starts with every creator, consumer or educator identifying a need, then problem, whilst finally creating a solution to that problem using technology. I believe that this is a great way to go about both living and teaching. Empathy is put first, to solve a common problem for learning. This is something, that most teachers are already doing when creating a lesson plan. As teachers, we listen to our students to identify said problems, then use our lessons to come up with solutions. The final step in design thinking, is one thing teachers already do; tie your lesson (product) to the curriculum. This module, provides a guide for the teacher who is afraid to try technology in his or her class. Overall, one might come to realize that one can not create a successful product without empathizing first then documenting later. Nor can one be a successful teacher by following the rule of empathy first.


powtoon

How to Become a Technologist

For this multimedia reflection, I chose to use Canva. I had previously used Canva once; however, I did not use a template. This time, I wanted to create an infographic using one of the templates provided. I wanted to use Canva another time because I have been using this program in my personal life for various reasons and I wanted to gain another chance to explore it even more. I really enjoy this application because it is user friendly and allows me to add my own creativity. I have trouble organizing ideas and my creativity to create an aesthetic product; therefore, I really appreciate all that is available on Canva. I can truly see myself using this program in my classroom and having my students use it as well! I feel like my students will love it and be able to show their creativity and knowledge.

The technologist module, click here to view–> https://extend.ecampusontario.ca/technologist-module-checklist/ that we explored a bit in class and then further on our own was interesting and I enjoyed how it broke down the core principal of Design-Thinking. It gave a step by step guide on how to understand and implement design-thinking; therefore, I thought an infographic on that principle would be a great way for others who are not familiar with the concept to grasp it as well. The 5 steps are presented for educators and how to integrate technology into your classroom if you are a new teacher or a teacher who seems to be sticking to the same course techniques over and over again. I think the first step of Empathizing is very important and stuck out to me. You must understand who your learners are before you can even begin to integrate technology. Integrating technology into your lessons for just the sake of doing so and to be “with the times” is not a useful mindset. During my last placement in a grade 7/8 class I had many ELL students and if I am integrating technology I have to make sure they are able to grasp the lesson as well.  There are all five of the steps:

  1. Empathize: Understand the needs of your learners so you can empathize with the challenges they face. Create a relationship so that you may better understand what they need from you.
  2. Define: Narrow and identify the challenges or problems. Knowing the challenge will help you develop a plan that will meet the needs of the students you have built a relationship with.
  3. Ideate: Form characteristics of how and what technology you will use to address the challenge. Create a mindmap by sketching it on paper or through some awesome programs online!
  4. Prototype: Try it! Test it! You might fail but you need to share it with an audience or yourself before it can be fully implemented. Play around and get to know the technology you want to use. You can always redefine and rework it if you haven’t met your expectations.
  5. Connect: Connect the use of this technology to the curriculum! These connections are important for your students to find meaning in your lessons.

Lastly, all of these steps are useful and it has made me feel less anxious about my own classroom in the future. Having an organized system is extremely helpful and following the design thinking process will help me and several others who want to integrate technology into the classroom!


How to integrate Design thinking in your classroom

Integrating tech into your classroom

As the world is spinning, new ideas, new technology is being invented daily for our better daily use. As teachers we want to integrate technology into our classroom because it’ll make our lessons more effect. Our students are becoming more tech savvy, we should be able to adapt to the new times. We depend on technology more than ever these days, so why not add technology into our lessons that we possibly have taught the same way for so many years. Developing these skills won’t take us a day to figure out, it will happen over time. This is what “Digital Literacies” are about,  “using technology tools effectively to address specific learning challenges is just one aspect of digital literacies for teaching.” (https://extend.ecampusontario.ca/technologist-digital-literacies/)


There are five processes for the design-thinking process:

  1. Empathize: You have to put your desires aside to make a lesson better and think about what the student wants. You may want to use a specific technology module that will help the students understand the material you are trying to teach them. In the end, it starts with the students, and it’s for the students.
  2. Define: Is pinpointing a problem that your learner will come across. You want to build a focal point that will overcome the challenge for your student(s), and this will help you identify challenges in the coming future.
  3. Ideate: This is where technology will come in and help you with your challenges. There are many different programs that will assist you in making these mind maps.
  4. Prototype: This category allows you to chose your favourite technology and add design a prototype lesson. This is your test run with your lesson. If it works, great, and if it doesn’t, you knew it was a test run, and make sure to refine it for next time.
  5. Connect: This is the key part of your lesson. You will need to connect your technology to the curriculum. Overall expectations, and specific expectations need to be checked off when you are designing your use of the technology for your lesson. If they are not, you’ll have to scratch that and make a lesson or find a new program that connects.


I found this Google Image and I liked it a lot, because it shows all 5 categories outside of an infinity loop, showing how all of these frameworks tie into one another. 

Picture citation: https://productcoalition.com/design-thinking-isnt-just-for-your-product-development-team-e8e25f713643


I wanted to challenge myself and make a Twitter Essay talking about the Design-Process.


Choosing Technology to Enhance Learning

As teachers we want to be able to introduce technology into the classroom but it is often difficult to do so in a way that supports the learning experience. This article helps educators figure out how to integrate technology into the classroom in an ineffective way. In order to teach with technology in an effective way we must consider digital literacies. We have to be able to communicate information while using technology and learn how to engage responsibly in online communities. Developing these skills is an ongoing process and won’t just happen at once. The article also informs us about the design thinking approach. It is a human-centered approach and the people who will benefit from this product are involved in the design. In an educational setting, it helps students become active participants in their own learning. There are five steps to the design thinking process:

  1. Empathize. You must understand who this is being designed for and what that person needs. For the learner, we must identify a challenge that could be solved through the purposeful use of technology in the classroom.
  2. Define. Now we must identify a problem based on what we have discovered about the learner. It is best to start small. A good learner challenge provides focus and frames the challenge, inspires others, informs how you will evaluate, captures the readers, and helps for most of the readers.
  3. Ideate. It is time to form the features of how the technology could work in the classroom. Asking “How might I…?” or a mind map helps when creating your ideas. First we must pick a technology tool to help address the challenges that the learners are having. After selecting the proper tool, we must use the SECTIONS model to evaluate if it is the proper tool to use. It helps decide if it’s a good fit for your students, the course, or your classroom by taking into account things like ease of use, privacy, cost, etc.
  4. Prototype. This is the step where we design a prototype of the creation. Play around t=with the tool you have chosen and find out as much information about it as possible. Next, share your prototype with peers or learners and get feedback from everyone. Take that feedback into account and make the necessary changes to the original prototype.
  5. Connect. Figure out how to integrate this technology into the curriculum. Give your learners clear instructions on what to do and link the activity into the learning outcomes.


I chose to create a poster on Canva as my artifact. I wanted people to easily see the five steps involved in the design thinking process. This way they can use it as a reference when trying to find technology to help facilitate the learning going on in the classroom. I think that this module is an incredible tool to have as a teacher. The website itself is easy to navigate and it offers many outside resources for readers to check out. I really enjoyed how it gave examples of ways to do each step of the process. For example, in the “Ideate” section it gives us examples of mind maps to help organize our ideas before creating a prototype. This website gave us many different resources that we can carry over to any subject in the classroom. Sometimes as teachers we have so many ideas but need help with organizing or implementing them. This is a step by step guide to make sure that the ideas we do come up with are effective and won’t waste our time or our learners’ time. There are many different types of learners in the classroom and not all of them are comfortable with technology or may be new to using it. This article helps us with making sure each person in the classroom has an equal opportunity in learning.


Technologic – Daft Punk

After reading and analyzing eCampus Ontario’s open PD modules, I decided to create an infographic using Piktochart, a medium I have yet to use. I personally find infographics to be the most appealing and well-read due to its organized layout, thus I wanted to create something of my own to interest readers. Being it my first time using Piktochart, I found it easy to navigate and manipulate. I was presented with the option of whether I wanted to use a template or not and found it effortless to put my thoughts and findings into words by use of a template. The medium offers its users access to graphics similar to clipart, as well as the option to upload photos from external sources. In addition to this, the site also enables for customization through different background colours and patterns, and multiple font options. Though I created an infographic with ease and without running into any drawback, I quickly noticed a small icon that states, “Level Up”, wherever an upgrade payment is needed to access premium features. These features included colour schemes, additional templates, password protection and watermark removal – all things that honestly did not interest me in this particular assignment.

Prior to exploring the modules, I believed I was well aware of technology integration as I have done so in my previous placements, and experiences supply teaching. My knowledge on this subject has quickly changed from adding in a video, or an interactive activity to my lessons, to now using technology to benefit my learners and their needs. The technologist module of design thinking follows the steps of Empathize, Define, Ideate, Prototype, and Connect. In outlining the Technologist modules for my infographic, I became excited to use the steps in my future classroom. Something I particularly enjoyed about the modules was its use of examples on how to facilitate the activities provided. samr_r2.pngWhen thinking of the SAMR model while perusing the Technologist modules, I thought of a way in which I have both enhanced through substitution and augmentation in my personal teaching experience. During an English Language task, I offered my students the option of hand writing or typing their assignment via Chromebook. In addition to this, I can also recall a scenario in which I provided a student with access to a voice-to-text programme to aid them in a written piece.


This module has provided me with the understanding that technology can implement differentiation in the classroom. Image result for differentiation in classroomIn future, I will incorporate technology into my lesson plans by referencing the SECTIONS model. I plan to focus on the needs of my students when choosing a tool, and always.


Below you’ll find my summarization of eCampus’ modules by form of an infographic.

What is Design Thinking?

For my form of media,  chose to create an infographic on Canva; here it is if you would like to look at a larger version.

For our media form, we were responsible for reviewing the Technologist Module of eCapmus Ontario’s open PD modules which describes the different aspects of Design ThinkingThis module summarizes the five main steps it takes in order to integrate technology with the use of design thinking. Design thinking is simply the strategic methods used to develop and create concepts. In my infographic I have set these five steps very clearly which a small bubble of information on each step and what it means. In the module, on the other hand, are a large variety of other sources and links offered for viewers reference in each step of this process. This includes Wikipedia links, YouTube videos and more.

I believe that these steps are very simple to understand, and in turn easy to follow as a teacher. I think that as teachers, we tend to follow through with some of these steps naturally such as trying to figure out where a student may be struggling, or trying to figure out how to help said student. I have experienced this personally in my practicum, where a student seemed to be disruptive in class; measures were taken to figure out why they couldn’t focus. My associate and I later discovered that the student had avoidance issues which in turn caused them to feel the need to avoid anything that makes them uncomfortable or that they do not understand. I do believe that with this specific set of steps any teacher should be able to move their students forward in a positive direction, whether it involves technology or not. When considering the integration of technology specifically I feel that it becomes more difficult as it is another concept being added. Being a teacher who is not fully aware of all the technology advances, there is a slight feeling of intimidation with the process. With that it, it becomes essential for teachers to take things step by step in order to not feel as overwhelmed.

As a science teacher, I very much appreciate the procedural approach that the module takes in solving a problem while also integrating technology. In my own experiences, the hardest part of getting through to a child is having them tell you that they are actually struggling. Many students are not comfortable enough to tell a teacher that they do not understand something. The only way this will happen is if the student trusts the teacher which is why I agree completely with having the first step be empathy. Once the student is able to open up, the teacher is then able to specifically define the struggles the student is having. I feel that this may be easy to do on paper, but is the hardest part in a real classroom as sometimes there are underlying issues which are the root cause of smaller issues that are easier to see. I have done student observations and anecdotals and in my opinion it becomes very hard to keep track of every student’s academic characteristics while also having multiple observations per student. In terms of having to ideate a design for the students, I think that it is essential for a teacher to have multiple sources to use. The module itself provides many external resources and link which provide extra information for the user which is very helpful. The more knowledgeable one is on an issue, the better they will be at solving it.


Tagged

A benefit for learners? Incorporating technology in the classroom!

For my multimedia reflection, I chose to create and infographic/mind map using Canva to represent the (ideas) from Technologist. I have used Canva in past classes best for smaller assignments therefore I wanted to have the opportunity to use Canva for a much larger project. I have not created an infographic in my previous multimedia reflections and was excited to use Canva for my assignment. Canva is very simple and easy to use with the many different templates to choose from. You are also able to import your own pictures or backgrounds if you wish to use certain ones that are not from the Canva website.

I found this module was very easy to navigate and it did an excellent job at explaining the different steps of the design thinking process (empathize, define, ideate, prototype, and connect. I thought that each step was explained very clearly in order for the reader to thoroughly comprehend the steps of the design thinking process. The first step in the design thinking process is empathy where you must know what the user needs in order to design the most appropriate activity. The next step is to define or identify the problems or challenges based on what you have learned about your learner. This is the step that will help you to build a solution to those problems or challenges. The ideate step is where we create new ideas in order to incorporate technology to help address the different challenges that the learner is facing. The prototype step is the step where you have made a creation and it’s time to see if it works. It’s best to experiment with your creation and if it doesn’t work the way you had hoped, you are able to refine your concept to better fit the needs of your learner. The last step in the design thinking process is to connect how you will integrate technology into the curriculum. I feel that technology has become a huge aspect of our everyday lives and as a teacher I believe that using technology will benefit my students in the classroom.

https://www.canva.com/design/DADRrl2iGFQ/6GSTvjmoHEZoMJKqVIzApA/edit?category=tACZCpzRB-E


Integrate technology in your classroom? YES LETS

                                                                                       I truly enjoyed creating my third multimedia reflection because of the medium that I chose to use. I had the opportunity to pick a tool to summarize and reflect on the assigned website, and I selected Piktochart. This was not only one of options provided in the list, but it was a medium that I had heard of before but not been willing to try. I decided to break out of my comfort zone and try to use a new medium for this reflection. After learning the hard way and creating a stop-motion picture video and taking over 300 pictures for my last reflection, I thought best this time that I try a different medium. I had an excellent experience with Piktochart. I read some reviews about the medium and thought that it would be a tool that I could incorporate my creativity and style into my reflection. By using Piktochart, I was able to do just that. There were several different templates and different presentation styles you could choose from. I selected a template that is viewed in the form of an online article or paper. The template only included the amount of pages but I had the freedom to add images, different texts and other details on my own. I LOVED all of the different fonts, backgrounds, images, icons, that you were able to easily insert into your project. I could also import my own images. I loved using Piktochart because there are no limits to your creativity, it is easy to use, and another great pro is that it is FREE unless you want to purchse promo options, but you do not need those to complete a project. After I finished creating the visual multi-media for this assignment, I felt that I would definitely want to incorporate Piktochart in my future career as a teacher and show my students how they can use Piktochart as well. There are truly many different ways you could use Piktochart in a classroom. Whether it be how you are presenting a lesson, to make it more creative or giving it as an option for the students to use for a project or assignment.

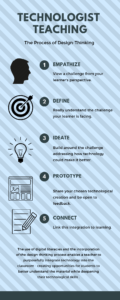
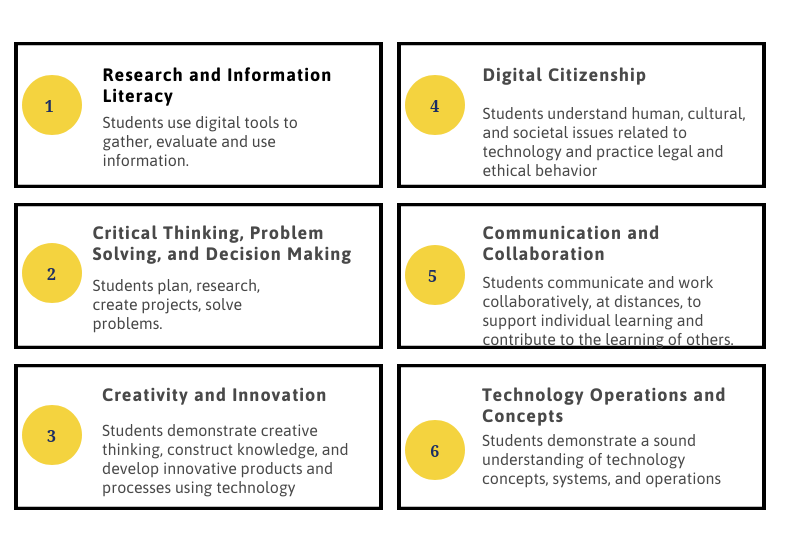
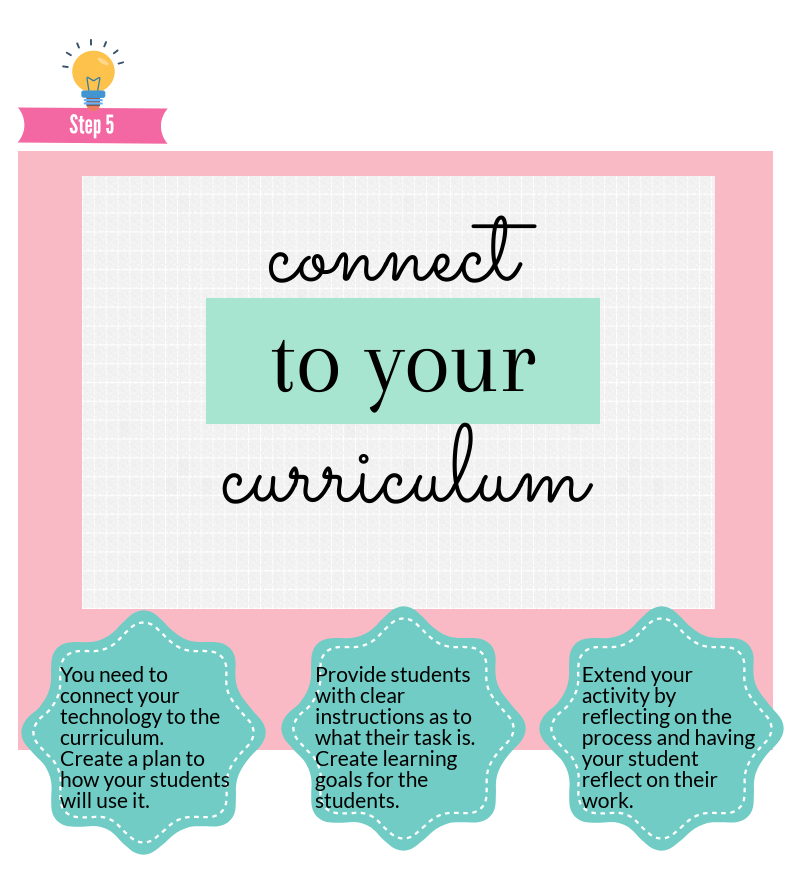
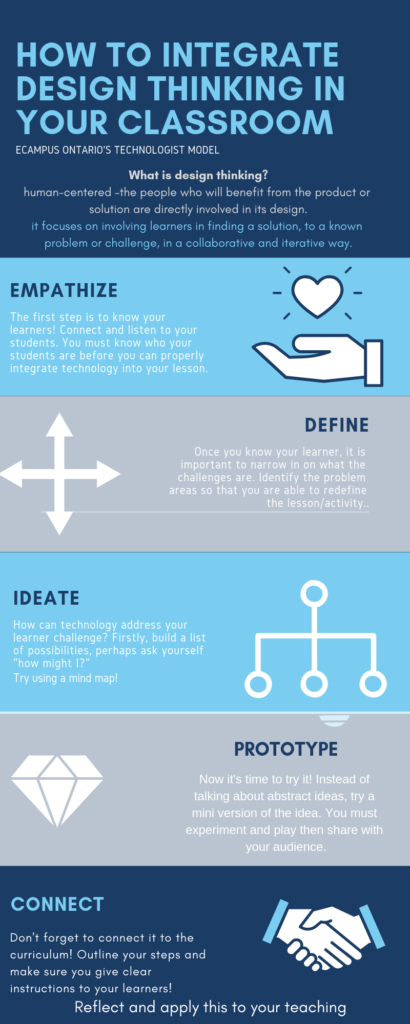
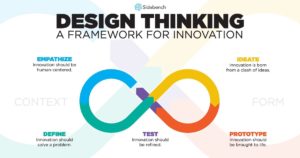
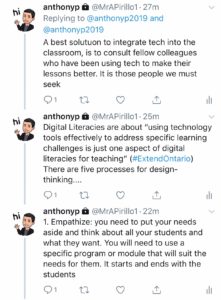
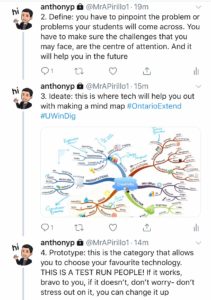
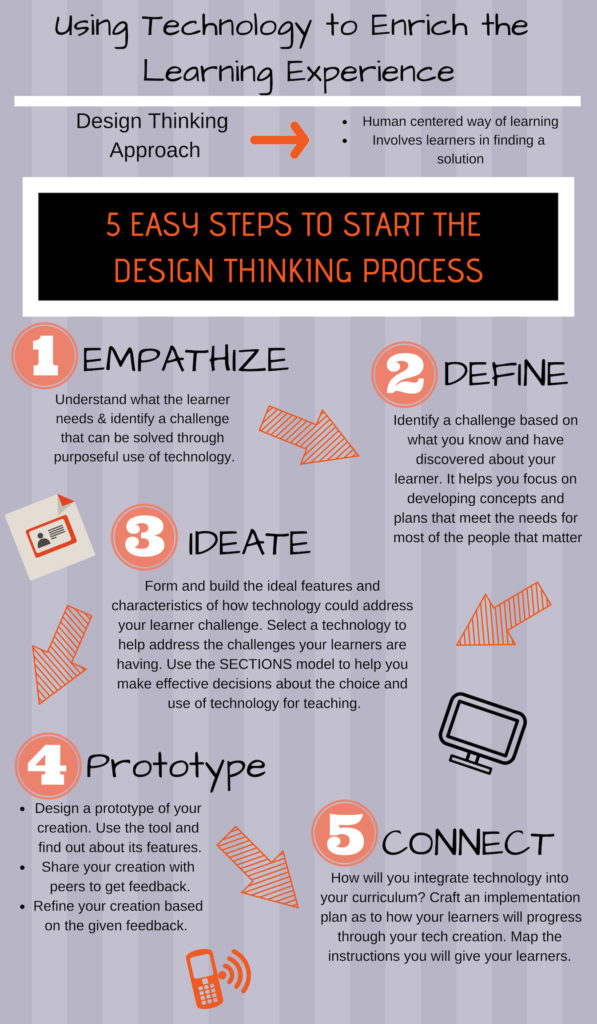
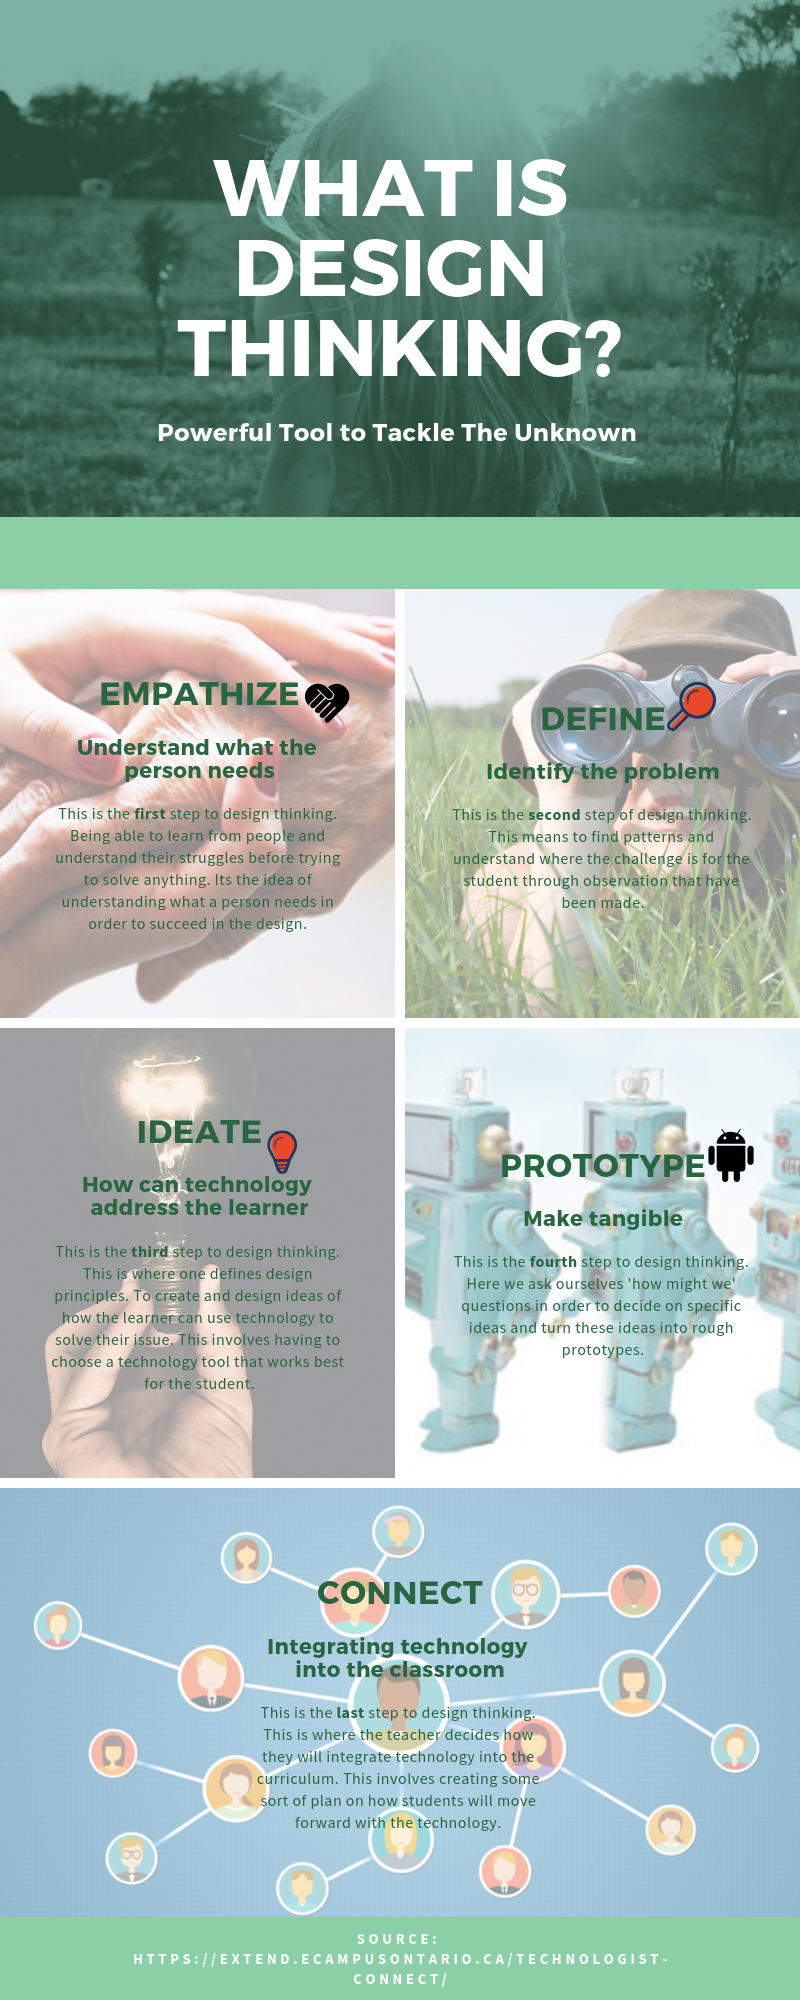
For my multi-media reflection, I decided to summarize the website,  “Technologist”  https://extend.ecampusontario.ca/technologist-design-thinking/and provided a sneak peek of what the entire website has to offer. With my written reflection, I decided I would reflect in greater detail on what the website has to offer and why it is a great tool for teachers and anyone wishing to incorporate technology in their classrooms, lives or other careers. When I first went onto the website, my first thought was “wow, this is going to be a lot to comprehend”, but after sitting down and truly engaging in the website, it explains everything in great detail. The main purpose I believe of this website is to demonstrate and explain how teachers can successfully integrate technology into their classrooms. This website is an excellent tool to truly show the many steps you take and need to consider when integrating technology into the classroom. “Technologist” is broken down into different modules which you can complete to learn more about the integration of technology. The module did a great job of clearly describing the steps in order to achieve your end goal when integrating technology. There are step by step modules about digital literacies and digital thinking. With the help of an excellent video, I was able to fully understand what digital literacies mean. I would define digital literacy the ability to be able to use digital technology as a way to communicate, manage, create, analyze and share information with other people. The digital-thinking section of the website is broken down into other modules including emphasize, define, ideate, prototype and connect. In each of these sections I was able to fully understand what they meant. There was not only an explanation of each, but an activity you could complete as well. After diving into this website, I now feel more confident in how I will integrate technology into my classroom as a future teacher. I believe in the importance of differentiation within the class and incorporating technology is another way I can differentiate my lessons and assignments for my students. As future teachers and living in the twenty first century, a technology filled world, we need to make sure our teaching practices are unique, engaging and help our students to develop a love for lifelong learning. I believe incorporating technology will be a factor in reaching this goal.

CLICK THE LINK BELOW…. to view my Piktochart and to see an example of what you can create using the wonderful tool!

https://create.piktochart.com/output/36454843-multimedia-reflection-3


Lets Get Integrated!

For this assignment I wanted to use a different medium that I have never experienced before, so I picked to do a Powtoon. At first, I was nervous about using this medium, I have never used it and it looked intimidating. But after doing the modules I took their advice and watched tutorials on how to use it. The part about choosing a template made me rethink it due to the many options, but I wanted to increase my knowledge of mediums, so I took the risk and picked a blank one to start from scratch. Image result for confusion gifThe blank template gave me more room for my own personal creativity, which made the process of creating the Powtoon much easier. I thought of doing it more as reflection of what the website offers, making it as more of an informative video for those that want to know what it is all about. I also found at the end I had to delete some slides due to the limitation of a free membership with the medium. If I wanted to have a video that was more than three minutes long, I would have to upgrade to the next membership. Related imageOnce I finished the visual multi-media I felt better about using the medium and I plan on it using in the future with my classes. I have already thought about how I would use in the classroom, for example for media literacy class to create business pitch for a product/company.


The modules on the website, Technologist, at first looks like something that would be grueling and not exciting to undertake. Before beginning the modules, the website gives you the breakdown of what will be achieved throughout and at the end of the modules. It is a great website for teachers to learn how to integrate digital technology into lessons that would be advantageous for their students. I found that in the past some of my teachers had difficulty integrating digital technology into lessons or even projects. The digital technology did not integrate smoothly into the content being taught, which ended up with most of my classmates trailing off from the work that was asked of us. The modules explain every aspect of planning it, allowing the learner/reader to concentrate on a certain aspect of the integration into lessons. The first module explains the term “digital literacies”, which I have heard of beforehand, but I now have a better understanding after reading many different articles that explain the term. This is an aspect that teachers need as an educator, it allows for a better understanding of how to use digital technology and how to implement it to its full advantage. This is something I am hoping to develop more of to ensure that I can use digital technology to its full advantage and use it in my lessons as much as possible to have differentiation for different learning styles. There are seven elements of digital literacies that you are capable of learning (shown in the picture labeled the seven elements of digital literacies).
Seven element of digital literacies
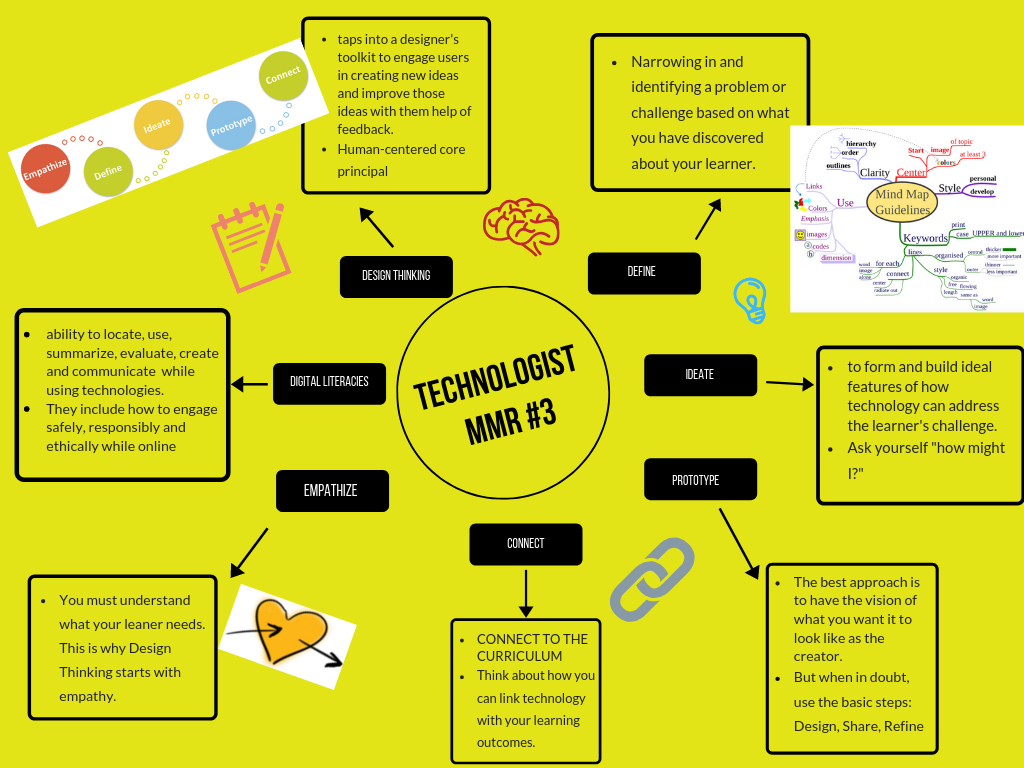
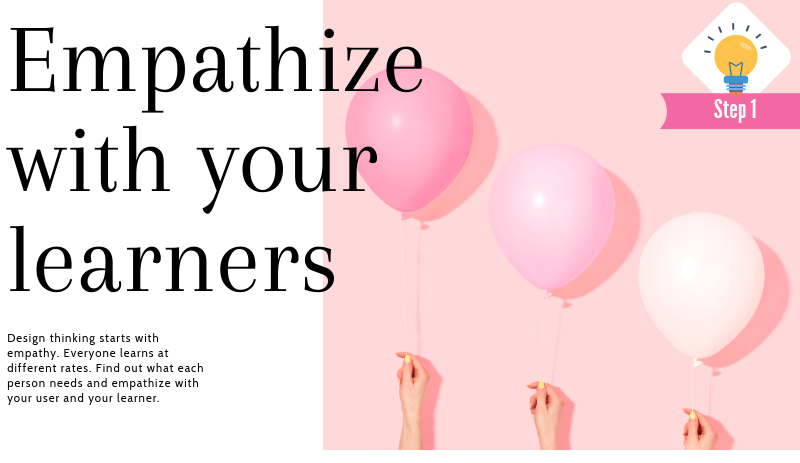
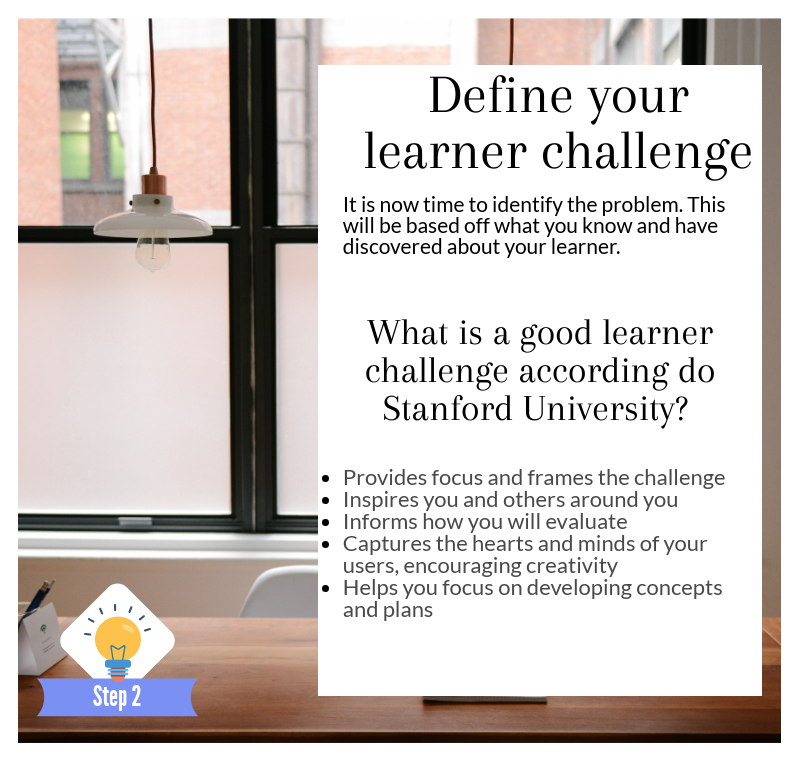
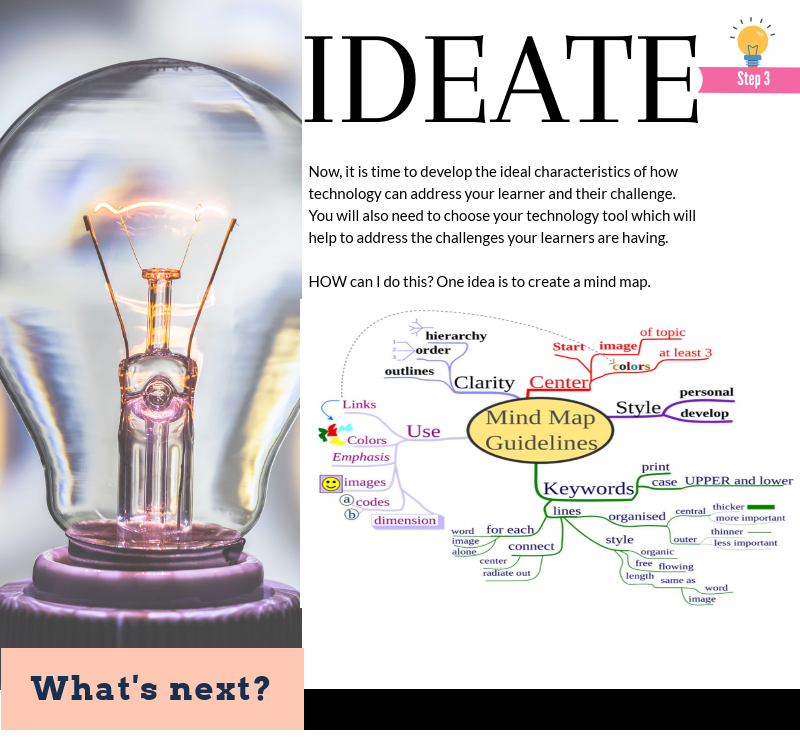
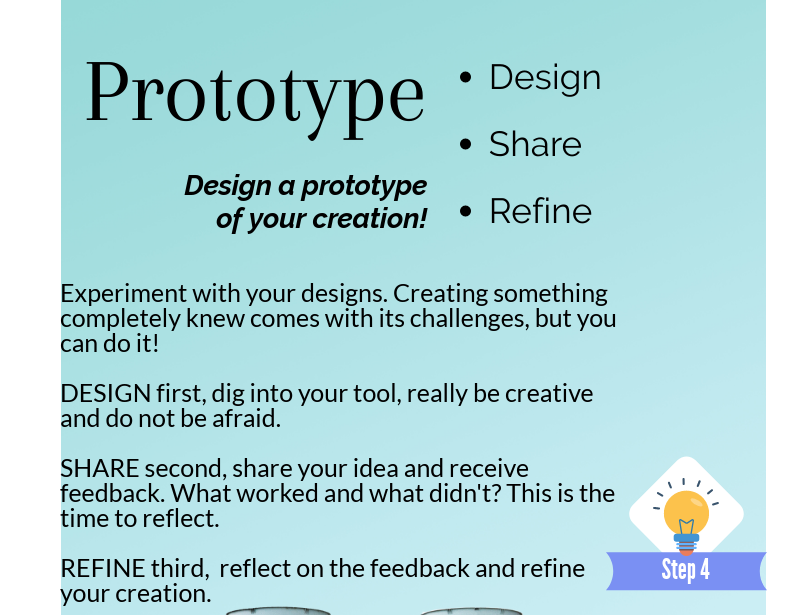
As a future educator it is important to learn information about the students to use when finding digital technologies; it is important to find the learner challenges that the students have in the class. If most students require a text-to-speech feature, the teacher will need to ensure that digital technology has this feature to ensure every student has equal opportunity in the class. The module, Empathize with your Learners, explains what questions to ask your students to learn what is necessary for choosing the most beneficial digital technology. During my summer break I was a scribe at a school and was able to experience a digital technology that would read any text to a student. The school evidently got to know their students and ensured they had text-to-speech technology that would help those that require it for their learning. Then the next set of modules go into using the digital technology with the students to see if it works to increase their learning; creating something tangible. I have had it in the past where the teacher would continuously assign us to do math work on the math circus, but I found that it did not increase my learning rather I would cheat or do the same activities every time. The teachers need to ensure that the students will learn from the digital technology; another way to test the usefulness of the digital technology is with other teachers. The other teachers will also give feedback that will be helpful about whether they think the digital technology will be useful or keep the students at a stand still. Another great system to follow is SAMR, which teachers can use to evaluate whether the digital technology will redefine, modify, augment, and/or substitute the student’s learning. If the teacher finds the digital technology falls under 1 or more of these categories, the digital technology is useful in the classroom for learning. Image result for samrThis website I found to be very informative and something I will use in the future to help me integrate digital technology. I want my students to learn in many different ways rather than listening to lessons all day from a PowerPoint slide. The integration of digital technology into my class is something I developed a passion for when I began teacher’s college.

Fun Fact: My sister took a class in university with the professor that invented the human-centered design and participatory design approach.


Tagged

Technologist Teaching

As I read through the Technologist modules, I was reminded of the SAMR concept. Teachers tend to incorporate technology with no real reasoning. By following the five steps of design thinking, educators are able to use technology purposefully enriching the learning of the student in their classrooms. Technology has come so far and shows no signs of slowing down. As teachers, there is no escaping digital literacy. The more we expose our students to technology, the better. There is no telling what kind of digital work they will face after school and it is up to us to prepare them for a world that does not yet exist. Good teachers will not shy away from technology that intimidates them, but embrace all the positive uses that can be implemented into the classroom. The design thinking process ensures educators make good use of technological tools by enriching education. By empathizing with the learner, the teacher will understand the struggle they face. Then by defining the real issue and really taking the time to understand the problem can we hope to get somewhere with a solution. The teacher would ideate characteristics around the problem before sharing a prototype with the classroom and being open to feedback. Finally, the teacher will implement the technology in their own way and connect it with the curriculum. These five steps are what makes up design thinking and encourages digital literacy among students and teachers alike.

I had not yet created an infographic and was eager to explore this tool on canva. I found it intimidating at first because the infographics my peers have made were impressive and so professional looking. After reading the modules and taking notes, I tackled canva. Once I started, it really became easy. I had issues with finding a template, positioning the text boxes, finding the perfect images, etc. Then I found myself focused on tedious small details for far too long – sizing my graphics just right and lining them up perfectly. After seeing the finished product, I am happy with the outcome and would most definitely create an other if an opportunity arose.

For a bigger view of my infographic, click here.


Tagged ,