Category Archives: Uncategorized

Don’t stick to the status quo – explore technology!

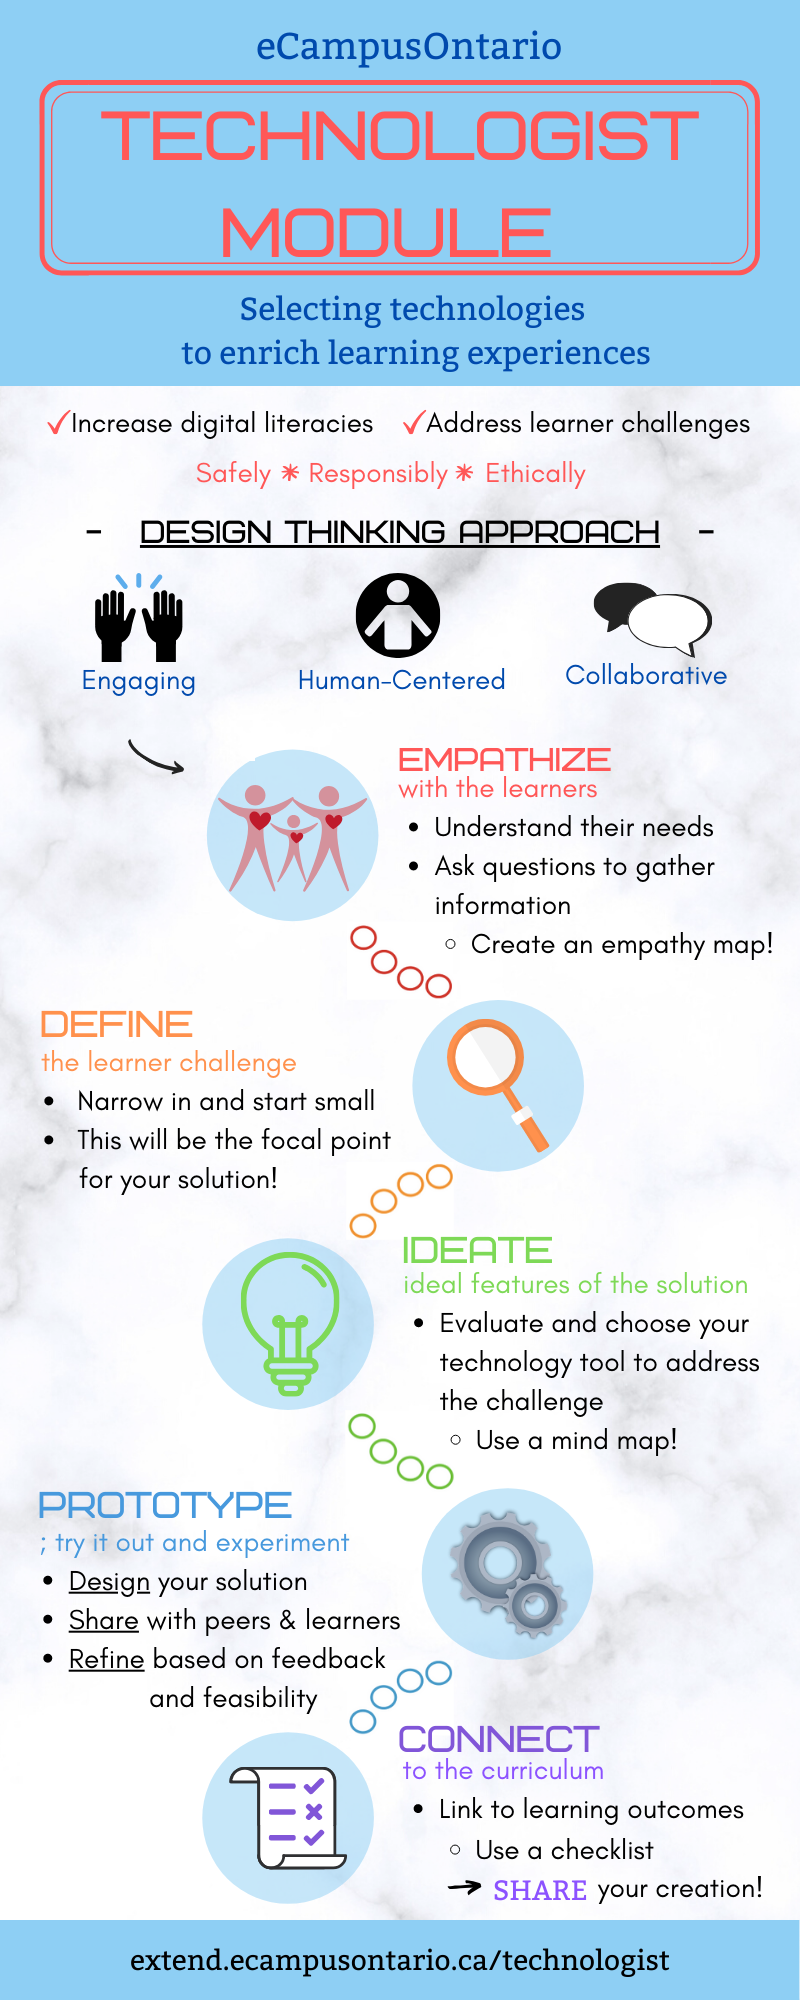
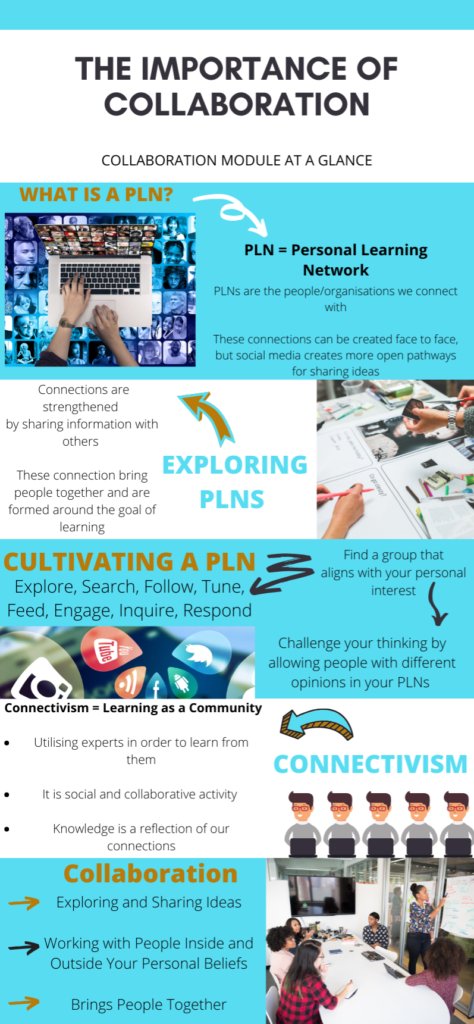
For this multimedia assignment, I explored the Technologist Module from eCampusOntario. I enjoyed going through the module, and found it relevant to this course, and to teaching in general. The module serves to improve digital literacies, as it guides educators through selecting technologies to address learner-centred challenges, and to enrich learning experiences. The module encourages educators to find what digital literacy means to them, then provides a step by step guide following the design thinking approach. 

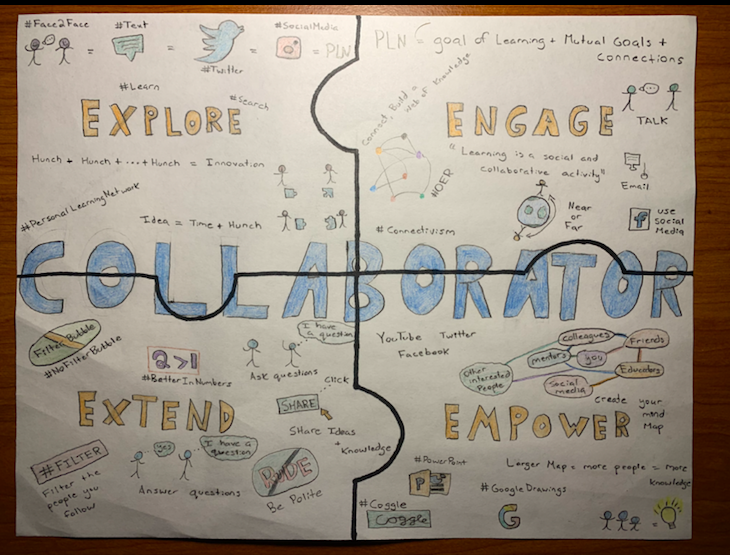
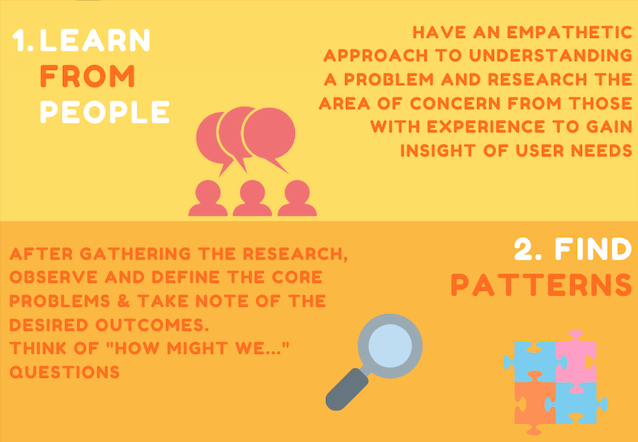
In relation to my teaching experience, I can appreciate the ideas that this module presents. As a teacher, I was always trying to think about what the students would enjoy, and what they may need to be successful. The empathize section of the module was useful in this regard, as it suggested the use of a mind map. I had not thought about using a mind map for this purpose before, so it was very eye opening.

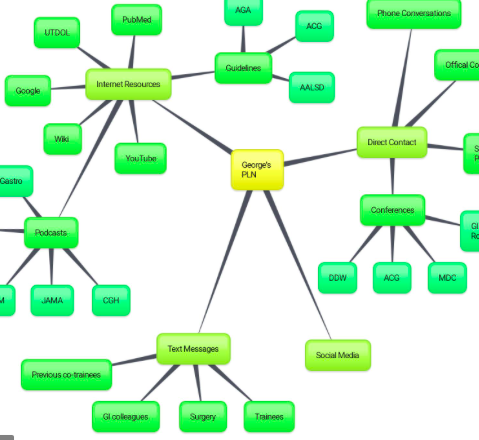
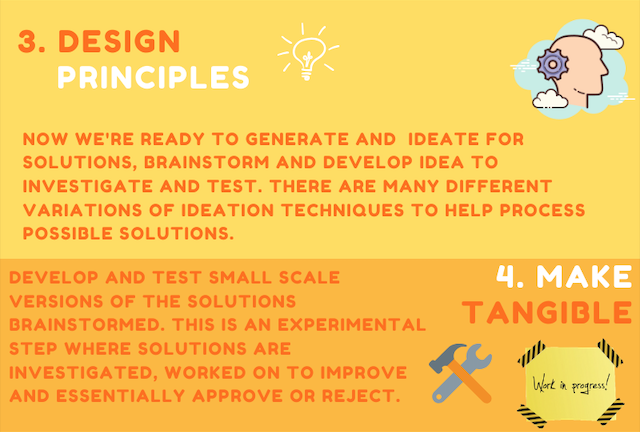
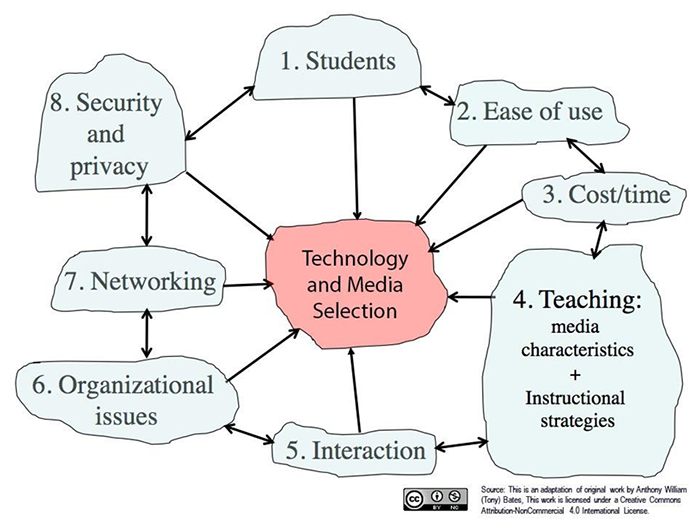
As a learner, I can understand the relevance of this module. I can recall experiences when technology has been both beneficial, and not so beneficial, within the classroom. The Technologist Module guides educators through defining learner challenges, and finding a solution that is evidence based rather than just a trendy idea. One aspect of the module that I found useful, but did not include in my artifact, was the SECTIONS framework within the ideate section. The SECTIONS framework serves as a guide for educators as they assess their chosen tools, and ensure that they are a good fit. The Technologist Module also provides significant ideas for creating a Prototype, as well as methods to Connect and share your creation.

The SECTIONS framework by Anthony William Bates

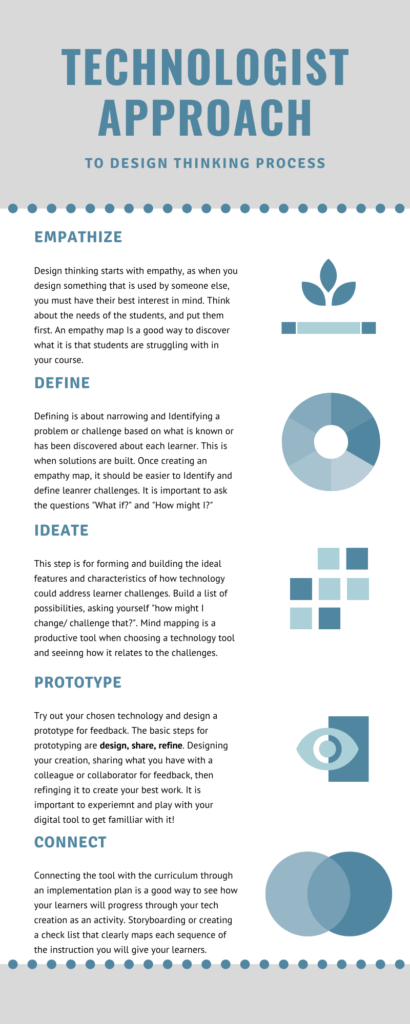
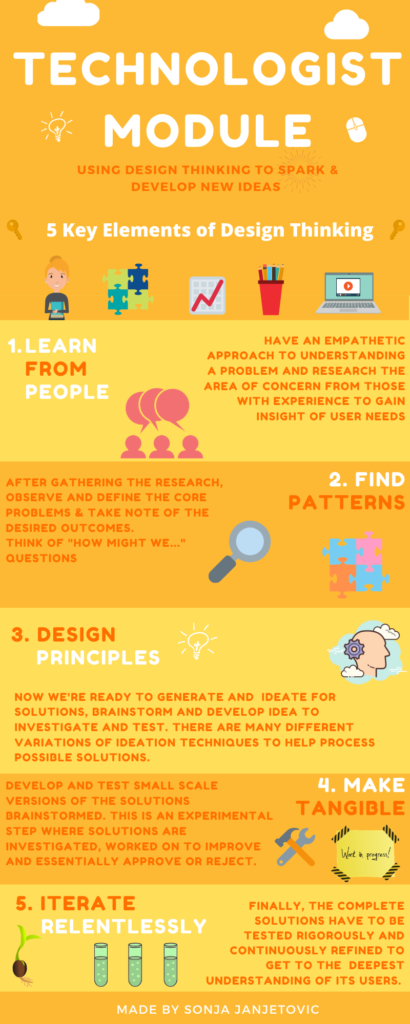
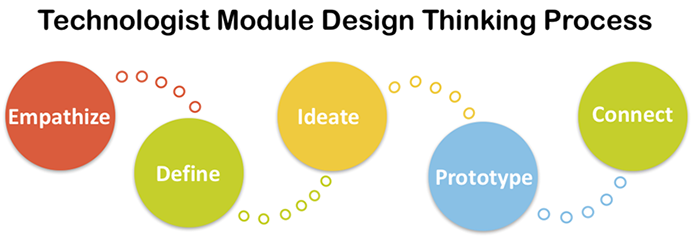
After completing a twitter essay for the first assignment, I decided to create an infographic this time around. I used Canva because I have had some experience with it in the past. It has some great affordances as it provides free photos and clipart within the website, as well as templates for infographics. Ultimately, I decided not to use a template, but rather create my own design inspired by the “Technologist Design Thinking Process” visual by Joanne Kehoe, found within the module and pictured below.

While I was comfortable with using Canva, creating an infographic proved to be more challenging than I expected. It required finding a balance between words and images that was visually appealing. I also had to decide how much text to include, and what information from the module was the most relevant. I certainly came out of this experience with new perspectives that will benefit my creative approach in the future.

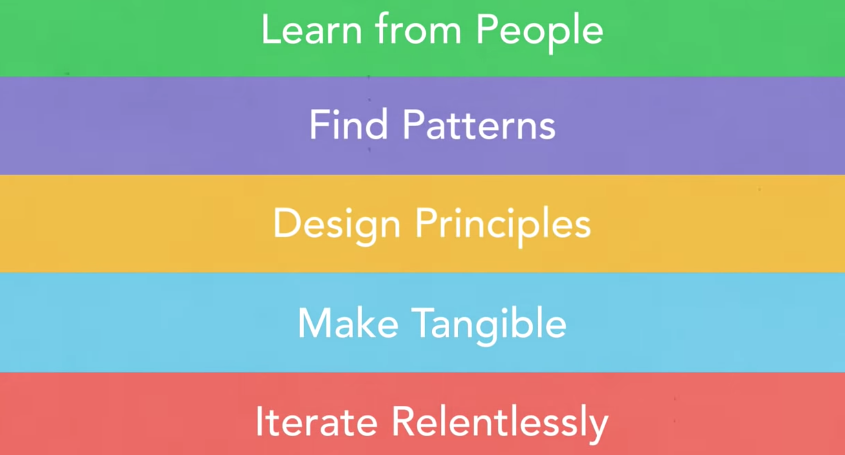
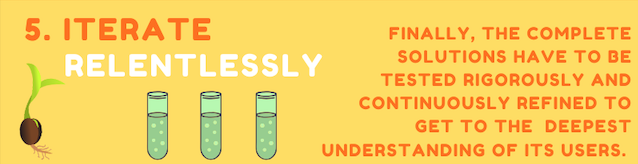
My approach when creating this artifact was to summarize the key points of the module for the purpose of giving viewers a quick glimpse into what the module entails. I went through the design thinking approach because this is the most practical part of the module that educators would participate in. I also thought it was important to start by outlining some of the overall goals of the module. However, the module itself provides many additional resources to explore digital literacy

Overall, I feel that creating this infographic was a beneficial learning experience. It is definitely something that I would consider having my students do as a future teacher!

Collaborator Module: Twitter Essay

For my second multimedia reflection, I decided to explore the Collaborator Module on the Ontario Extend website. Since I created a sketch note for my first multimedia reflection, I decided to create a Twitter Essay for this reflection.

I have been an active member on Twitter since 2011 for personal use. However, I have only just created another account last year for professional use. Since the majority of my time on Twitter has been liking funny videos/tweets and dm’ing relevant tweets to friends, it is a completely different purpose to use Twitter as a professional network of co-workers, colleagues, and professional members. 

https://extend.ecampusontario.ca/collaborator-scenario/

The Collaborator Module emphasizes the importance of connecting people who share the same passions and concerns as well as the goal to improve their practices.  Using collaboration is key to reaching goals and completing tasks. Throughout my education, I have often reached out to a peer online or in person to consult them about an assignment or researched my question online through discussion posts, YouTube videos, or educational papers. 

https://www.uctoday.com/collaboration/team-collaboration/team-collaboration-101/

Steven Johnson’s interactive sketch note titled “Where Good Ideas Come From” explains the importance of collaborating so that we are able to become our most creative, organized, and overall best selves. Since all of us are striving to be our best selves in our personal lives and our work lives, collaborating is something that we should all be participating in. As Johnson explains, we do not individually carry all the good ideas we may need for our projects and this is where collaboration comes in. Through collaboration we are able to share ideas that may complete another’s project or goal to create an invention or new concrete idea. 

Without noticing before, I have realized that I rely heavily on collaboration and feedback from my peers to finish work, make corrections, and make decisions. Collaboration is the easiest it has ever been due to technological advances in the internet and the various social media platforms there are available to create online networks and communities.

Technology in the Classroom

1) As an educator, the effects of our teaching on others is limitless. We possess the power to mold and shape society through our students. Which is why we owe it to them to provide the knowledge and skills necessary for them to be successful. #uwindig #ontarioextend

2) We as teachers are responsible for unlocking the potential of our students. Except, when the world around us is constantly evolving (especially in technology), it can become rather difficult. As we must also evolve in order to stay effective in our teachings. #uwindig #ontarioextend

Image result for evovling world

3) Now let me ask you, have you ever heard of digital literacy? If not, let me inform you! It is ultimately the ability to effectively use technology to communicate with the world around you. #uwindig #ontarioextend

Image result for digital literacy

4) Get excited because it’s time to learn the importance of incorporating digital literacy in our classrooms! There are so many benefits, including the capability to overcome various learning challenges that may arise. As well as allowing students to gain more independence through properly being able to locate and analyze information online by themselves. #uwindig #ontarioextend

Image result for kids using technology in school

5) Now I never said any of this would be easy, so i’m going to share a little secret with you. Only if you promise to do one thing that is, which is share the information I provide with all your fellow educators. Now that you’ve promised, let me introduce you to the Technologist Module! It is free to use and offered by E-campus Ontario for anyone to use! #uwindig #ontarioextend https://extend.ecampusontario.ca/technologist-scenario/

Image result for technologist module

6) The module will teach you all about the use of technology and how to effectively implement it in your classroom. So get ready to enrich the learning experiences of your students as we start with the design thinking process! It is a 5 step approach to generating new ideas and goes in the order of: 

Empathize, define, ideate, prototype, and connect. #uwindig #ontarioextend

Technologist Module Design Thinking Process

7) We start off by empathizing with our learners. When you’re creating something for others, it has to be made with a focus on them (in this case their learning abilities). Which is why it is important for you to understand them, so you can cater to their needs. I would suggest designing a survey to better get to know them, or the empathy map! #uwindig #ontarioextend

Image result for kids taking a survey

8) Now we move onto defining our learner challenge, this step is probably the most important. Using the results of the prior step, you should now be locating and determining  the core problem before attempting to solve anything. As I would imagine it to be very difficult to find a solution if you didn’t first know the problem. Additionally, don’t be afraid to challenge yourself, you can do so by accessing the padlet on the website! #uwindig #ontarioextend

Image result for animated thinking gif

9) Onto the third step, we have Ideate! This is one of my favourite parts, as this is where you get out all your best approaches towards a possible solution. Here, mind mapping is your best friend. You can use this tool to plot all the characteristics available and select the most appropriate one. #uwindig #ontarioextend

Mind Map Guidelines

10) Nearing to the end, we now have to prototype. Using the selected technology, we will experiment with a rough model of what we hope to create. From that, we will then use the results to adjust and improve, so that the final product is as effective as can be. #uwindig #ontarioextend

Image result for experiment gif

11)  For those who may be a little uncertain in how to begin, I would suggest locating the section named “The How To’s” on the website. By choosing a technology that is found on the list, you will be provided with access to tutorials and activities that will aid you in the beginning process. #uwindig #ontarioextend

Image result for technology in school meme

12) Last but not least, connect to your curriculum! We’ve talked a lot about implementing technology in our teachings, but how do you plan on doing just that? What’s your plan? This thread has given you the puzzle pieces, and now it’s time for you to put it all together! #uwindig #ontarioextend

Image result for puzzle gif

13) I would like to briefly mention that there is also another learning module you may want to check out. It is called the collaborator module, you can find it on the same website and I guarantee it will be a similar learning experience. As well as improve your teaching approaches. #uwindig #ontarioextend

Image result for collaborator module

14) I know trying new things can be scary, especially being an educator, we are usually the ones doing the teaching. So when the roles are reversed, we might get a little nervous. Well here’s a reminder that you are more than capable, no one knows your students like you do, you are the best person for the job. #uwindig #ontarioextend

Image result for be confident

15) This is it guys, we have officially reached the end of thread. As sad as it is for me to say goodbye, I truly hope you’ve found the information I provided useful. As well, left with a greater understanding of digital literacy and its ability to assist you in the classroom. #uwindig #ontarioextend

Image result for goodbye animated gif

The Price Of The Best Educational Tool? Free!

For my second multimedia reflection, I chose to explore and summarize the collaborator module created by Ontario Extend. Throughout the module, it discussed collaboration while specifically focusing on four key ideas: explore, engage, extend and empower. Before discussing the four key ideas, a solid definition of collaboration in the educational context should be defined. I define collaboration as “the action of working with other people to solve problems, improve resources/techniques or further develop the educational environment.

Of the four key ideas mentioned, the first “explore” is the easiest to understand but the hardest step of collaboration for most educators. In the module it is explained that the first step is exploring other resources that other people can provide. These resources can be found via face to face conversation, email, social media, texting, etc. During the 21st century, communication with anyone is possible and quite familiar to most due to the access the internet creates. This is the main point emphasized in the explore module. The internet gives access to everyone and should be used to improve the educational environment. Educators collaborate in person often but it can also be achieved on facebook, instagram, websites, email and even twitter. Twitter specifically was explained to be a great resource for educators. When hashtags are used correctly, twitter can be a great resource for improving education. Using an appropriate hashtag such as “#EngChat” or “#SciChat” could make discussions, ideas and knowledge easily available at the search of a word. Alec Couros, a professor at the University of Regina was quoted saying in a video ” not understanding how to use a hashtag is actually becoming a detriment if you don’t know what a hashtag is or how to connect via hashtag” which emphasizes how important twitter can be when used correctly. At the search of a word, ideas and thoughts can be shared and compared with other educators within a second which makes twitter an amazing resource. Using many resources like this can create a strong PLN (personal learning network) which is important for educators. Teachers constantly need to learn and improve themselves which can easily be done by collaborating with educators and mixing ideas. Technology makes this the easiest it has ever been as long as you’re willing to “explore”.

The next module discussed engaging. When talking about engagement in collaboration, it refers to creating a PLN. A PLN requires three mains things: a want to learn, a specific interest and connections with other people. While creating a PLN, yours may be similar to other people’s but it will never be the same because everyone has their own specific interest and want to learn. A good PLN is built around the want to learn and a specific area of interest. After figuring out a specific topic of interest, creating connections can be easy due to the internet. Finally the idea of connectivism is discussed which is the idea that your network provides the context for your learning, not the content itself. People can direct their own learning while still being a part of a bigger community.

The third module discusses extending in terms of collaboration. A distinct term called “filter bubble” is used a lot. A “filter bubble” refers to an isolation from personal search created by the internets algorithm which shows you things it thinks you may want to see based off of prior searches, location, etc. This can be avoided by changing your search to include different views or sides of a view. In the module it also discusses that PLN can be extended by searching, following people, asking good questions, editing who you follow (only relevant to your interest), answering questions and sharing personal thoughts/content. Doing all of these can broaden and improve a persons PLN.

Finally the final module “Empower: Map your PLN” discusses how a PLN can be created into a mind map to optimize the way a PLN is created and used. Creating a mind map of a PLN starts by drawing “you” as the middle point. Adding close members such as friends, colleagues, mentors is next. Adding members you may not personally know or websites is next. The final step is adding a description for all points of the map so that during review, people can be added and subtracted easily as appropriate. Good tools listed for doing so were google drawings, coggle and powerpoint.

After reading through the modules, I agreed that collaboration is the best tool for an educator. Bouncing ideas and using other members of the same interest can be the best way to solve problems and improve pedagogical techniques. Other members of the same interest may have different ideas that can “insert the missing piece of your puzzle” and help create new ideas. Collaboration has become so much easier than before due to the internet. People across the world can be accessed at any time. Educators are not limited to colleagues any more. Educators can reach anyone, anywhere and discuss and bounce ideas which has historically created the best inventions. The internet always creates walls but using the “extend” module can easily help solve most issues with virtual collaboration. The best part of all, many resources on the internet used to collaborate are free which leaves the access to internet problem as the only downfall of online collaboration. While reviewing the modules, I created a sketch note to highlight the key ideas explained both in the modules and my summary.

Create Your Own Digital Tool Unique to Your Class!

For the second multi-media reflection, I chose to focus on the technologist approach to design thinking in digital literacies. The article (which can be found here https://extend.ecampusontario.ca/technologist-digital-literacies/) talks about the 5 steps of the design thinking process: Empathize, Define, Ideate, Prototype, and Connect. I chose to create an infographic that describes these steps, which can be found here.

The article at first sight seems to be quite simple. It has a quick over view of the article as a whole, and then branches out into separate pages that describe each method in little detail. What is very interesting, though, is that there are hyperlinks to other articles and lessons throughout. There is so much more information that meets the eye, which makes for quite the interactive experience. The main idea of the article, though, is about the design thinking process.

The design thinking process is five steps that ensures educators to be successful when designing their own digital tool to use in the classroom. Each step scaffolds from the one before, as it allows for change and revision from the work that has previously been done, but the ability to move on is limiting unless the task is complete. One of the most interesting and, in my opinion, important steps is empathize. This is the first step in the process, and the article calls for an activity called an empathy map. The empathy map is to help the educator get to know the challenges that students are facing right off the bat. This allows for the teacher to keep in mind what it is they do that isn’t working for the class, and to look for new and innovating alternatives. It is such an easy and inclusive way of getting to know your students, and it encourages to ask questions that cater to the student’s individual needs. No student should face consequences for having specific needs, and this way everyone is included in the creative process through catering to those needs.

Technology is a very inclusive tool. It allows for students of every walk of life to experience an abundance of knowledge, supportive tools, and so much more that couldn’t be accomplished analogically. Software such as talk-to-text, voice dictation, video modules, translation, etc cater to students with learning challenges in ground breaking ways. Allowing a deaf child to do presentations, a blind child to read homework chapters, or an international student to answer a question in class are just some of the ways that technology has allowed schools to be more inclusive to those who are not within the majority. By following the design thinking approach, it allows teachers to be held accountable to use their chosen technological tool to be inclusive to all within their classroom, no matter what challenges they do or don’t have to face on a daily basis. The technology acts as the even playing field, making the classroom a safe and inclusive environment for the unique set of minds that the teacher has in their hands.

I want to follow this approach when integrating technology into my classroom. There are so many different platforms that I haven’t even had the chance to explore yet, but through these 5 steps, I will be given the opportunity to challenge myself to do research into different programs and softwares that will improve my classroom environment. The collaborative approach is also something that I admire. Asking my colleagues for feedback opens so many doors to new ideas that I may have never thought of, which only benefits the students. This model is set up to be student focused, as the teacher is continuously asked to challenge themself to think how they can adjust or improve what they are working on to benefit the students. Being a teacher means putting aside your own personal feelings towards something if it means the student will benefit, which is something that is not easy but is extremely meaningful. Luckily, this model keeps both teacher and student engaged, which is something I find very intriguing and I look forward to implementing in my future practice.

Design Thinking for Fool Proof Solutions

It is fair to say that digital technology is the new tool used most in today’s average classroom, from the use of SMART boards, taking attendance on Edsby, and if you’re lucky, even a whole class set of iPads or laptops. This brings on a new opportunity of teaching and integrating technology into the classroom is a developing technique of teaching that many educators want to welcome. Though many educators have access to so many various technological tools, it does not mean the digital literacy comes with it. That brings us to the very handy tool that is the Technologist Module, which is an online educational tool to help introduce the various topics of starting into the world of incorporating technology into lessons.

“Ontario Extend” Technologist Scenario video

While the module explores and discusses multiple cases of technological points, one aspect of the appeal is that of “design thinking”. A 5-step process that allows creators and educators to approach a system of how to develop a plan to resolve challenges and issues. The Technologist Module links to a great educational video from Daylight that breaks down the idea of design thinking. The video uses an example of their own to help illustrate the process and benefits of this methodology. The company was on a mission to help kids in America to move more and prevent childhood obesity and found it a difficult issue to challenge and present an effective solution. That is when they breakdown the 5 steps: 

5 Steps of Design Thinking

In other words, the process comes down to empathize, define, ideate, prototype, and test. Let’s take a deeper look into each category and understand the importance of each step.

Steps 1 & 2: Empathize & Define

Before we can jump into solving any sort of problem, we have to gain a good, deep, and empathetic understanding of the issues and challenges surrounding the targeted audience. The best way to do so is to connect, observe, engage, and learn from the people with experience and analyze the different issues brought up. Once a substantial amount of research has been developed to get the feel of desired needs from users and the flow of possible solutions initially start to be discussed, we can approach the next step: find and define patterns and problems.

During this stage, creators and educators can break down the information gathered and analyze observations to start creating correspondence of what sort of features, needs, and concerns need to be addressed in the solution. Once a good understanding of the resolution approach is developed, we can start to progress to the third stage and start asking “how might we…” questions to encourage the brainstorming process ahead of us.

Steps 3 & 4: Ideate & Prototype

Starting to generate ideas, having solid background information collected, the brainstorming process is in effect. There are many variations to ideation techniques to aid in identifying new solutions to the problem statement. It is best to generate as many ideas at the beginning of this phase as possible to ensure many options to develop further in stage 4.

To make the developed ideas tangible, creators and educators will develop and test small scale prototypes of each possible solution to experiment on and identify the best possible solution to cater to the challenges identified in the first few steps. After testing each, investigating the pros and cons and attempting to improve the prototypes, one by one will be decided to either be approved or rejected to narrow down the final options.

Final Step: Test

Finally, the decided solution has to be iterated relentlessly and revised constantly to keep it running smoothly and fix any smaller issues within itself for its users. Constant alterations and refinements are made in this stage to continually develop and improve to keep users engaged and the outcome fully functioning.

It is important to state that though the process of design thinking is ordered by steps, it can essentially be executed in a non-linear and flexible manner. Going back and forth through each step in different orders to continuously improve and investigate until the finished product is confidently providing its purpose. Design thinking can be adapted in many ways for many reasons to produce answers and resolutions for varying factors and challenges, whether in the classroom or an entrepreneurial environment. Its use has no limit and is a repeated cycle for a fool proof module.

Collaborator Module: building meaningful connections

.https://www.youtube.com/watch?v=7kZjhNOP4YI&t=40s

(Sorry I couldn’t figure out how to embed my powtoon) I chose to create a powtoon because I thought it could be more enjoyable than my other options and because it allowed me to promote my thoughts in an interesting way that I was not used to at all. With that being said I definitely could use some practice with the app because I ended up uploading it with some things not how I wanted it at all. I still really enjoyed it but I think the full version was way better than the free version, and I wish they would have gave a little more tools to work with.

I chose to talk about the collaborator module in my powtoon because I liked it more than the other module. It was also easier to understand in my opinion. One of the biggest determining factors was that it was split up into four compact parts which made it a real treat to explore and summarize during my reflection.

The first talking point was the EXPLORE portion of the module. Here the question of “why collaborate?” is proposed. This is in my opinion the most important part of the whole module (next to how to cultivate your PLN). I think it was very important that people understood the importance of collaborating with their peers, and how helpful it could be in your life as a whole. With that being said, I tried to keep my slides pretty minimal because I know too many words isn’t exactly aesthetically pleasing…

Next, the ENGAGE portion of the module focused on defining PLNs. For this part of my powtoon I really utilized Marc-André Lalande’s video “What is a PLN”. In the following slides I took time to explain why PLNs are personal in the first place. Letting people know that the user is in full control of the way they use and nurture their PLN. This shouldn’t be intimidating at all, in fact it’s very empowering knowing that you get out what you put into your PLN. Then I also talked about what makes it a “network” and how one can learn from it, but I think the most important thing is the fact that it is personal!

there used to be more on the slide but during uploading the app took away all of the things that were only for the “Pro version” I guess 🙁
Howard Rheingold states that to cultivate a network you must explore, search, follow, tune, respond, inquire, engage and feed the network

For the next part, I took basically all of the main points that Howard Rheignold talks about in his article. I thought the way he used key words such as Explore, Follow, Tune, Feed, Engage, Inquire, and Respond to explain his personal tips for creating the best PLN that you can possibly have was very helpful. I basically re-explained the image that was shown on the module….

The same thing happened to this slide too :/

Although I think that the EMPOWER section of the module was the weakest, I still believe that there is something to be said about the how helpful mapping one’s PLN could be. I think the main way that it helps people is by being able to really pinpoint what is important in you particular PLN and what it is that you want to get out of it. Mapping doesn’t only help you mentally recognize the reasons why your PLN is the way that it is, but it also give you a visual representation of worth and meaning within the PLN.

Anyway, thanks guys!

Matt Gagnon

THE IMPORTANCE OF COLLABORATION

I chose to further explore the Collaborator Module for this assignment. This module stood out to me because learning through connecting with others piqued my interest. I have also heard the term PLN before in classes and online and wanted to dive deeper into the topic. The four main groups that this module is divided into are explore, engage, expand and empower. Each of these topics looks at the importance of connecting with others who are interested in learning similar topics and creating personal learning networks.

Before we dive deep into this Collaborator Module, it is key to understand what a PLN is.

WHAT IS A PLN? (infographic) created on: https://www.canva.com/

A PLN, also known as a personal learning network is the people and organizations we connect ourselves with. Marc-Andre Lalande helps us to better understand what a PLN is in this module. He mentions that not all personal learning networks are online, but the online aspect is what makes them special. Using social media outlets such as Twitter create spaces for people to engage, explore and learn from one another. What you chose to learn and how you engage in learning can be personalized and created to fit your own personal needs and interests. So, in simple terms, PLNS is created for the goal of learning and bringing people together.

EXPLORING PLNS (infographic) created using: https://www.canva.com/

Let us take a better look into what PLNS are all about. Like I mentioned above, PLNS are created around the goal of learning. Connections between the people that want to learn are strengthened by sharing information amongst themselves. Dr. George Veletsianos pointed out that being part of a PLN creates long term effects that will help to improve the skills you are looking to learn. For example, when I was in my first placement this year I used my Twitter and Instagram accounts to follow different educators. Although I may have not engaged to the fullest extent I could have to reap the full benefits of these PLNs, I definitely used these platforms to create networks of learning that helped me to succeed in my first placement. These tools I learned through these communities will also help me in my next placement as well.

CULTIVATING A PLN (infographic) created using:

When cultivating a PLN it is important to remember the eight steps laid out in this module: explore, expand, follow, tune, feed, engage, inquire, and respond. In order to get everything you can out of a PLN it is important to FULLY engage in it. In my example above I have only explored, expanded, and tuned. If I were to engage with other educators, I would have gotten more out of the learning I did. It is also important to be aware of filter bubbles. It is important to allow people with challenging opinions into your learning groups as this can help us to learn and challenge our own thinking.

CONNECTIVISM (infographic) created using: https://www.canva.com/

Connectivism means to learn as a community. Dr. George Siemens talks about how knowledge is a reflection of our connections. This is a social and collaborative activity that focuses more on the context of our learning rather than the content. This theory recognizes that we learners learn better as a group/community rather than individually. Connectivism, I believe, is important in a classroom setting. As teachers, we should be open to learning from one another on our staff and in our classroom with the students rather than taking on everything by ourselves.

COLLABORATION (infographic) created using: https://www.canva.com/

Collaboration looks at exploring and sharing ideas with one another. Communities of practice are a great example of what effective collaboration can look like. They are groups of people who can share passions, concerns, goals with others who share similar interests and they can all work towards learning how to further improve. There are three characteristics that make communities of practice effective. Having others to bounce ideas off of or gain new information is a great and important way to learn. All in all, collaborations bring people together and help individuals to grow as learners.

THE IMPORTANCE OF COLLABORATION ( finished infographic) created using: https://www.canva.com/

This module was helpful in exploring the importance of learning through collaboration. Even when creating this infographic and working on this assignment I collaborated by reading others post in from the previous assignment and reaching out to others who did and infographic for their first assignment in order to know how to execute it properly. I am glad I chose the Collaborator Module since I was able to dive deep into topics such as PLNs which I have heard before, but never fully grasped.

Thanks for reading!

Citations:

https://www.canva.com/

Can This Strategy Actually Make You a Better Teacher?

I decided to read and explore the Collaborator Module from eCampus Ontario. This is a Twitter essay that I made that sums up the module in a visually and attention stimulating way. Essentially, this module aims to help you build a network of experts using some type of social media or tool– Twitter in particular is mentioned numerous times. I really enjoyed this module as it resonates with something that I practice currently, without ever having really given it much thought, or even a name at that. I generally use Youtube as a personal learning network to develop my knowledge on various topics that interest me. After having read this module, it has opened my eyes to even more ways that I could extend and connect through my learning network.

It is very important that people understand that just because there may not be many like minded people that surround them physically, there is a whole WORLD of people they can connect with online. These are people that think exactly like you or I do, #relatable. Personally, I have very deep philosophical thoughts that my brain STARVES to have or listen to conversations about, and unfortunately I haven’t met people that can hold those kind of conversations with me. Online communities, such as Youtube holds plenty of experts in this field. In addition to that, the comment section is filled with people that think the way I do, so it is great to see that. I’ve also noticed that not many people exercise the way I do, so a lot of my information comes from Youtube and Instagram. So the idea of a “virtual community” is very important when you are trying to build your knowledge about a topic.

This is one area I could improve in my collaboration strategy. I tend to watch and learn, rather than participate actively in the conversation. However, I tend to do that in real life as well. I would like to increase my knowledge and confidence before I go posting my own content and tough questions! This is something I can see myself pushing my limits in as I gain more experience in my fields of interest.

Overall, I thought the Collaborator Module was very insightful, especially in a time where social media and the internet allow us to access information so easily. This module is more than just how to collaborate well, but I think it teaches us how to use social media responsibly and professionally. Something as a teacher I could go on to teach my students about. Incidentally, I found the Twitter essay much harder than I thought it would be. With the word limit I had to plan out exactly what I wanted to say, what section I wanted to cover, and in how many tweets I could do it correctly. I enjoyed the world limit because it challenged me to get straight to the point on a lot of ideas. Furthermore, the gifs and images added the extra context and dry humour necessary to keep the reader’s attention. Overall, this was a valuable experience that is sure to make me a better teacher moving forward.

Collaboration of Ideas Using Technology in the Classroom

For my blog post, I decided to create an infographic using Canva to support and summarize the ideas presented in Steven Johnson’s video “Where Good Ideas Come From”. The first main idea in his video that caught my attention was when he said that there are patterns that can be observed when creating environments that support innovation. I thought this was interesting and I wanted to keep listening to the video and learn about these patterns and how I could possibly implement similar strategies into my classroom that would support the same kind of innovation and creativity. In the video, Steven describes the concept of a “slow hunch” which he says is a process that ideas go through over a long period of time in order for those ideas to develop into something great. Great ideas need time to “incubate” and develop. He also talks about how sometimes one “hunch” or idea needs another “hunch” to come together and create something better. The collision of these hunches creates collaboration among individuals who all have great ideas who come together to share ideas and have breakthroughs. 

Modern technology has allowed us to connect and collaborate with other people that we would have previously not had the chance to communicate with which has the potential to create such breakthroughs. Without the technology we have to share our ideas with others, it would not be possible to have some of the amazing ideas, innovations, and access to information which exist today. 

This type of collaboration is essential to our education system. I want my students to feel supported in taking time to develop their great ideas and going through multiple steps in the process to develop meaningful ideas that they can go on and share with others and connect or collaborate with others to further develop those ideas. Collaboration amongst peers in the classroom is beneficial, but collaborating with others from all around the world over the Internet allows students to gain insights and perspectives that they would have never had the chance to consider without the use of technology. This video was a great example of how collaboration can lead to the development of great ideas and is a great video for educators to consider in relation to technology integration in the classroom for the benefit of the student.