Everyone knows that collaboration is king, but I opted to look at Ontario Extend’s Technologist Module instead of learning more about how to co-operate with colleagues (which is a skill we should all have by now, considering the unending wave of group projects sent our way, some of which have their teams randomly built). I want to expand my understanding and practice of digital and technological tools or concepts as much as I can, as the world will (obviously) entrench itself further and further into this current Information/Digital Age. I want to be prepared to excel exceedingly well, and I’d much rather be the one explaining how to use technology tools than be the one struggling to catch up.
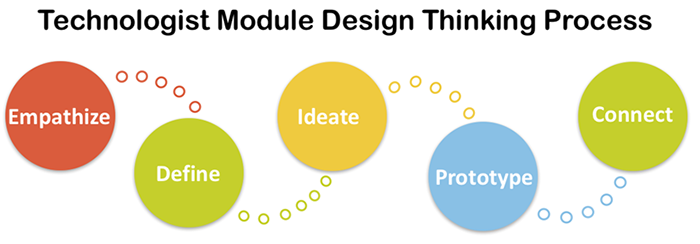
The Technologist Module gives us lots of guidance in terms of which processes to follow when implementing a tech tool, and provides a plain and clear series of steps (Empathize, Define, Ideate, Prototype, Connect) to adhere to if seeking success. I’m no fan of being overly-regulated or heavily restricted when it comes to thinking and acting creatively for academic purposes, but it is important to realize that these are loosely defined guidelines for us to follow in the footsteps of, and shouldn’t be thought of as a fence barring us from acting as we wish with whatever digital or tech tools we find ourselves using.
The main basis of this module is centred on reflection, careful consideration, comparisons, and trial and error, of which all are meant to stop us from acting wildly or over-eagerly with tech tools. One step of the process is meant to lead into the other, beginning first with “Empathize”, where you take into account all of the wants and needs of your learner(s). Gathering this information leads you to planning and then acting accordingly, hopefully leading to less bumps in the road for you and faster, finalized successes.
I can say that during my placement, I may have opted for Chromebook usages on several occasions, but having acted prematurely and without actual consideration for how best to use those Chromebooks (having been convinced they would be beyond helpful regardless of purpose solely because they were *CHROMEBOOKS*), those devices were little more than substitution rather than augmentation, or even modification. If anything, using Chromebooks for the lessons I had in the works for those classes, the devices were more of a handicap than anything, adding unseen challenges to what should have been easy tasks of research and mapmaking.
It may sound lame to follow some third-party’s checklist, keeping in mind every little thing the module makes note of, or sound like a lot of unnecessary work to do recon on your learner(s) needs, and the hypothetical making of many mindmaps seems daunting to some, but in reality, these procedures really will (or should) lead you to craft better lessons with properly thought-out tech tools. You don’t want to use a device or software solely due to “cool” factor or assumed effectiveness, but due to your own proper reasoning skills.
In the end, it really is all about working within the needs of your learner(s), but you should also work for their wants, trying for some dual effort of making your tech implementation effective but also engaging. If you want further insight, you should definitely check out my Twitter essay for more information, or go right to the source itself.
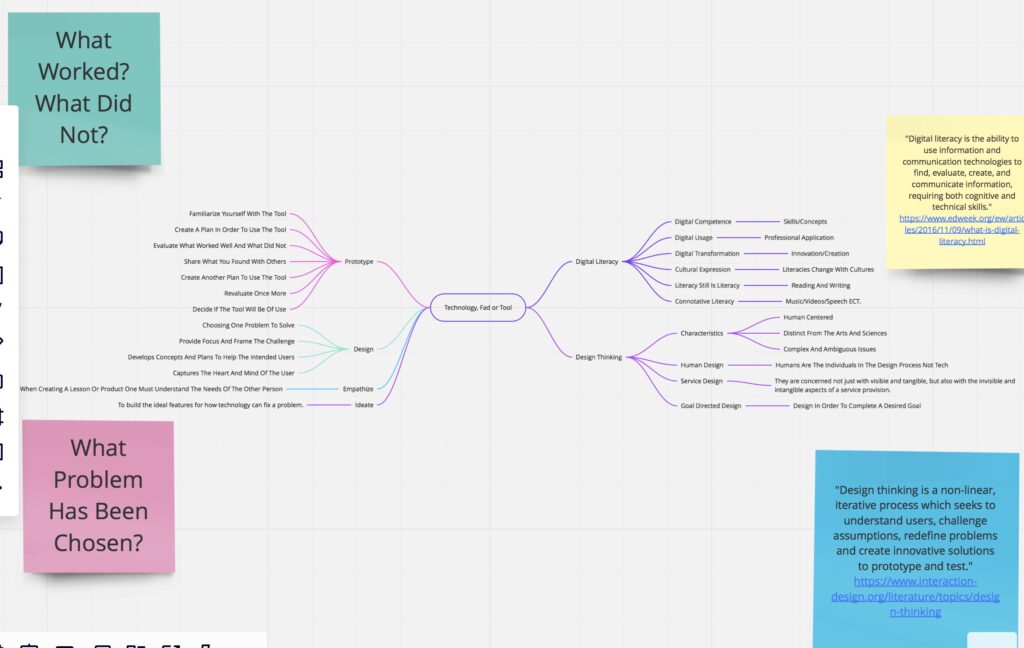
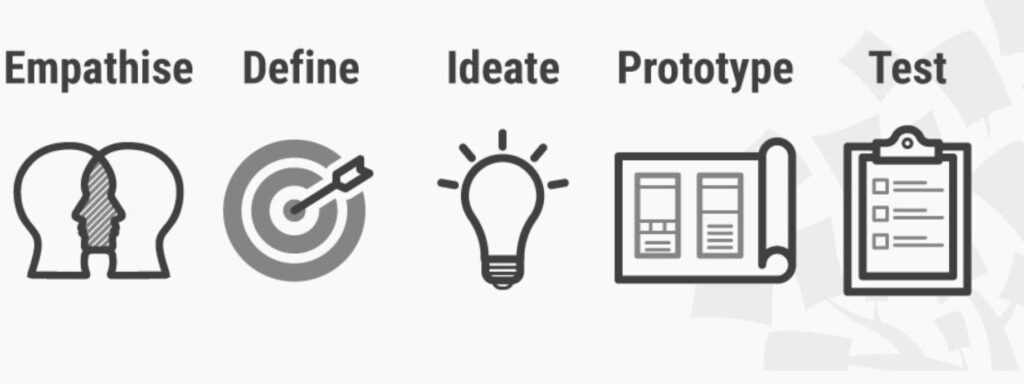
The Technologist Module provided by Ontario Extend claims that it will help its users to “[u]se technology tools effectively to address specific learning challenges,” outlining the process of “design-thinking” that should lead to a successful use of technology in the classroom. While the process described in this module could certainly be helpful in the integration of technology into some lessons or activities, the module does have a few flaws and seems to describe a complicated plan (design-thinking) to solve a complex problem (using a tech tool to aid learning), like trying to use a circle to fill a square-shaped hole. This module describes design-thinking as the following series of steps, illustrated by Kate Golden in the artifact attached below, for selecting and integrating a technological tool into a lesson or activity: i) empathize with your learners; ii) define your learner challenge; iii) ideate; iv) prototype; and v) connect to your curriculum.
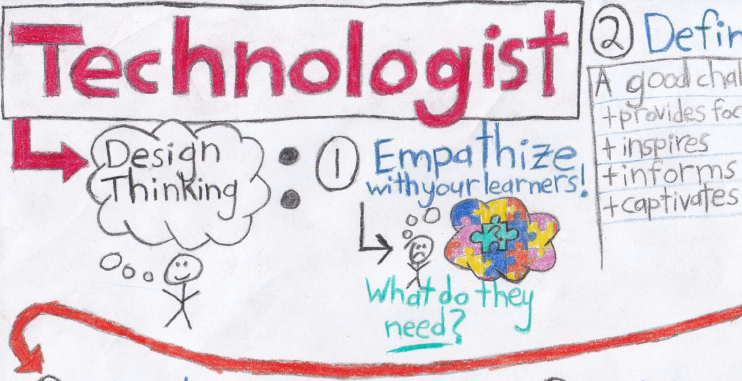
Empathize with your learners: what do they need?
The first step in design-thinking is to empathize with your learners: one must think about what their learners need and how you would like to use a tech tool to help the learners achieve. I believe that it is important that this be the first step when one wants to integrate technology into the classroom as it helps to focus one’s efforts on meeting the students’ needs rather than using technology.
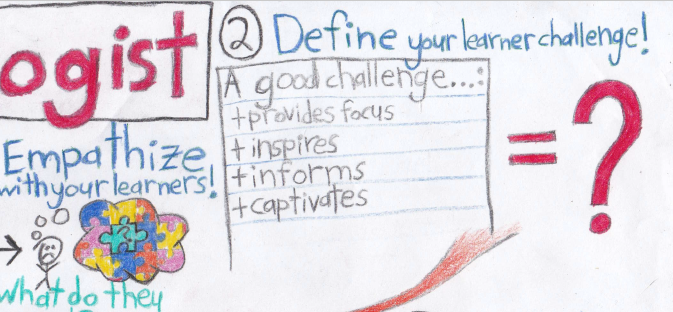
Define your learner challenge
The second step in the design-thinking process is to define the challenge you want to put to the students. The module describes a good “learner challenge” as one that: provides focus, inspires, informs, captivates, and meets the needs of the many. While not mentioned in this section of the module, I believe that it is at this point where one should start connecting the challenge to the curriculum; when defining the learner challenge, once must consider how the challenge relates to and integrates with the curriculum so that the learners will get the most benefit from it.
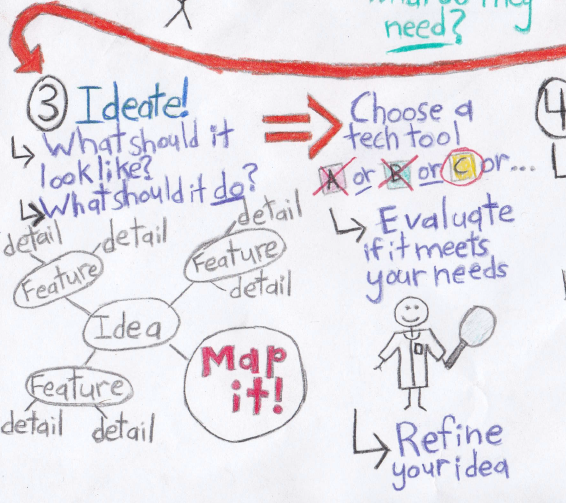
Ideate: what should it look like? what should it do?
The third step in design-thinking is to ideate; to come up with ideas on how technology could be used to address the learner challenge. The module suggests that one use a mind map to formulate and plan out their ideas. The module contains a helpful example of a mind map, one which demonstrates the different aspects of mind maps and how they can be used. The “ideate” step in the module goes on to list sub-steps which should aid in ideation: i) choose a technology tool: find a tech tool that could be used to complete the learner challenge; ii) evaluate the tool: use the “SECTIONS” model (Students – Ease of use – Cost – Teaching – Interaction – Organizational issues – Networking – Security and privacy) to assess the pros and cons of the tool; iii) refine your idea: based on the SECTIONS evaluation, make any necessary changes to your idea or try a different tech tool. I believe that the idearation step in this module, like the former steps outlined, is also very valuable in classroom tech integration. However, similarly to the “define” step, I believe that this step would be vastly more useful if it emphasized outlining/deciding how the tech tool could be used to help achieve the curriculum expectations.
Prototype: design it, share it, refine it
The fourth step in this module is to make a prototype. At this point in the process, one should have enough information on the chosen tool and a sufficiently formed plan such that they can make a functioning prototype of their tech-integrated lesson or activity. Next, the prototype should be shared with one’s peers and/or the learners so that they can evaluate it and provide feedback. Then, using this feedback, one should go about refining the prototype to form the final product that will be used in the classroom.
Connect to your curriculum: plan how to integrate it
The module’s fifth and final step before implementing the selected technology into the classroom is to connect it to one’s curriculum. The module states that this last step should be to think about how the technology will be integrated with the curriculum and to design an “implementation plan” as to how the learners will work with the tech-integrated product as an activity. I think it’s a rather poor idea to wait until the end of the design process to consider how the tech creation will integrate with the curriculum as the whole point of this module was to design a tech-integrated activity for the classroom. By leaving the curriculum connections until the last step, it seems clear that the Technologist Module considers how the technological tools can aid in meeting curriculum expectations. Before one decides to bring new technology into the classroom one should identify the need for a new technological tool in the classroom, otherwise one may simply be directly substituting one tool for a new one, creating more work for no additional benefit.
Overall, the Technologist Module could be a useful resource to aid in integrating new technological tools into the classroom. However, the module would provide greater benefit if the user maintains a focus on bringing more to the classroom rather than bringing technology to the classroom.
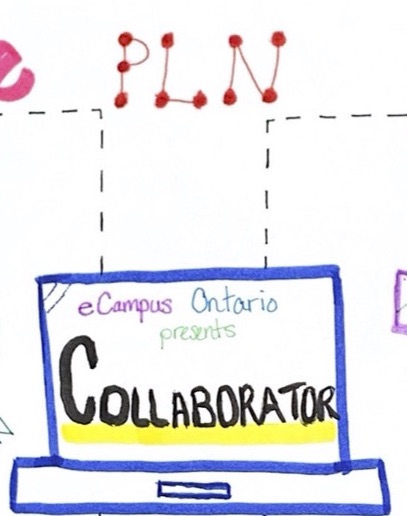
For the second multimedia reflection, I decided to create a visibly complex sketch note based on the collaborator module. This was my first time attempting anything drawing-related, nonetheless, it was a fun experience to be able to think outside the box and transfer my thoughts onto paper. I really enjoyed using vibrant colours, bubble letters, and sketches to bring the collaborator module together as one artifact. Although the principles of the collaborator module may seem simple at first glance, it is in fact more complicated than one might think to build a PLN and know exactly where and when to start. Once educated, you will begin to build trust, honesty, and openness with the network. Throughout the creation of this sketch note, I found the easiest way to comprehend and grasp the information that was being articulated was by watching the videos, listening to the TedTalks, and reading the articles on the collaborator website. It was also very helpful to go back and read my classmates perspectives on specific points in the discussion board. These learning tools are definitely something I can bring to my future classrooms to enhance a new learning experience for all. I also want to encourage students to step outside of their comfort zone such as I did with this assignment. It is important not be afraid to take risks or make mistakes because mistakes are what lead to success. In relation to that statement, when I first attempted this multimedia reflection, my entire sketch note was based on the Power of Twitter video, until further realizing it was supposed to summarize the entire collaborator unit. This mistake pushed me to work harder and create something bigger and better. Although it was a major setback and downfall to my academic progression, I did in fact learn from my errors and overall, I am happier with these results.
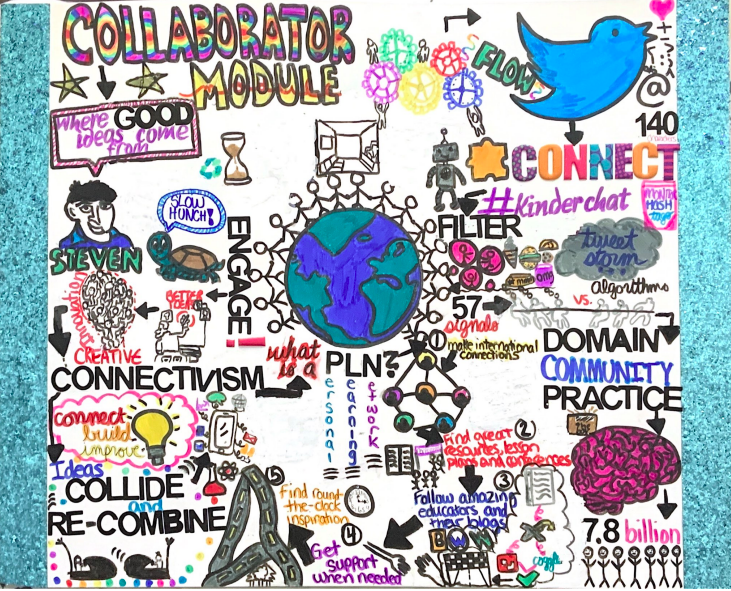
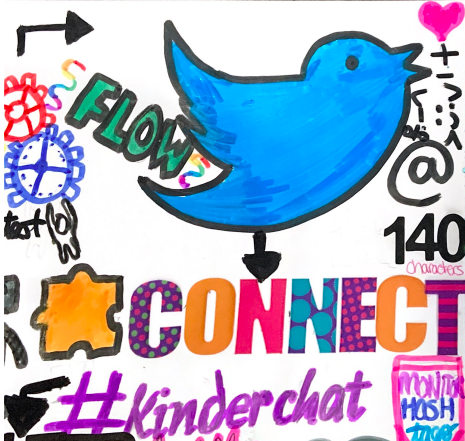
At first glance, this sketch note may seem overwhelming; however, the purpose of this visual aid is to direct the viewers attention to the title, the world, the twitter logo, and the brain. The title was tie-dyed to grasp the viewers attention, the world is to represent all individuals coming together from different countries in order to create and expand on ideas, the brain illustrates what humans could be capable of if we use all 7.8 BILLION brains that God has put on Earth. With that being said, every single person has something to bring to the table likewise to students in a classroom. No mind is alike, and whether the student needs differentiated learning, or an alternative strategy, we are all capable of accomplishing great things. Every single person in the videos, and articles shared a different opinion and perspective on digital tech and collaboration. With that being said, there is no right or wrong answer, and I want to push my students to think creatively.
If the reader follows the arrows from the title, they will notice the fluency -the left side is one section, the middle (PLN) is its own section following steps one through five, and the right side is one section.
The Power of Twitter
The relevancy of twitter for educational purposes has a lot of controversy on whether or not it is an effective platform to use in modern classrooms. Some think it serves a digital purposes, while others tend to focus their opinions around the fact that technology is a distraction. In my case, I believe twitter to be an excellent tool if used properly. With that being said, teachers must begin by building a PLN (personal learning network) by following admins, educators, and users giving out interesting facts/ information pertinent to their daily lives. Twitter allows you to have 140 characters, which may seem like a downfall at first; however, there is a lot of richness in this. It may lead you to different paths, opportunities, or hashtags. Two of the most popular hashtags as educators are #KinderChat and #EdChat. Furthermore, it is very important to monitor hashtags and filter your feed. In 140 characters, it allows you to quickly read summarized texts about something that interests you in a specific area or discipline. Twitter is a platform that allows you to connect with some of the brightest educators in the world, allowing you to build off their ideas, resources, and thoughts. In my classroom, I would encourage the use of social media platforms -primarily Twitter in this case because I like to think of it as a modern way to follow the news. Users are always active, and providing updates from around the world, allowing us to build off each other. It is a never-ending learning cycle while giving students the freedom to be independent learners. Twitter would also allow my students to learn how to collaborate, research, and build off of others.
Filter Bubbles
There is something called “Filter Bubbles”. In Eli Pariser’s TedTalk “Ideas Worth Spreading”, he says that “A squirrel dying in front of your house may be more relevant to your interests right now than people dying in Africa”. There is a shift in how education is flowing online meaning what we are clicking and posting. For example, Facebook and Google. If multiple people were to search the same thing, they would all get different results because of our tailored inquiry results. We are unaware that the combinations of algorithms are creating filter bubbles based off of 57 signals. Signals include the type of computer, type of browser etc… I drew people having a tug of war to represent what the web THINKS they want us to see but not necessarily what we NEED to see as continuous learners. One does not actually control what is put in these filter bubbles, and one is not able to see or decide what gets edited out. Instead of a balanced diet of news that make us happy, sad, uncomfortable etc… we are surrounded by filter junk food hence why I drew different types of food. Algorithms are curating the world and do not have the same power as editors. This text relates to my future classrooms because it will be important to show students ways on how they can escape filter bubbles and becoming more aware of what is happening behind screens. Making sure students are researching diverse perspectives and parts of the stories that are purposely left out in order to build a controlled and more democratic society through the aid of these filters.
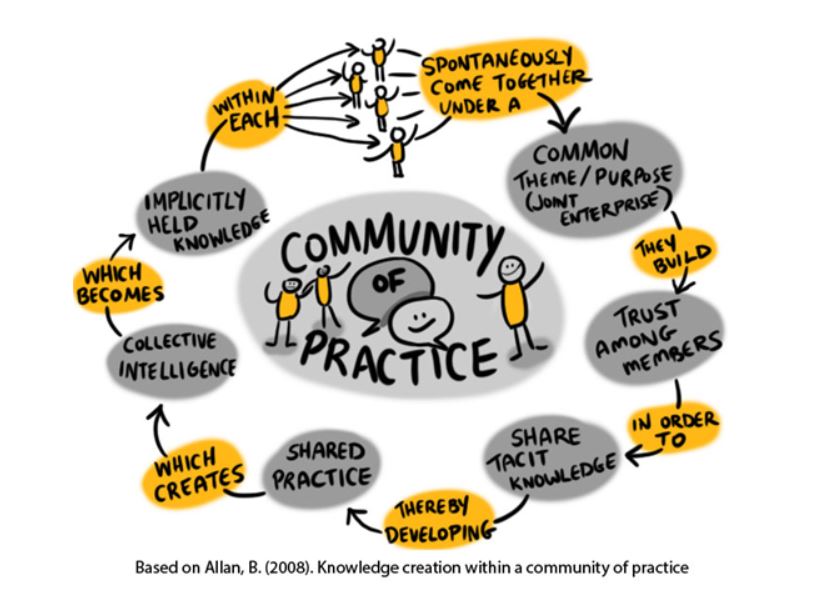
Community of Practices
In this section, I focused on the communities of practice which divides itself into three keys sections: DOMAIN, COMMUNITY and PRACTICE. Domain is a shared knowledge or skill within a specific area, the community are individuals converging and learning together, and practice is the sharing of strategies, tools, resources, and examples through a knowledge exchange. “The Role of Communities of Practice in a Digital Age” by Dr. Tony Bates describes how technology provides a wide range of tools that can support communities of practice. In my sketch note, those three key words are followed by a drawing of box that demonstrates how my students should THINK OUTSIDE THE BOX in the classroom. Furthermore, this text relates to my teaching and learning because I will further be able to educate my students on their online presence, their contributions to the better good of the community and motivate them to be willing to share their strategies. The drawing of the brain is that there are 7.8 billion people in the world so why would you only use one brain, if you had the opportunity to work with others?? Throughout this assignment, I have learnt that the more people you collaborate with, the better the ideas because everyone has an important element to add to your learning and understanding or a particular subject-matter. In classrooms, I know group work is not always encouraged or a personal favourite; however, I believe every once in awhile it expands learning and creates a favorable opportunity to build off of each other.
As a teacher candidate, I find it is crucial to continuously be outsourcing and researching diverse topics to build pedagogical practice.
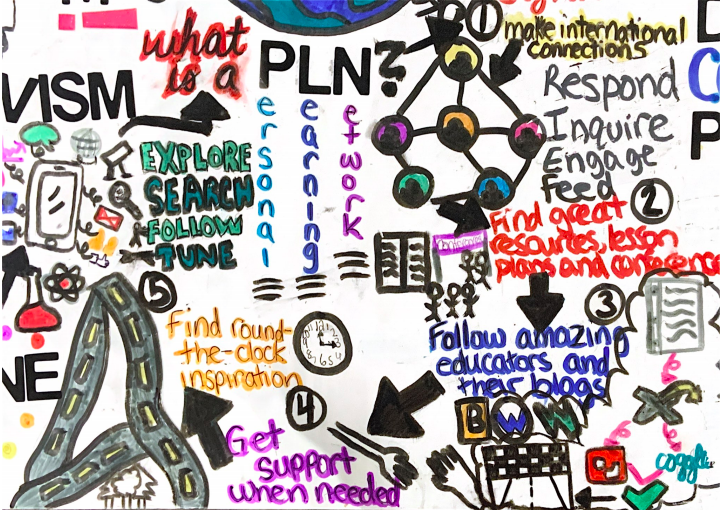
One might ask… What is PLN?? I am here to tell you that a PLN is a personal learning network to help better understand what you are teaching or learning. It is a group of people that you will essentially learn from and connect with over the years. It is personal because it is ultimately up to your discretion to decide if you want to participate, collaborate, and who you want to be apart of your PLN. This will be useful fr my classroom because I can engage and follow educational pedagogies to expand my professional development to assure that I am bringing various perspectives to the table. It is not limited to global connections, but it is what makes it special. Additionally, the learning aspect is a constant cycle that connects people with similar interests which enriches your media activity on a device. The network includes platforms such as Youtube, Twitter, and the educator’s PLN. In my sketch note, I have included 5 steps to cultivate a PLN: make international connections, find great resources, lesson plans and conferences, follow amazing educators and their blogs (Word Press), get support when needed, and find round-the-clock inspiration. I have also included roads… essentially representing that your online presence can lead you to all sorts of learning opportunities and paths. I can apply this to my teaching in a way to express that the final destination is not what is important, but primarily the route, the scenery and the learning that you gained along the way.
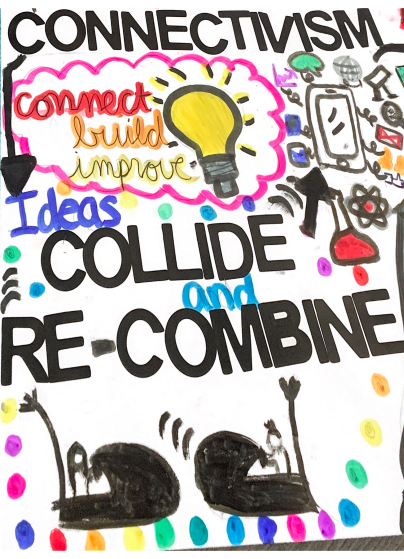
In the video “Overview of Connectivism”, Dr. George Siemens explains the importance of collaborating. In my sketch note, I drew bumper cars to enhance the idea that ideas collide and re-combine. They bounce off of each other and take those ideas in new directions. As a teacher candidate, I will take ideas/lesson plans/resources from my fellow educators and personalize them into my own version. Similarly to the notion of science in which we connect knowledge and build to allow for large societal advancements. This analogy is why I drew an Erlenmeyer to represent that science and technology can coincide.
You’re still reading??? We made it this far. One more point, I promise.
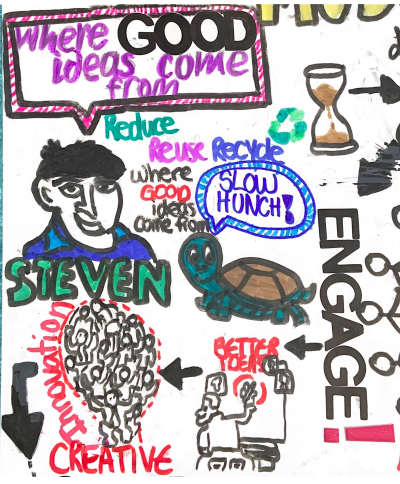
The video “Where Good Ideas Come From” by Steven Johnson really put creativity into perspective for me. From an environmentalist perspective, he explores the recurrent patterns that are continuously occurring to be innovative. The reason I drew a turtle is because he discusses the importances of hunches that remain dormant for years to come. Over time, this information will become relevant and the hunches will begin to collide. The reason I wrote “Reduce, Reuse, Recycle” is to reinforce the idea that you will condense your thoughts, you will reuse ideas or re-formulate others ideas, and recycle them to create something better. You must ENGAGE in a system that allows these systems to multiply the formation of hunches hence why the word engage is highlighted. In my classroom, I will teach the effect that the Internet has on our brain, as well as the importance of exchanging and borrowing other peoples hunches to create something new and innovative hence why there is a lightbulb full of people. Also, the importance of finding the proper study spot, and correct strategies that work for each individual can really increase creativity. Sitting in an isolated, dark room will not be effective for all hence why I drew the empty living room. Finally, I want to make an analogy to the turtle and the hare race. The hare thought he was too good for the turtle and could have easily rushed to the finish line with his speed; however, by the turtle taking his time, he really got to learn and ended up winning the race. Ideas take time to develop, similarly to how the turtle took time to complete the race at a slower pace.
I chose to further explore the Collaborator Module for this assignment. This module stood out to me because learning through connecting with others piqued my interest. I have also heard the term PLN before in classes and online and wanted to dive deeper into the topic. The four main groups that this module is divided into are explore, engage, expand and empower. Each of these topics looks at the importance of connecting with others who are interested in learning similar topics and creating personal learning networks.
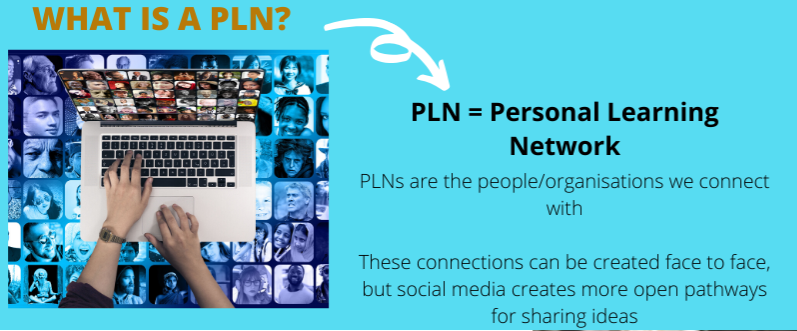
Before we dive deep into this Collaborator Module, it is key to understand what a PLN is.
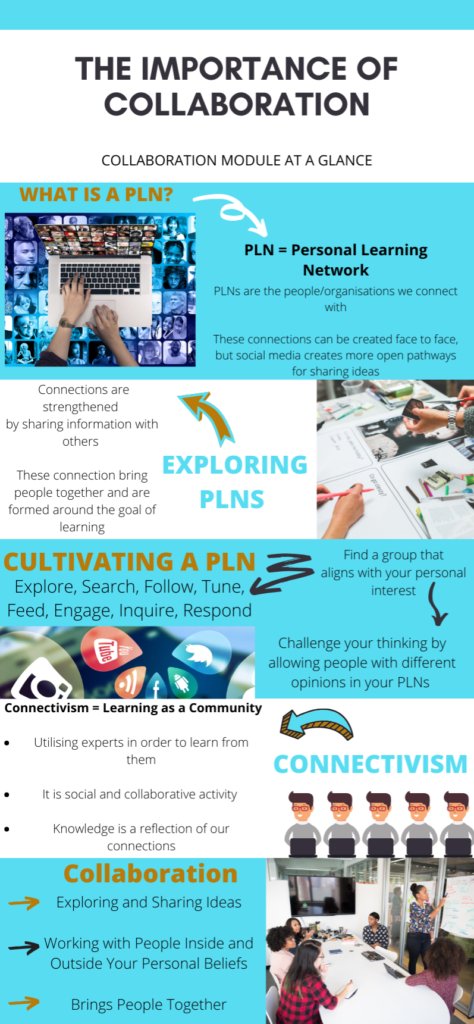
A PLN, also known as a personal learning network is the people and organizations we connect ourselves with. Marc-Andre Lalande helps us to better understand what a PLN is in this module. He mentions that not all personal learning networks are online, but the online aspect is what makes them special. Using social media outlets such as Twitter create spaces for people to engage, explore and learn from one another. What you chose to learn and how you engage in learning can be personalized and created to fit your own personal needs and interests. So, in simple terms, PLNS is created for the goal of learning and bringing people together.
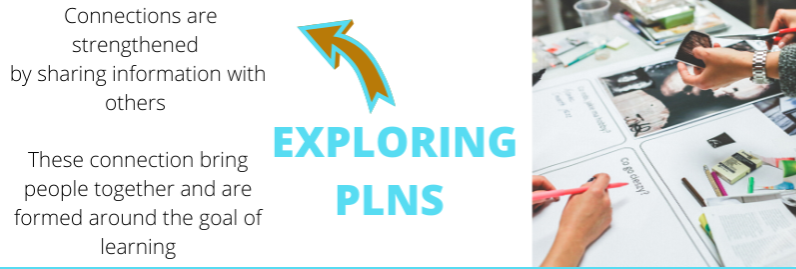
Let us take a better look into what PLNS are all about. Like I mentioned above, PLNS are created around the goal of learning. Connections between the people that want to learn are strengthened by sharing information amongst themselves. Dr. George Veletsianos pointed out that being part of a PLN creates long term effects that will help to improve the skills you are looking to learn. For example, when I was in my first placement this year I used my Twitter and Instagram accounts to follow different educators. Although I may have not engaged to the fullest extent I could have to reap the full benefits of these PLNs, I definitely used these platforms to create networks of learning that helped me to succeed in my first placement. These tools I learned through these communities will also help me in my next placement as well.
CULTIVATING A PLN (infographic) created using:
When cultivating a PLN it is important to remember the eight steps laid out in this module: explore, expand, follow, tune, feed, engage, inquire, and respond. In order to get everything you can out of a PLN it is important to FULLY engage in it. In my example above I have only explored, expanded, and tuned. If I were to engage with other educators, I would have gotten more out of the learning I did. It is also important to be aware of filter bubbles. It is important to allow people with challenging opinions into your learning groups as this can help us to learn and challenge our own thinking.
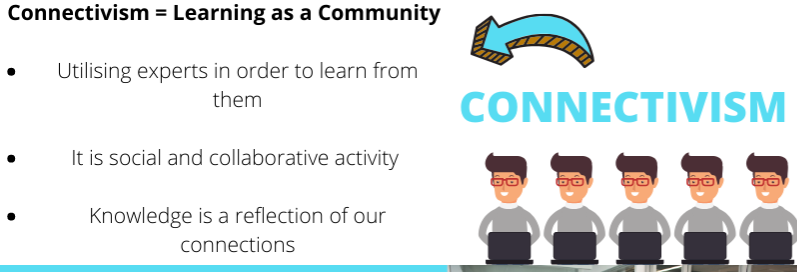
Connectivism means to learn as a community. Dr. George Siemens talks about how knowledge is a reflection of our connections. This is a social and collaborative activity that focuses more on the context of our learning rather than the content. This theory recognizes that we learners learn better as a group/community rather than individually. Connectivism, I believe, is important in a classroom setting. As teachers, we should be open to learning from one another on our staff and in our classroom with the students rather than taking on everything by ourselves.
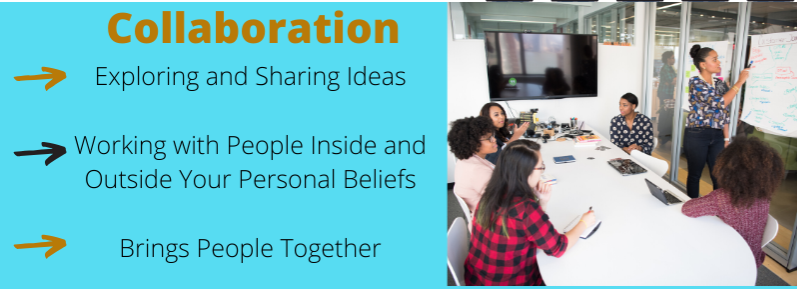
Collaboration looks at exploring and sharing ideas with one another. Communities of practice are a great example of what effective collaboration can look like. They are groups of people who can share passions, concerns, goals with others who share similar interests and they can all work towards learning how to further improve. There are three characteristics that make communities of practice effective. Having others to bounce ideas off of or gain new information is a great and important way to learn. All in all, collaborations bring people together and help individuals to grow as learners.
THE IMPORTANCE OF COLLABORATION ( finished infographic) created using: https://www.canva.com/
This module was helpful in exploring the importance of learning through collaboration. Even when creating this infographic and working on this assignment I collaborated by reading others post in from the previous assignment and reaching out to others who did and infographic for their first assignment in order to know how to execute it properly. I am glad I chose the Collaborator Module since I was able to dive deep into topics such as PLNs which I have heard before, but never fully grasped.
For my second multimedia reflection, I decided to do an infographic on The Technologist Module using Canva. I enjoyed making the infographic as a first time Canva user, because this website was very user friendly and easy to navigate. Although, I did prefer making the sketch note for my first multimedia reflection, since I could more freely express my creative side. I found with Canva I was still able to add creative elements, but I would much rather draw than work online.
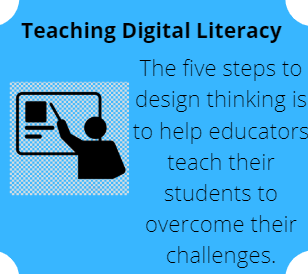
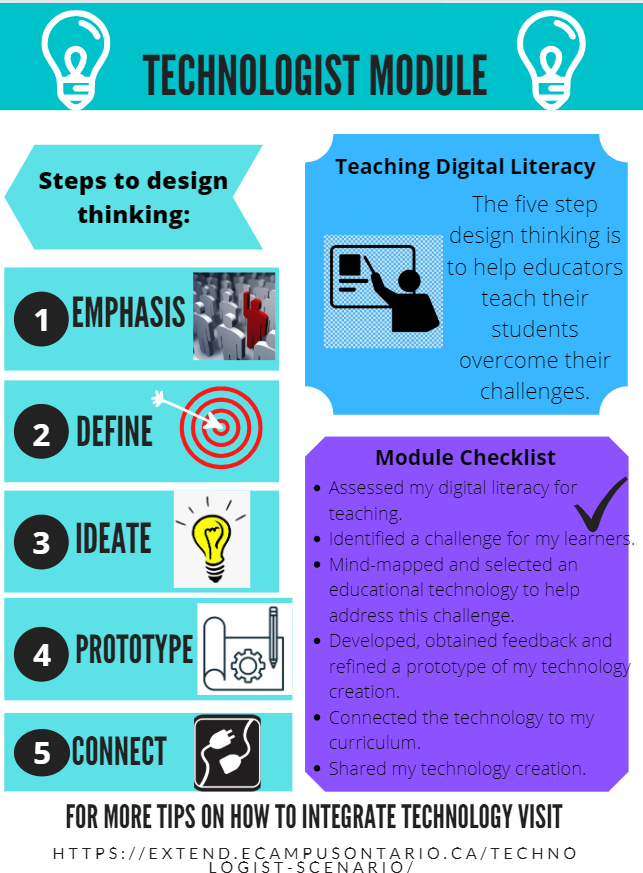
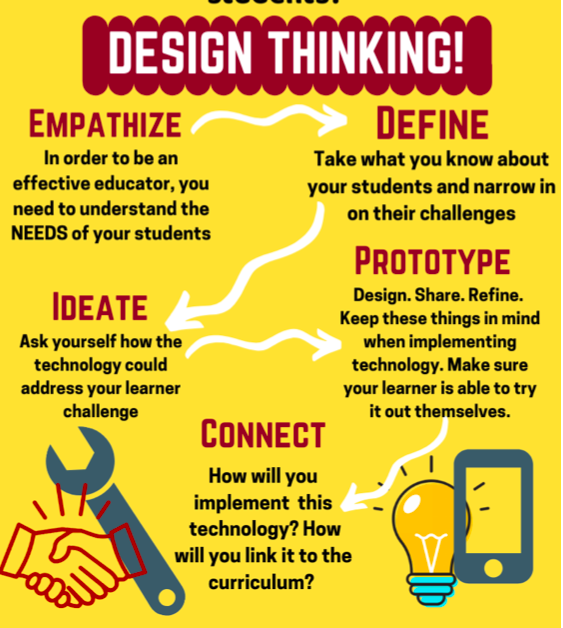
The technologist Module is a great resource created by the Ontario government for educators to enlarge their knowledge on digital literacy and design thinking to better assist their students in this technology filled world we live in.
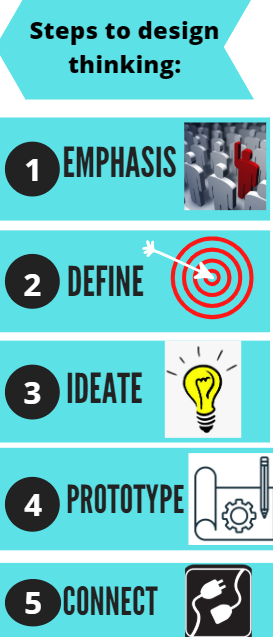
Design Thinking is broken up into 5 easy steps to help learners with any challenges they face with technology. The first step is putting emphasis on understanding the learners needs to be able to assist them properly. The second step is define, which is for identify the problems or challenges the learner is having based on the needs you just discovered. The third step is ideate, which is for brainstorming solutions to your learners problem or challenge. This can be done by asking yourself questions such as “How might I?”. The Fourth step is prototype, which is where you would try out your solution to fixing the problem or challenge according to the learners needs and addressing feedback. Lastly the fifth step is connect, meaning connect your integrated technology to the curriculum content.
This design thinking strategy plan should be used in all classrooms to improve the digital literacy of educators as well as students. By incorporating this into classrooms, it will get learners more familiar with digital literacy and higher their level on the SAMR scale.
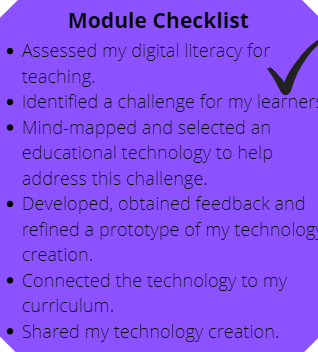
After following the five step plan for design thinking, here is a checklist to see if you as an educators are using the technologist module approach accordingly. If you can not check everything off this list, those are areas to improve on and put into your feedback.
Overall, I found the technologist module approach very educational and I look forward to integrating more technology during my second practicum.
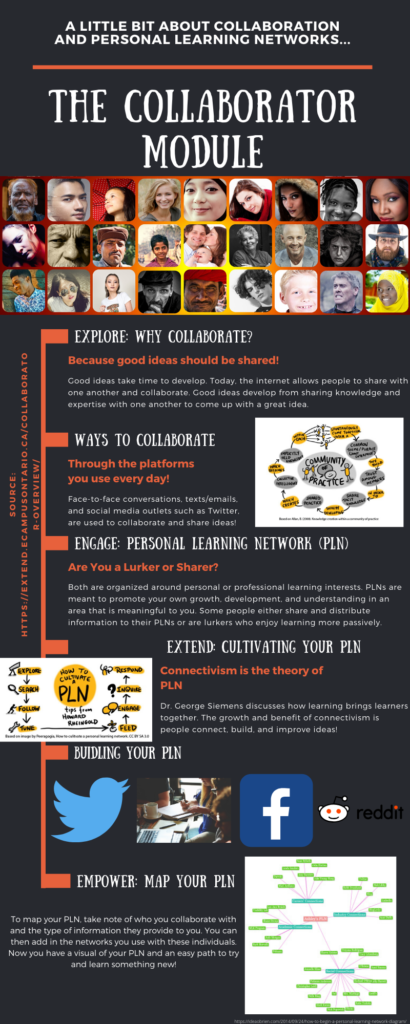
For my Reflection, I decided to design an infographic to summarize the collaborator module we were tasked with exploring! This is only one of the modules presented by Extend Ontario ELearning where you can check out the other modules surrounding elearning! Keep scrolling if you want to read more about the collaborator module and a reflection that goes along with my infographic.
I decided to organize my infographic in this way because I believed it would be easy to follow and summarize the key points of the module so others can get the main idea without browsing through the entire module themselves. Here, I add some photos from both the module itself and an extra picture to try and visually represent what a completed Personal or Professional Learning Network (PLN) map would look like. Let’s dive a little deeper into it!
The first photo I added is about community practice from the Explore: Why Collaborate module. It shows the way that a learning community or PLN comes to develop. People with similar learning interests share with each other to create a thread of information for others to either follow or participate in. I decided to place this diagram into my infographic as it can help readers see the development of a community with the same interests, both professionally and/or personally!
The second picture from the collaborator module comes from the Extend: Cultivate a PLN section. It shows that there is a process to follow when cultivating your own PLN. You can explore what is already out there concerning your learning interest and then how to start participating in different PLNs! I thought it would be good to add this picture since it would be simple to follow and hopefully one could understand what goes into the making of a PLN.
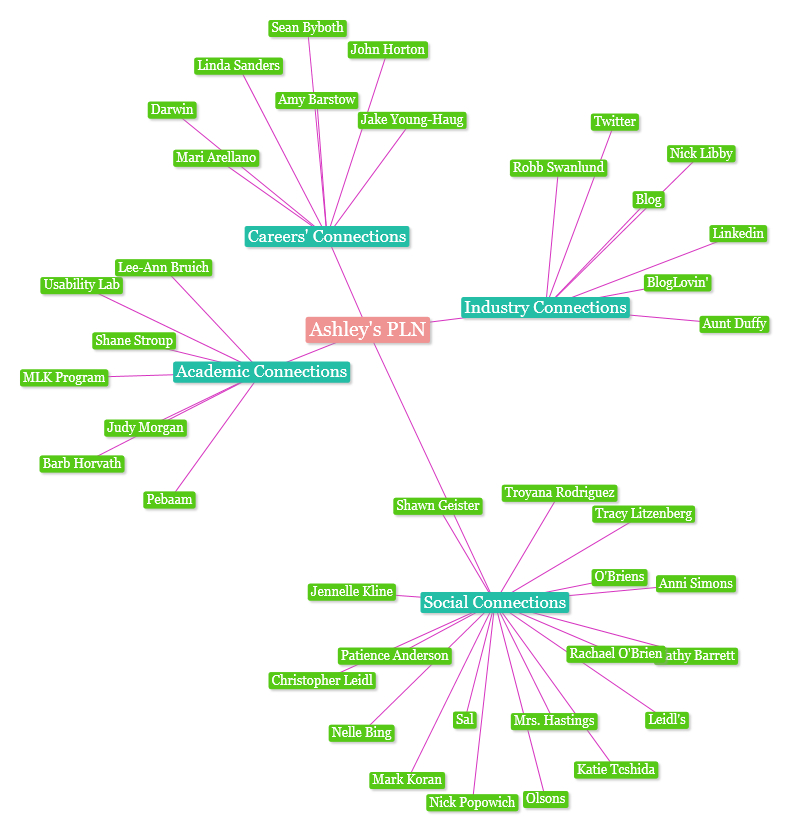
The final picture I added was from an outside source that is a blog about A Technical Writer’s Guide to the Galaxy by Ashley Idea O’Brien. I thought their picture perfectly represented the type of idea they were going for in the Empower: Map Your PLN section. It includes an activity where they ask you to create your own personal map of your PLN so you could have a visual representation of where and who you get information from!
Feel free to leave a comment and let me know if you have any questions or constructive feedback!
Digital tools can be a boon to any classroom, but a teacher shouldn’t just select an app they stumbled upon, give it to their students and expect miracles. There is a lot of work that must be done before and during (and after) the implementation if the tool is going to be of any use.
Ontario Extend’s Technologist Module explains one procedure teachers can use when selecting digital tools to enhance a lesson. I decided a quick video would be an interesting way to summarize the module. It’s also completely different from the sketchnote that I completed last year! Please enjoy.
Note: This thumbnail was the only one Youtube selected that didn’t feature my completely open mouth. So flattering…
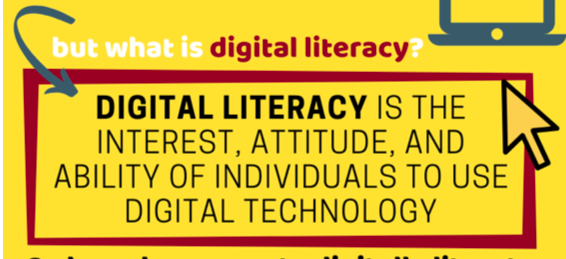
Interestingly, the module doesn’t start with selecting the technology or with anything to do with implementation, but with several definitions of digital literacy. Some of these definitions were rather wordy, so here’s a boiled down version: a person is digitally literate if they can effectively navigate, communicate and create information using digital platforms. The module explains (and I agree) that a teacher who understands how literate their students are will select an appropriate tool for the benefit of all their students.
As a physics and math teacher, I’ll be entering a field that complements with tech pretty well. However, understanding and interpreting what digital literacy means in regards to students and their abilities must be considered before handing any tech to them. If a student doesn’t have the capability to use it yet, they will gain little from it.
This module goes into great detail while discussing a process called design thinking. It lists five steps an educator should consider when attempting to implement tech into their classroom.
Empathy
The first step is to empathize with your students which (to be honest) is something all teachers should be doing already. Empathy is something outlined in the OCT’s Ethical Standards.
Video Snippet: Empathy. It’s in the Ethical Standards for Teachers.
The module suggests building an empathy map to help organize how to students are responding to your current lessons by noting their feelings and reactions while in your classroom. I believe this is a harder activity to complete accurately than it sounds. Some of the pieces of the map might be very difficult for a teacher to decipher on their own. I think I would show students my completed empathy map and allow the students to give their feedback on what they believe is missing to get a more accurate picture.
Define and Ideate
Video Snippet: The ideal educational tool
The next two steps in design thinking are to first define what parts of your lessons could be changed or improved with a digital tool and then to decide what features of a tool would be ideal for your classroom. These two steps will use the empathy map (or whatever was used to collect information). The goal is to narrow down what you need and what you want in order to make your search for the tool as efficient and effective as possible.
Something I did not mention in my video is the use of the SECTIONS approach when selecting a digital tool… Four minutes just isn’t a lot of time to discuss something as robust as this technologist module! Luckily, there is an excellent resource by Anthony William Bates that explains everything you could ever want to know about the approach. It narrows down eight elements to consider when selecting a new tool for students to use; all conveniently organized in a delightful acronym.
Prototype
Video Snippet: Check out this cool thing I found!
Time to implement the tool! By making a prototype or a test run of the tool for their students to play with, a teacher can observe what the tool enhances and where it may fall flat. By making changes to how the tool is used, these new iterations should become more and more effective, resulting in (hopefully) improved learning. A successful implementation should always be shared with others. Don’t keep your digital creation a secret; I don’t intend to!
Connect
The final element of design thinking was a no-brainer: connect the use of the tool to the curriculum. I found it very strange that this step is at the end. I believe that it would be better placed in between the defining stage and the ideating stage. To put all this time and energy into implementing a tool only to reflect back on its usage and find that it does not help in teaching the curriculum would be very frustrating. So frustrating in fact that I don’t believe any teacher would fall victim to this oversight.
Though I agree with many of the steps outlined in design thinking, I do not agree with the order in which they are presented. As I said earlier, I think it would be foolish to wait until the implementation is nearly done to check if your technology-driven lesson addresses the curriculum properly. This problem shouldn’t even really arise if the define and ideate phases of the implementation were done correctly.
One final note: I believe that having the end goal in mind at the very beginning would be beneficial to the project in the long run. To blindly rush headlong into a problem with no solid aim to work towards seems like it could waste a lot of time and resources. The idea of asking “What do I want the students to be able to do” is absent in design thinking’s protocol. It asks this question of the technology, but not the students and that is a tremendous omission.
Students as well as teachers alike live in a modern world where technology is ever changing. Technology is constantly changing the methods that students learn and the methods that teachers teach. Digital literacy is a major skill that is taught to students in the modern day classroom. “These literacies encompass the abilities to locate, use, summarize, evaluate, create, and communicate information while using digital technologies and web-based platforms.” (https://extend.ecampusontario.ca/technologist-digital-literacies/) In order for students to succeed in the workplace once they have finished high school and post-secondary education opportunities they must be digitally literate. Educators are responsible to teach students these skills.
Design Thinking has five different steps to the approach that educators must take into consideration as they are teaching their students. Teachers must empathize with the learning process of their students. Teachers must place themselves in the shoes of their students in order to gain a sense of the information that they will absorb from their lesson. Teachers must also clearly define one problem that they wish to solve in a lesson or with a project. The must only choose one, a broad scale of problems will easily lead to confusion with the teacher and with students. Teachers must then move to the ideate point in the process. This is where an educator should have multiple ideas on how to solve the problem that they have chosen in order that it will work for all of the students inside their classroom. Teachers then must prototype. They must create a product that can be tested in the future. Teachers must create a tool or a lesson in order so that they can test it to see if it solves the problem that they have chosen. Lastly, teachers need to test the prototype that they have created. It is important that they ask for feedback from their colleagues as well as their students after they have tested the prototype in order for them to evaluate what was successful and what needs to change in the future.
Teachers must also be aware about the limitations that technology has on some students within their classrooms. Not all students have access to wifi, not all students have access to a laptop, desktop or mobile device. Teachers must be aware of the resources that students have inside the classroom and give students adequate time to complete the work asked of them within the classroom because it is unfair to assume that each child has access to the internet when they return to their homes.
For my second and final multimedia reflection, I chose to create an infographic that focuses on the Technologist Module. Specifically, I made an infographic about digital literacy and design thinking. I chose to create an infographic because it’s something that’s new to me and I’m always trying to get out of my comfort zone. Honestly, I had a lot of fun making this one as it allowed me to be creative without having to be artistic. Not sure if you remember my sketchnote from my first multimedia reflection, but it was pretty rough.
Anyway, the government of Ontario has created a website called “Ontario Extend”. This is a capacity building initiative that is grounded in the belief that the impact of learning should be the primary motivator for creating technology-enabled and online learning experiences. Its goal is to empower educators to implement technology in the classroom; and the technologist module goes into detail about how to do this. The module starts with defining digital literacy. This is a term I had honestly never heard of before, but after learning its definition, it’s pretty straightforward.
In order to create digitally literate students, it’s important to implement design thinking into your practice. Design thinking encourages educators to empathize with their students struggles in order to accommodate their needs. Over the course of my first placement, I found myself constantly incorporating technology into my lessons in order to help my students succeed. For example, at the start of a novel study unit I conducted with my grade nine students I found myself having to constantly read answers out loud in order for them to copy the right answers. This ended up taking a lot of class time, so in order to better accommodate their needs, I created PowerPoint presentations with the answers and shared them with all my students. That way, they were able to follow along with my explanation and not be so focused on copying the answers. This technology integration was small, but it really helped my students stay focused on what I was saying, which was more important than copying answers word for word. This demonstrates me empathizing with my students, which consequently led to me to define their struggle and come up with a solution.
Overall, I believe our government is starting to do their part on incorporating technology into the everyday classroom. Having teachers implement technology in small ways is a great start at making the classroom a tech-friendly place. The Technologist Module is a fantastic tool for educators to use in order to start incorporating technology into the classroom.
Now I apologize if my intro got Ice Ice Baby by Vanilla Ice stuck in your head; I know it is stuck in mine.
Now taking a look at eCampus Ontario’s Collaborator module, there are four tabs on the side breaking down the reasons to collaborate and how to effectively build a personal learning network (PLN). These four tabs are as follows:
Explore: Why Collaborate?
Engage: Personal Learning Networks
Extend: Cultivating Your PLN
Empower: Map Your PLN
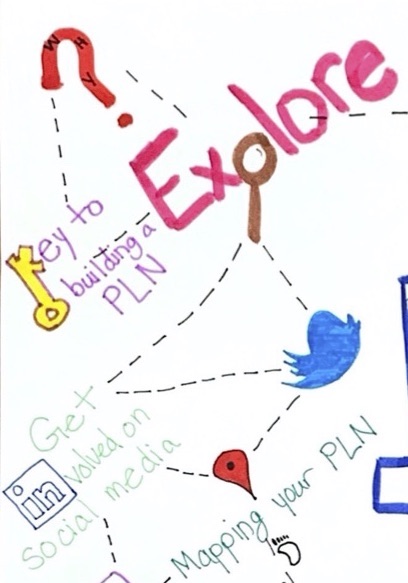
As stated above, the Collaborator module presents the idea of the importance of building our own PLNs. It outlines some techniques to effectively incorporate a PLN in the world of education and teaching. When thinking of the term network, a few things come to mind. A social network is probably most prominent (and will be touched on later), and also a neural network. That was my aim in drawing out the letters ‘PLN’ above – to depict a network.
1. Explore: Why Collaborate?
The first sentence you read when on the Explore tab of the collaborator module is “Being open to collaboration is a key to building a personal learning network (PLN).” There are a variety of modalities while exploring a PLN. We can use face-to-face, text messages, and even social media. By getting involved on social media, there are many tools available to us fellow educators and students. The “professional” networks such as LinkedIn can intimidate but also cultivate students’ learning, whereas something as simple and popular among students like Twitter, can truly be powerful. Having students explore this tab on their own will guide them in the right direction to start a collaboration process.
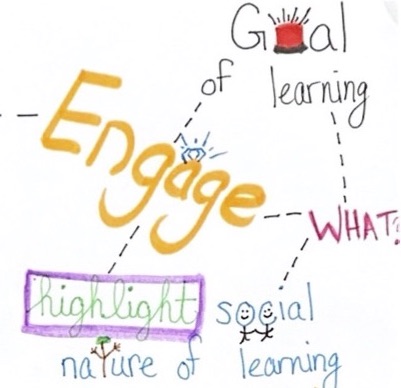
2. Engage: Personal Learning Networks
As the weird in-between of being a student and somewhat teacher, or the best of both worlds as “student teacher”, we know all about engaging activities. As a student, we want to be engaged, whereas as a teacher, we want to be engaging. This tab outlines some great resources for the importance of having a PLN. It also introduces the idea and definition of a PLN, as shown in the first video posted on the tab – “What is a PLN?” by Marc-André Lalande. The true goal of learning is to promote growth, development, and understanding. This leads into highlighting the social nature of learning by using Connectivism – which sees learning as a social and collaborative activity.
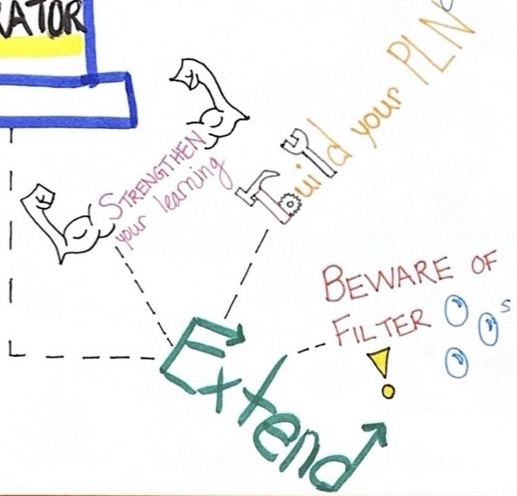
3. Extend: Cultivating Your PLN
Cultivating a growth mindset is a hot topic within the Faculty of Education here at the University of Windsor. However, with every strength, comes a weakness. Students and teachers can build a PLN that strengthens their learning, but heed one caution: Beware of Filter Bubbles. Letting a PLN flourish to its full potential is great. We want to be able to explore and extend our learning by exasperating every detail we possibly can. We are able to do this by constructing a great professional PLN. However, filter bubbles can pop up during our online searches. Algorithms and online biases will hinder our exploration – so being aware that these exist can also strengthen our PLN.
4. Map Your PLN
Empowering students and educators provides insight to their PLNs. At first glance, a PLN may be seen as informal. However, this tab encourages students and teachers to map out their PLN and draw connections (as I have depicted above). The power of social media builds and draws connections without the user realizing it! The term mapping can also refer to a geographical context within a PLN. With social media, we are able to connect to other professionals and colleagues across the globe and continue to cultivate our teaching AND learning. This draws (literally and figuratively) a huge connection to the power of Twitter and other social networking websites.
Final Sketch-note showing networks
Now seeing the sketch-note pieced together fully makes more sense than the cropped images. The black slotted lines represent networks and also show the different connections through the tabs outlined by the collaborator module. There are a multitude of commonalties throughout the module, and I thought it would be a creative touch to portray a network while introducing networks! Thanks for taking the time to explore my multimedia reflection – as you can probably tell artwork is not my strong suit.