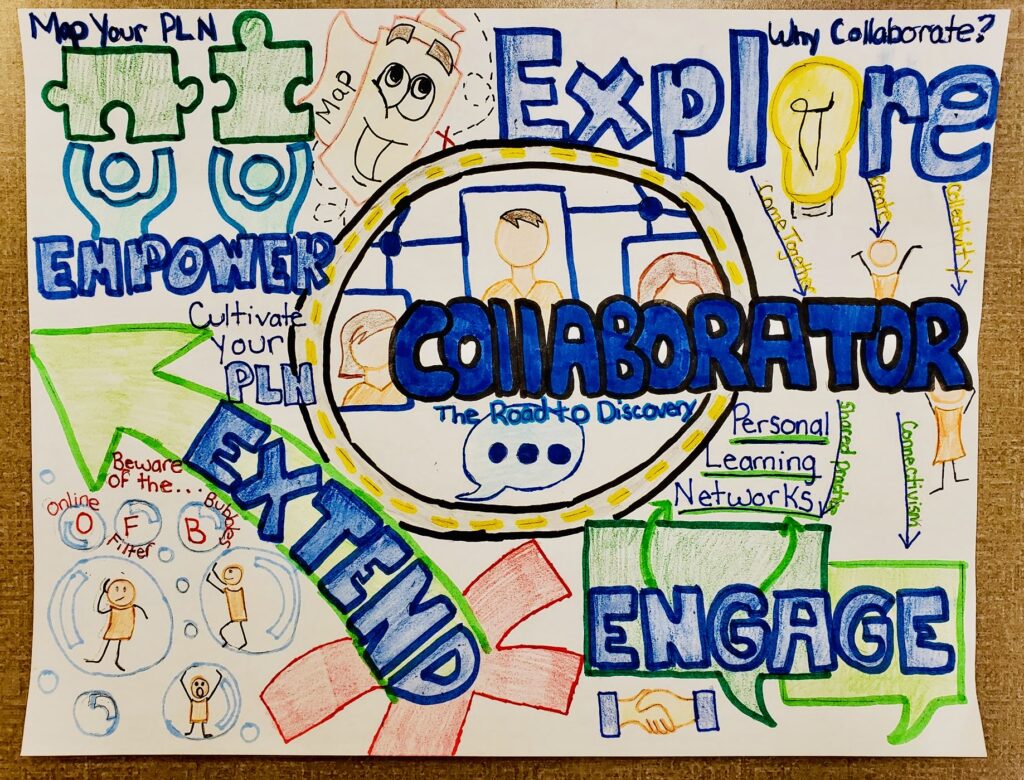
I decided to create a visual sketchnote that summarizes the key points in each section of the Collaborator module. I chose this module because I think collaboration is an essential component to a successful teaching career, so I wanted to learn more about what collaboration is all about. I was interested in how technology tools can be used to build a Personal Learning Network (PLN) and capacity for teaching and learning through understanding and being open to collaboration (Explore), making intentional connections with others (Engage), posing and solving problems collaboratively (Extend), and strengthening independent thought (Empower). To outline this key connection, I made all the titles and subtitles blue to emphasize how they all need to be utilized in coordination with one another. Sketchnoting serves as a way to take notes in a more visual fashion that serve in helping one remember something that was recently read, heard, or seen. Creating a sketchnote was harder than I thought. Given that my first reflection was a Twitter essay, I took a completely different route this time. As a visual learner, this method ended up being more impactful for me. Creating the sketchnote was a challenge, but I think it serves as a great visual tool, even though I felt like I was trying to navigate through space at first.

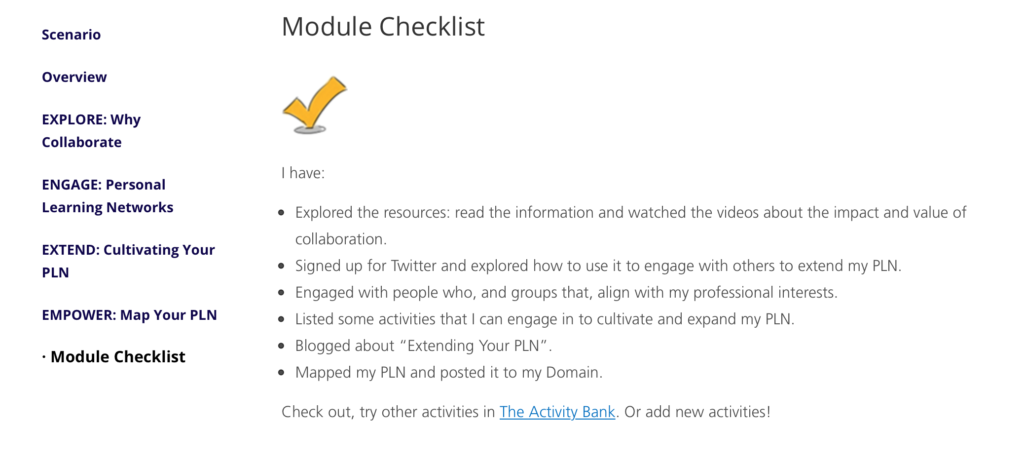
My sketchnote contains the basis of what everyone will need to ensure that they can complete the Collaborator module’s checklist efficiently.
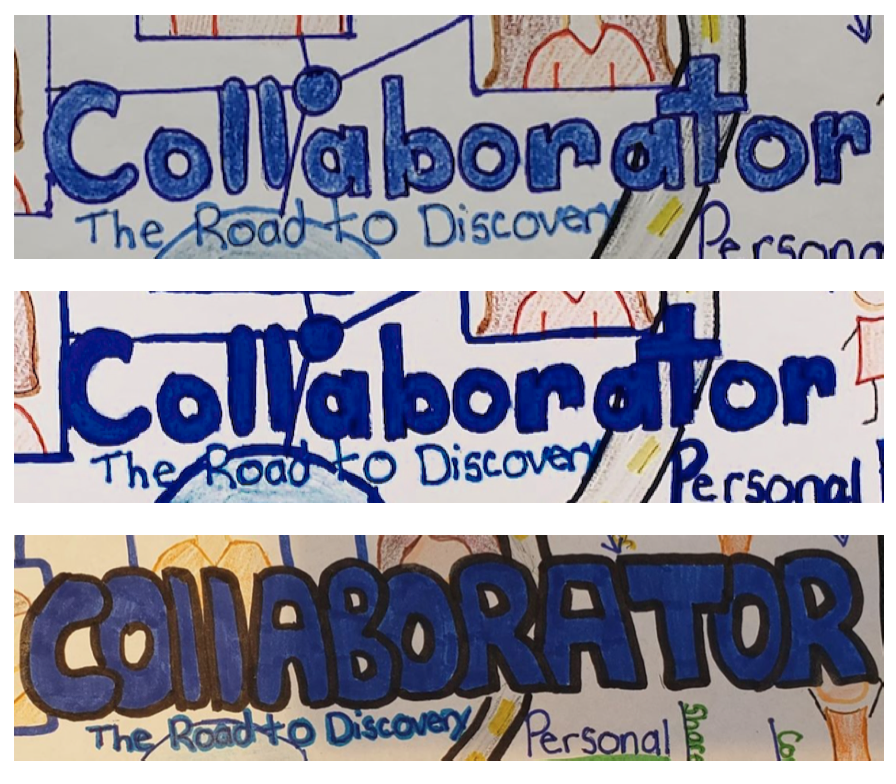
With regards to visuals, I recreated my sketchnote a couple times. I kept an original copy that was outlined in pencil, and I photocopied it each time I made changes, so that I could test with different font sizes and colours. After my first draft, I realized that the “Collaborator” title was not bold or large enough. In my second draft, I made the title more bold, but it still needed to be larger. In addition, I realized that it wasn’t made clear what section the words and arrows on the right side of the page belonged to. Finally, in my third draft, I enlarged the title and kept it bold. I also colour-coded the words in the right, so it is clear that they belong to a specific section (I will describe this more individually in the specific sections). Through my experience of creating this sketchnote, I learned that it is a great tool to use for summarizing, organizing, and problem solving skills.
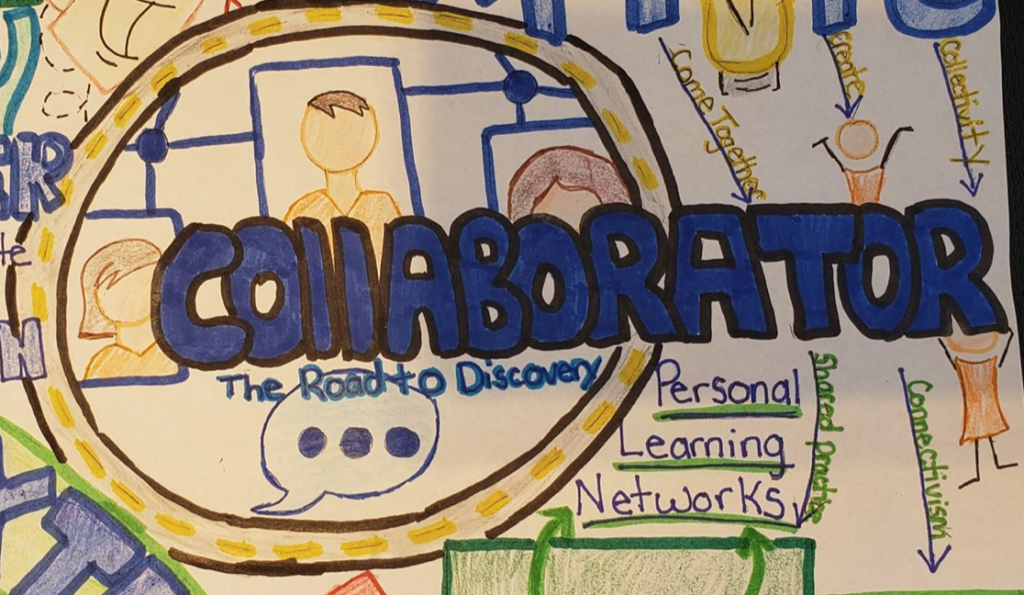
Though a majority of the sketchnote is specific to what is on the website, I added my own touch of opinion with the subtitle “The Road to Discovery,” because that is what I feel about the process of collaboration and the effect that it has for teachers. To go along with that subtitle, I drew a road circling around the title to make it stand out more and to help the subtitle make sense. Within the road, there is also a network of people who are connected together, as well as a text/speech bubble to emphasize communication and connectedness. In addition, I purposely chose not to number the different sections because my title is shifted to the right side of the page, so it automatically shifts people’s attention there, so they will know to start with the “Explore” section.
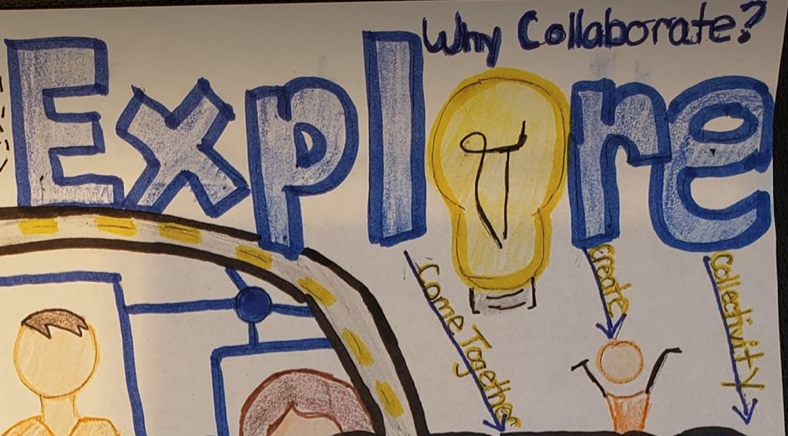
In the top right corner, I have the “Explore” section which highlights the importance of being open to and understanding the impact and value of WHY we collaborate. I drew a light bulb to represent the letter “O” because it is a symbol of invention, intelligence, and knowledge. The light bulb was created by Thomas Edison, and it helped everyone have light and create connections at all times. Thus, I believe that we should all be our own version of Thomas Edison by coming together to create in collectivity, just like the module suggests. Our own networks of collaborators may be made up of tens, hundreds, or thousands or people with different areas of interest and expertise, and that is where our good ideas can come from. By creating an online space, we can explore how to participate in digital communities for learning or how to build our own PLN. One can also explore how a good collaborative community is reflective of the guiding principles found within a community of practice: people who share a knowledge and skill within a focused area (domain) learn how to do (practice) it better as they interact regularly (community). In my sketchnote, the lightbulb represents the domain, the person represents community, and the arrows pointing to the next section represent the knowledge exchange that can take place in the “Engage” stage. The arrows also represent my personal view of the aim of collaboration: to make progress in broadening your network.
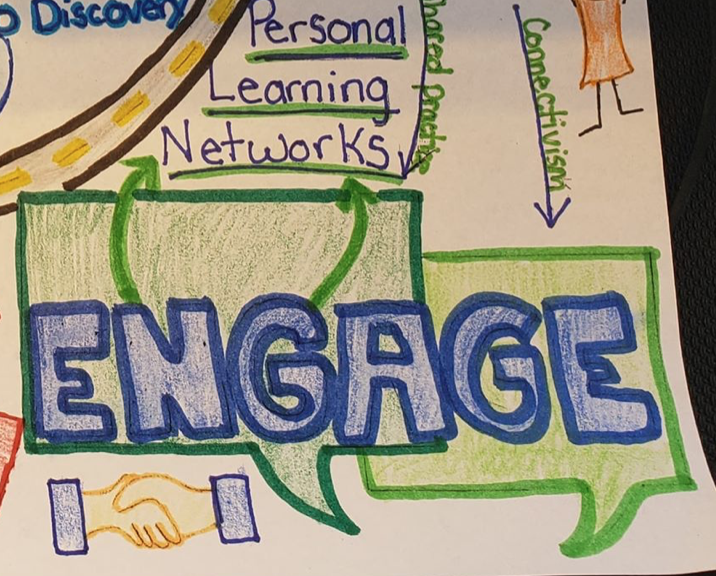
In the bottom right corner, I have the “Engage” section which highlights the importance of making intentional connections with those who share aligning professional interests through PERSONAL LEARNING NETWORKS. This section of the module differentiates PLNs from other networks that are more personally relevant and driven by one’s own needs and aspirations. This section explains how PLNs can be shared, but people determine who is in their own network and how they would like to engage with them. Inevitably, PLNs are about engaging with one another which is why I drew the word “Engage” inside of text bubbles. In addition, the drawing of the shaking hands suggest the unity of people in a better way than drawing people standing next to one another would. PLNs are formed around the goal of learning, so the words “shared practice” and “connectivism” in this section emphasize the value of acknowledging people who you recognize to be important to your learning as well as the connections between them. Connections between these people (nodes) are built and strengthened through shared practice, conversations, and other interactions. Thus, the shaking hands also symbolize this professional interaction between people. In my opinion, idea of connectivism in this section suggests how learning is a social and collective activity where existing knowledge and resources can be connected for us to build, grow, and advance together- this is a skill that I utilize in teaching.
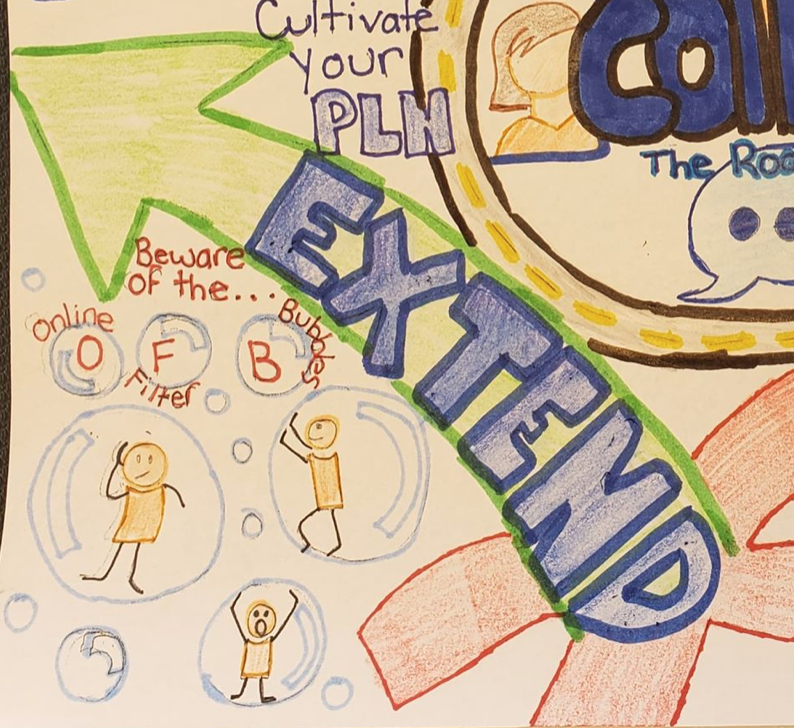
In the bottom left corner, I have the “Extend” section which highlights the importance of posing and solving problems collaboratively by CULTIVATING your PLN. A PLN does not just happen; it requires cultivation. I drew the word “Extend” inside of a green arrow to represent continuous growth and development, and the red “x” at the bottom represents the starting point (you will see this “x” again in the next section, but with a different symbolic meaning). This module explains the steps for building a PLN (explore, search, follow, tune, feed, engage, inquire, respond), and it provides other tips for cultivating your PLN. The people in the filter bubbles represent some of these steps in their desire to escape. The person in the right bubble is exploringand searching for a way out. The person in the left bubble is engaging and inquiring and he is thinking about what he already knows and asking himself how he can further that knowledge. Lastly, the person in the bottom bubble is joyfully cheering, as he had figured out a way to escape the filter bubble. So, what are these filter bubbles anyway? They are the personalized searches when a website algorithm selectively guesses what information a user would want to see. These, are what we want to avoid, hence my use of “Beware of the Online Filter Bubbles” in red lettering. The “x” with the arrow shooting out of it can also represent the importance of sharing your knowledge by extending it to others. Overall, I think section of the module has the main goal of highlighting ways that one can participate in activities and conversations and think outside the box (or bubble) in order to cultivate a PLN.
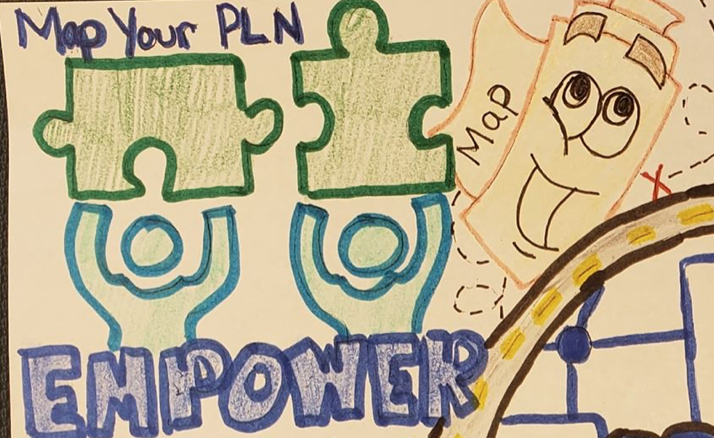
In the top left corner, I have the “Empower” section which highlights the importance of strengthening one’s independent thought by MAPPING the your PLN. This section of the module reliees heavily on ways to use digital technologies to build and develop and network that will breathe new life into professional growth and support teaching. How do you do this? Well, by mapping your own PLN, of course! My drawing of the map represents the whole idea of this section. There is also a path with a red “x” at the end. Unlike the last section, this “x” represents an ending point with a path leading up to it. Mapping your PLN is the final step in successful collaboration. Though the “x” represents an ending point, there really is no end for teachers who are collaborators and lifelong learners because teaching and learning will always be a continuous process. However, once we have established this connection within our PLN, we will feel empowered. The puzzle pieces represent digital technologies and the people represent us teachers who are bringing those tools together to create a strong unit within us where we can connect to one another just like puzzle pieces. I think that a team effort is crucial in teaching. We are all our own puzzle piece, but when we come together, we can create the full picture.
Overall, I believe that the collaboration process will benefit me as a teacher. I can personally relate to this module because planning out the sketchnote helped me relate back to the module and pick out important points that I valued and chose to emphasize. I wanted to keep my drawing simple, but with heavy symbolic references. Every image is thought out carefully to represent something from the module, as explained earlier. I intentionally kept the words short with a title, subtitle, and a couple extra words in each section. I can look back at this sketchnote in the future and remember exactly what each image stood for. Though I did recreate my sketchnote a few times, It was primarily for visual purposes. The content stayed the same, but playing around with colour and size options helped me look deeper into what was more important and what needed to be highlighted. Creating this sketchnote was a great learning experience for me, and it is definitely a project that I will adopt with my future students, because it will enable them to express their ideas in a medium outside of just written notes.
