Monthly Archives: February 2020

Who says collaboration can’t be easy?

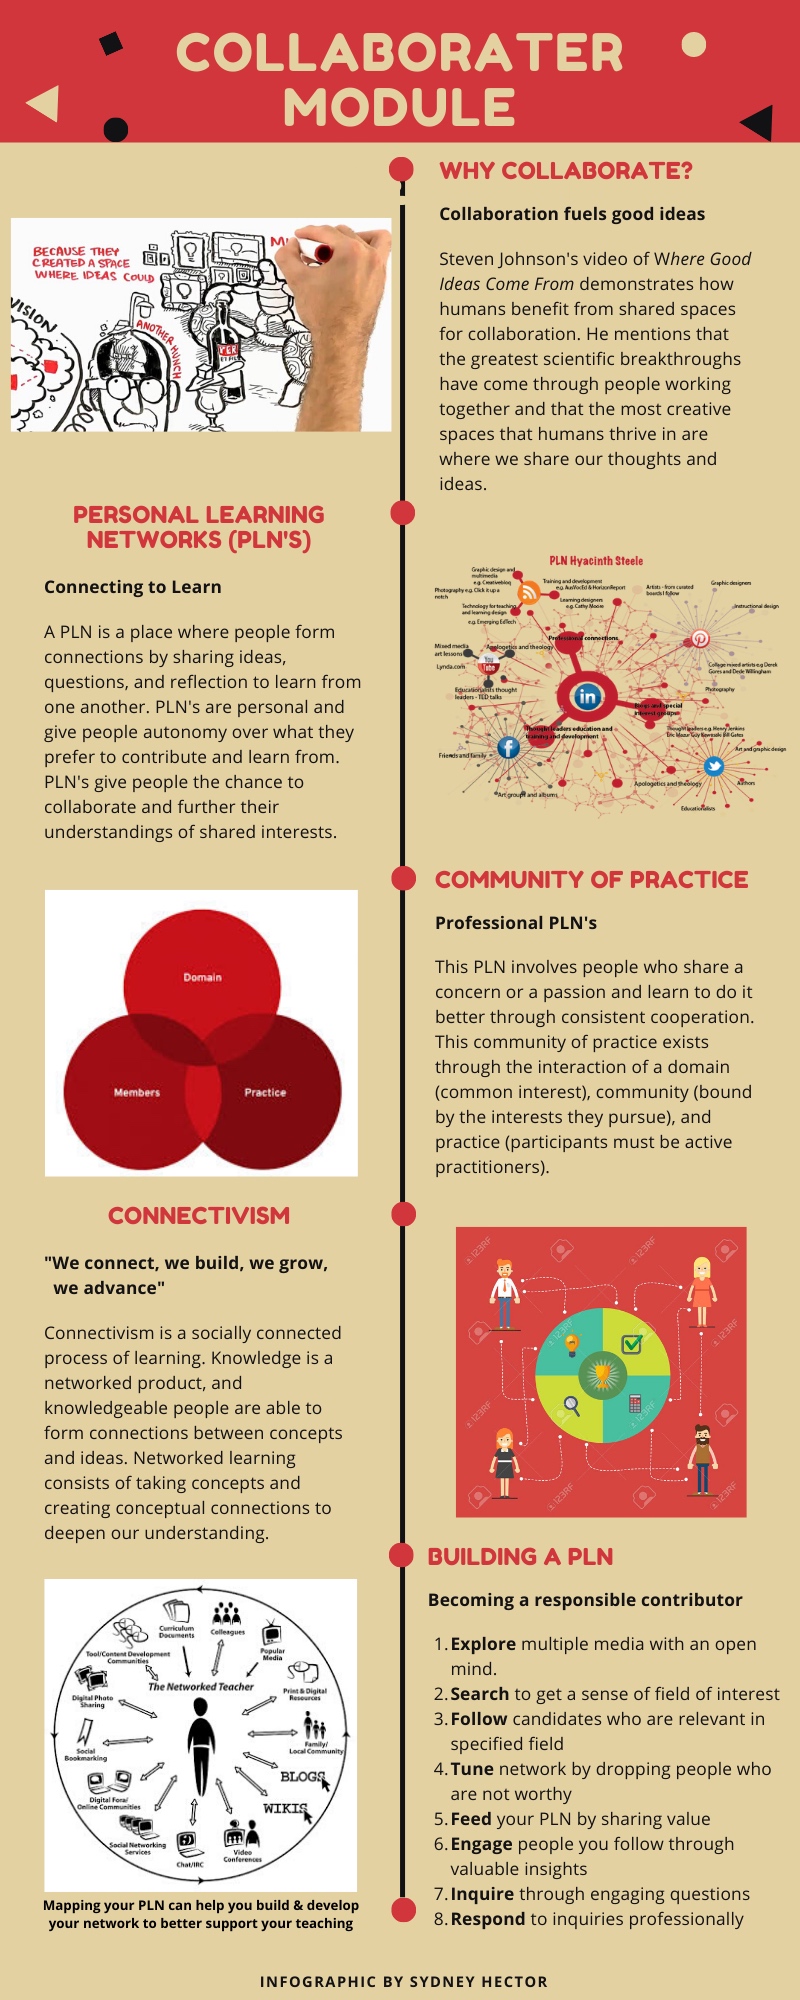
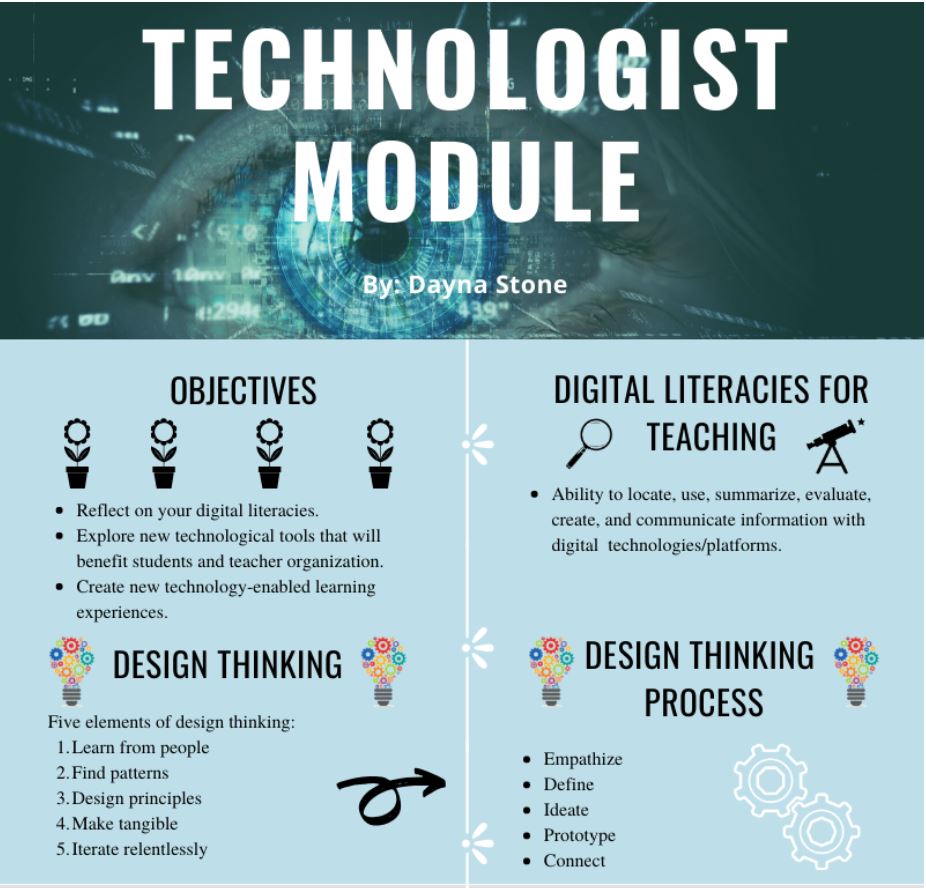
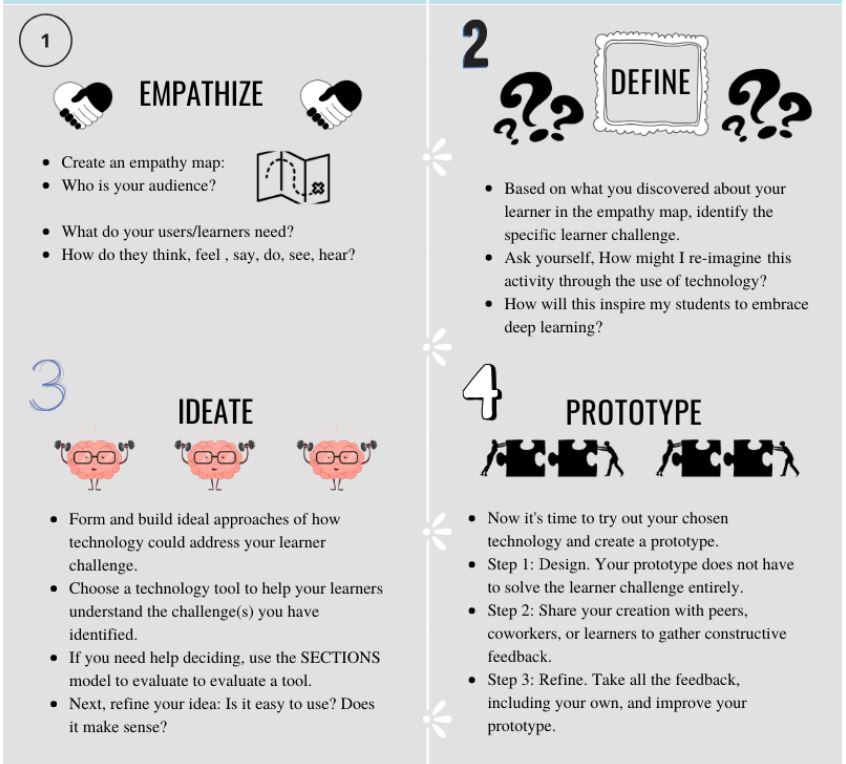
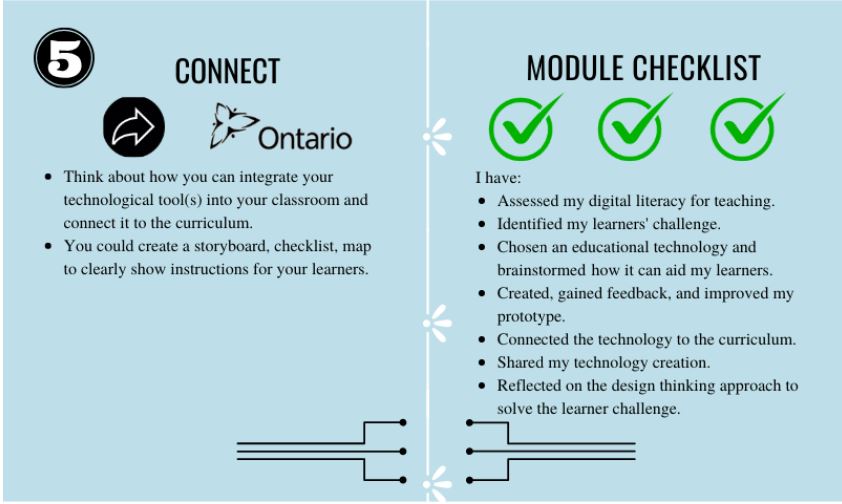
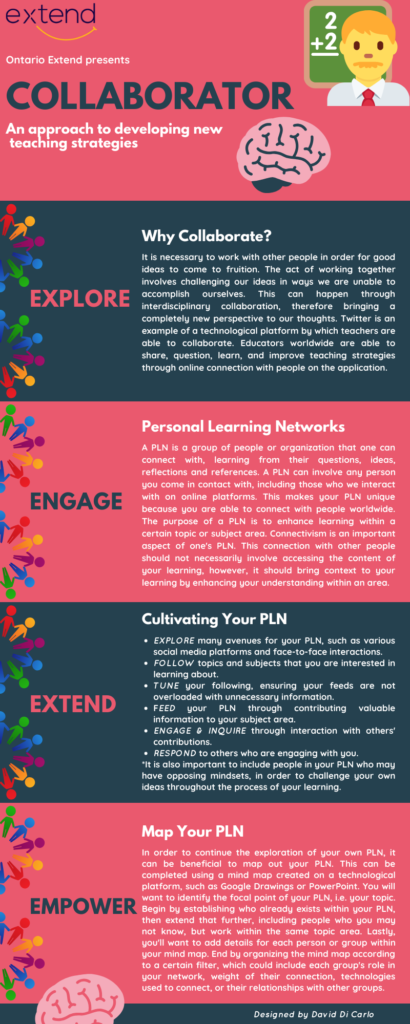
I chose to do the collaboration module because I believe it’s an integral component of the teaching profession that many are not aware of. I made a mind map summarizing the key points of the module as shown below.

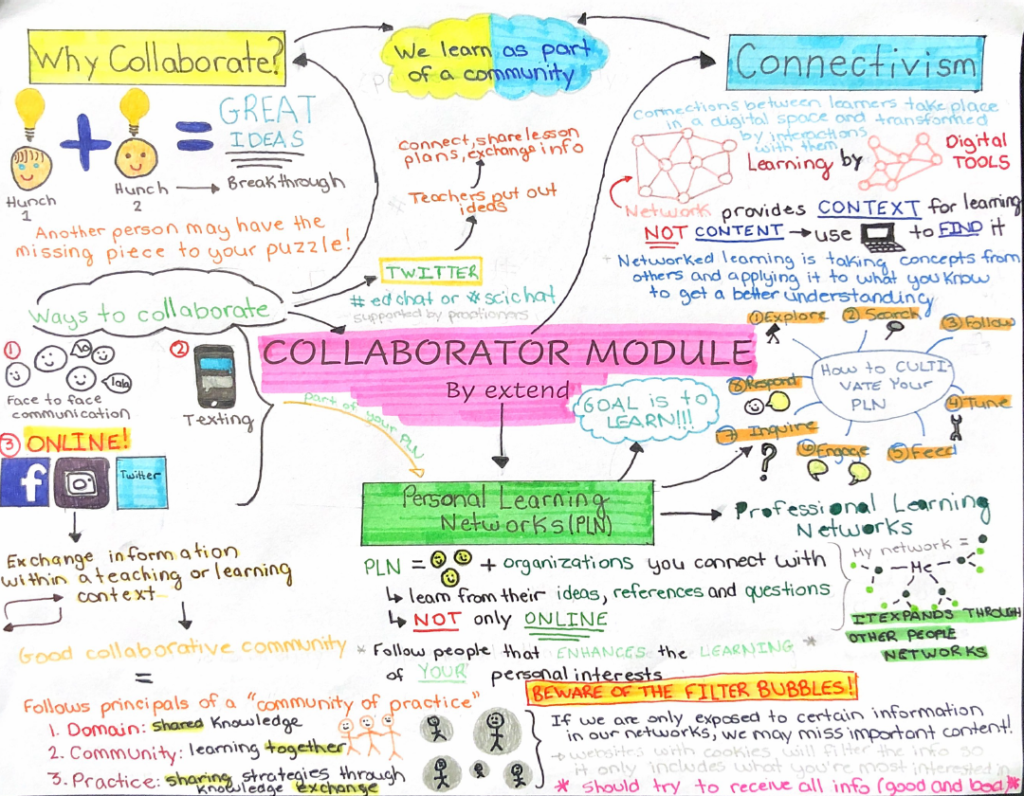
The mind map was separated in three main sections being Why Collaborate?, Connectivism, and Personal Learning Networks. I chose yellow and blue for the first two sections which can be combined to form green which is the colour of the Personal Learning Networks (PLN) section. This symbolizes how the first two sections connect to form a PLN. Furthermore, two sections were added that linked Why Collaborate with Personal Learning Networks and Connectivism with Personal Learning Networks.

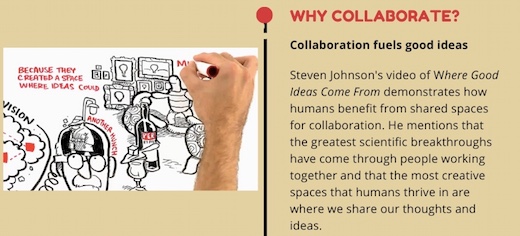
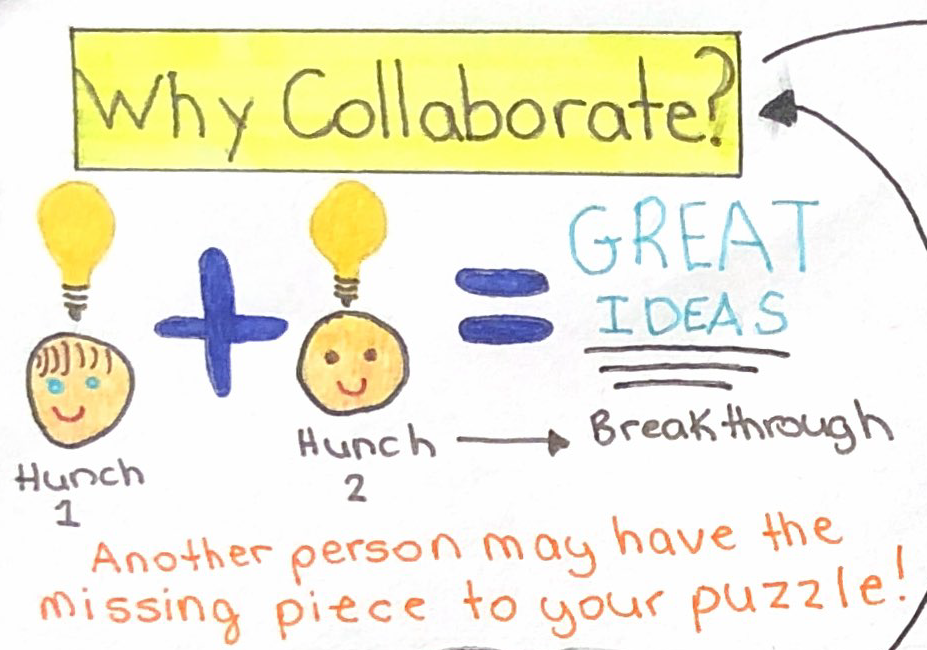
In the video Where Good Ideas Come From, Steven Johnson explains the power of collaboration. When numerous people share their ideas and hunches, greater ideas can begin to form. I know for myself, when I am trying to think of an excellent idea for a project, I struggle. It usually takes me some time to think of something that I like; however, when I converse with other individuals on some ideas, it takes me no time at all! The image below demonstrates the point of his idea being great ideas come from the ideas of the collective.

Where Good Ideas Come From by Steven Johnson

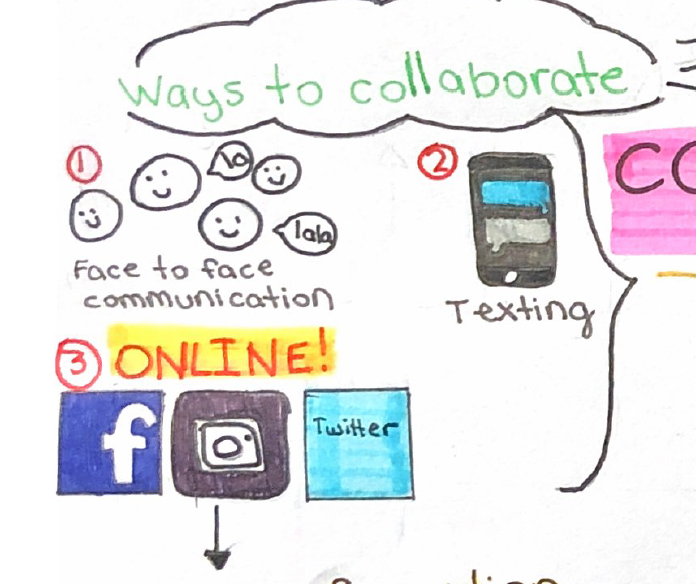
The module than explains some different ways to collaborate which included face-to-face communication, texting, and social media (e.g. Facebook, Instagram, Twitter). As technology is becoming an integral part of the classroom, finding ways to utilize its usage to enhance your teaching profession is essential. As such, the rest of the module focuses on using online platforms to collaborate and form a personal learning network.

When collaborating as a teacher, that purpose is to exchange information pertinent to teaching and learning. Alec Couros explains in the video Using Twitter Effectively in the Classroom how Twitter can be properly utilized by teachers. The primary message furthers the point of the video Where Good Ideas Come From as he explains a similar view. Twitter can be used by teachers to share ideas, lesson plans or even questions. Personally, I have never used Twitter as a pedagogical tool. I had originally never heard (or thought of) the usage of hashtag (#) as a teaching resource; however the video brings attention to how they can be used. For example, there are chats called #scichat and #edchat which are supported by practitioners. After having watched this video, I will potentially start using other social media platforms to follow educational resources to expand my learning.

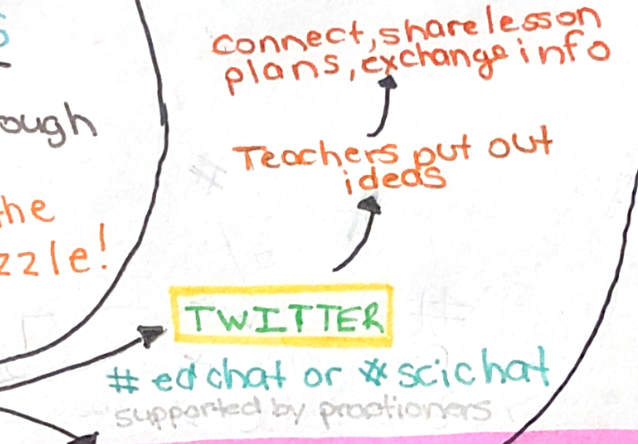
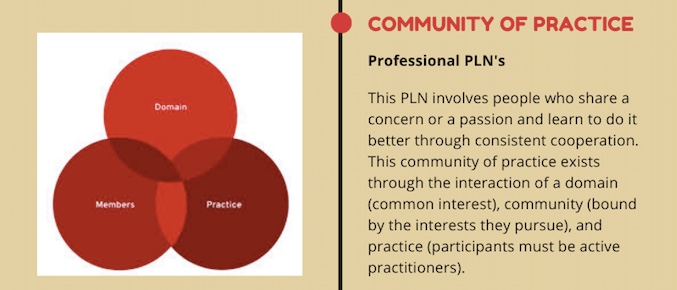
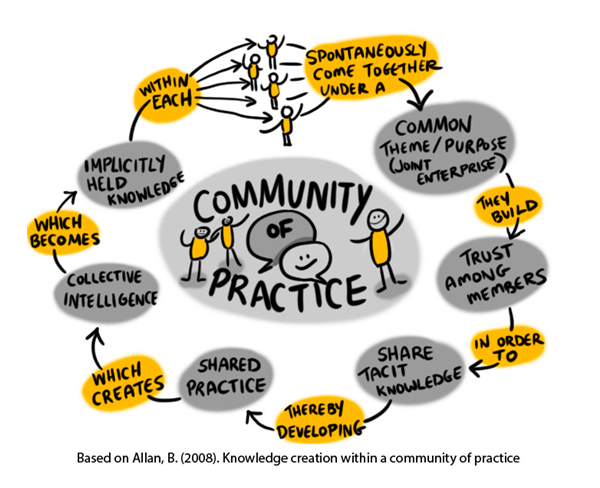
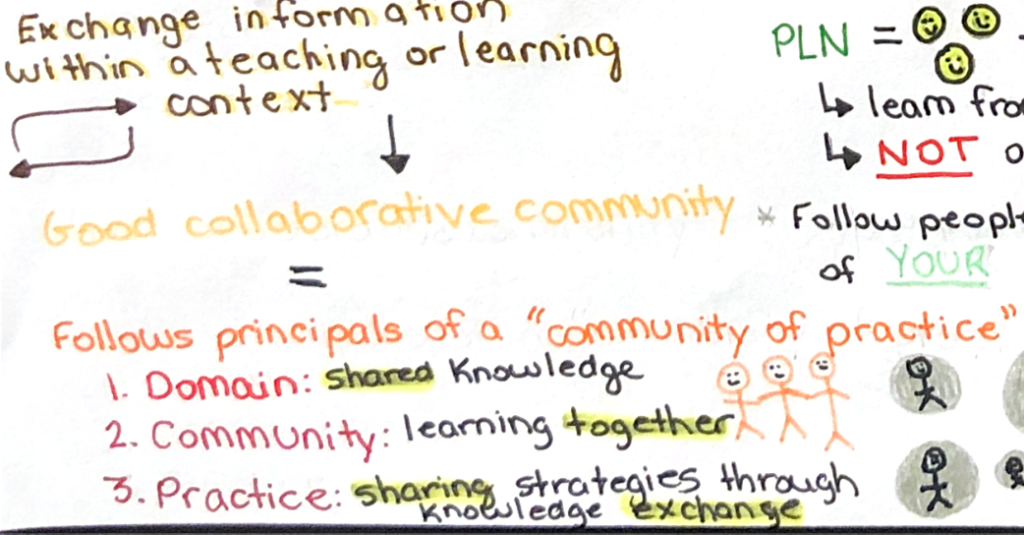
By using online mediums, they can develop a solid collaborative community that follows the principals of “community of practice” which are domain, community and practice.

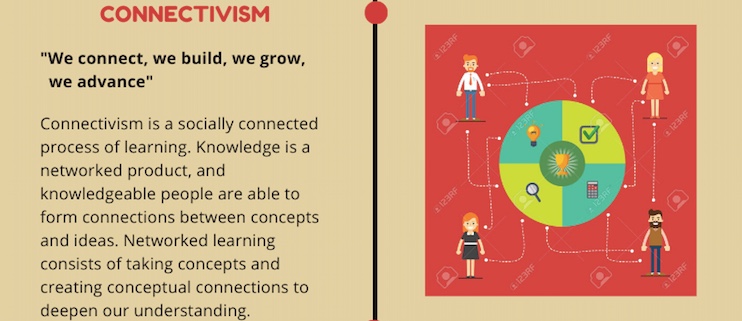
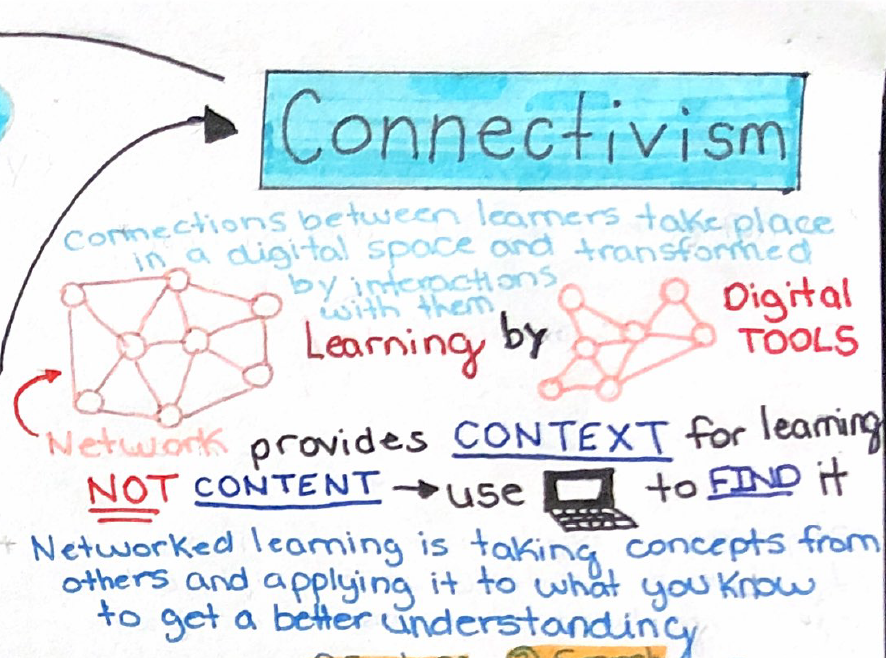
The second portion of the module explains the concept of connectivism. Connectivism is a theoretical framework which emphasizes how digital networks is a new avenue for learning. In other words, interactions between learners occurs in a digital space and as a result, learning is transformed. From my experience, online networks or discussions are useful to gain insight on practical experiences. For example, while doing research for my Europe trip, online discussions helped me to decide where to go, what to visit, and where to stay. People who shared their experiences provided me with some knowledge on the best things to visit. As such, these online discussions can provide insight on how to address certain classroom problems for example. The image below further explains the message given by the module.

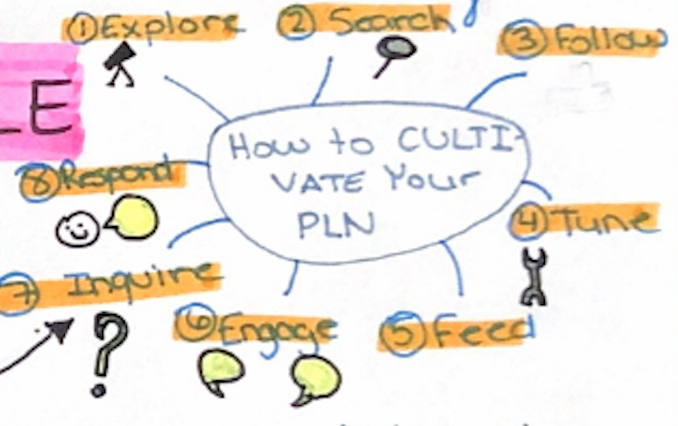
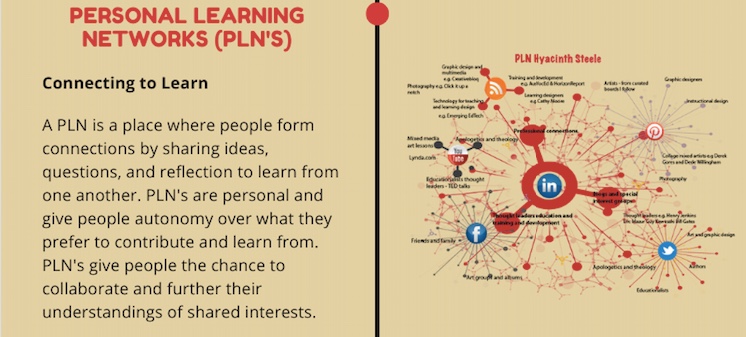
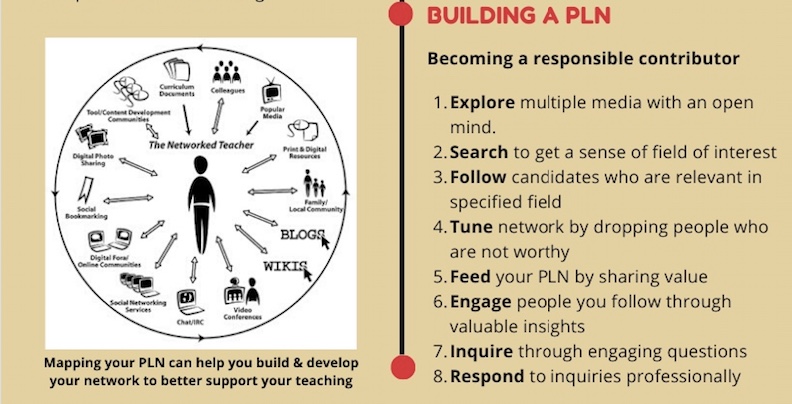
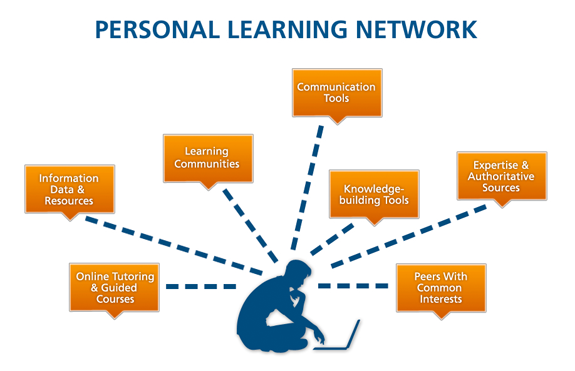
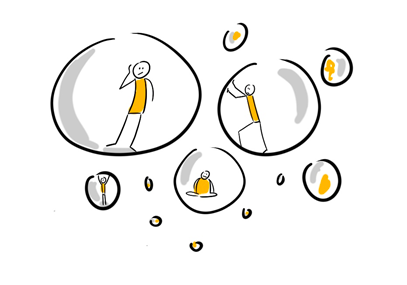
The last section of my mind map is Personal Learning Networks (PLN). As shown in the mind map, there are two subcategories to this section. First, there is ways to collaborate which is connected to the first category as well. Second, there is how to cultivate your PLN which is also connected to the connectivism section. Your personal learning network includes all the people and organizations that you may connect with either through an online platform or in person. It can provide you with new ideas, references and questions you have never even thought of. The idea is to interact with people or follow individuals that will ENHANCE your learning of your personal interests. After having read through this module, it opened my eyes to the opportunities that social media can provide. Currently, I only follow friends and family on my social media; however there are thousands of pages that explore teaching practices, sports news, new science research as well as other of my personal interests. I will most likely begin to explore this aspect of online platforms to further educate myself. It is also crucial to be aware of the risks of only engaging in your personal interests as it can cause a filter bubble to form.

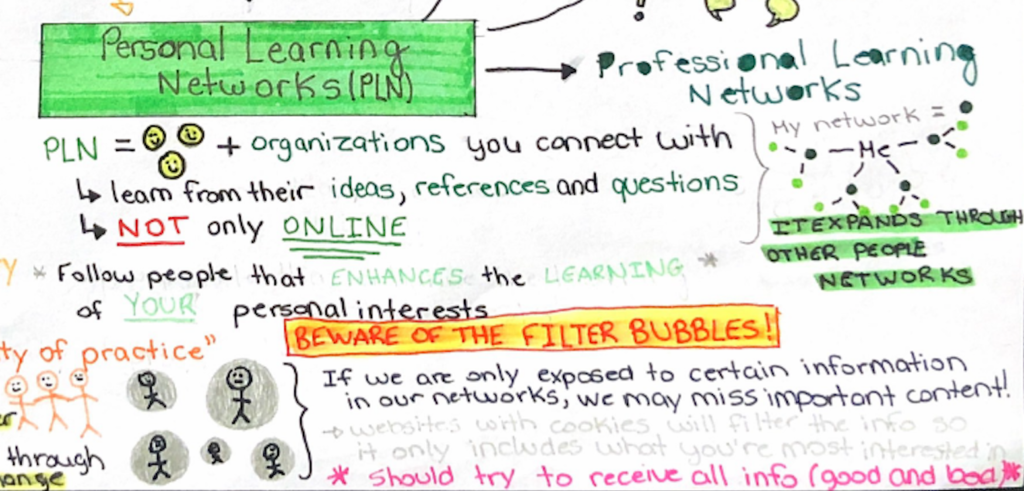
On the hand, part of building your personal learning network is to engage and to respond through these platforms which is something that is outside of my comfort zone. I have now learned this is something to address and to hopefully improve in order to develop a personal learning network.

Use this method to address learner needs!

Technologist Module: Design Thinking

By: Allison White

For this artifact, I decided to try using Canva. I had never used it before and was really impressed with its affordances. It was really user friendly so navigating through the tool wasn’t too difficult.

Being able to use Canva to represent the module was really useful. On Canva, I was able to explore templates that I could modify to fit what I needed. The template I chose represented a five-step model, exactly what I was looking for. My end result turned out to look like this:

The reason I picked this ‘five-step model’ is because as I was exploring the Technologist Module, I noticed that it was dividing into many different sections. After looking at the sections and doing some of my own exploration, I realized that the first few sections were an introduction that included definitions and overviews to the first few sections; Digital Literacies and Design Thinking.

Here is where I began to understand the main idea of this module: using technology as a way to address learning challenges to support and facilitate student learning. This process seemed very complicated. How does one do that when they don’t have any idea where to start? This is where my step-by-step model reflects the module. The last few sections of the module is the broken down process of implementing this main idea. It’s in the order that one must follow to effectively address learning challenges with the use of technology.

Although the main focus of my Canva was the process required to address learning challenges, I still wanted to incorporate the other ideas of the module as well.

At the very top, almost hidden, I included what digital literacies for teaching are. This is a reflection on the main idea. The section in which this part is found is under the Digital Literacies section, but since this is an educational approach, the teaching definition is the most pertinent. This is purposely placed here because after looking at the infographic as a whole, one shoul notice the title as well as the subtitles first, and be able to figure out what exactly is going on. By looking at the smaller details if whoever is reading is still interested, they will find more information as to what this is about. I also find it important to have the main idea stated somewhere on the module without taking the attention away from the modules explanation of the process.

Underneath the “Design-Thinking” I included its definition. This ensures that the one reading the infographic knows what I’m talking about and what the steps I have included describe. This definition also describes what exactly the user of the infographic is looking to do when creating their project. (It’s almost like a makeshift learning goal that someone can relate back to to make sure that what they are doing is still connected to the main idea).

“Technologist Design Thinking Process” by Joanne Kehoe is licensed under CC BY 2.0

I found this step-by-step process to be very interesting during my exploration of the module. Throughout it, there are plenty of opportunities to be creative, but in the “Ideate” section, there is ample resources that can be used to create. This is the main section where technology coincides idea creations. Some of these tools include: mind mapping, Prezi, Padlet, or even a Canva. Tools that are able to be used for multiple disciplines. The possibilites are multitudinous as long as the creator knows what to do. A great example is this Canva that I made. This infographic is an easy to process for teachers to follow a to integrate digital literacies in teaching.

Before choosing the tool, its important to look at different tools and explore them all to see if one fits best to address the learner challenges. For example, when I was deciding on what type of mulitmedia I wanted to use for this assignment, I had to think of what key ideas I wanted to represent; so, I made a mind map. Then I was able to look though the different tools available to best represent the main points of the module.

For teachers looking to integrate technology to reach learner needs, this SECTIONS chart is very useful. It looks at all the aspects that could be deciding factors when choosing and designing for the creation. All of the connect to the big idea by giving one a guide to selecting the most appropriate tool.

Some of theses chart ideas are are self-explanatory or can be inferred upon to reach an understanding of the idea such as: cost/time, ease of use, networking, organizational issues, and security and privacy. A lot of these ideas are broad and need to be narrow down to figure out exactly what each section means. This is a model of the design step, taking a big idea and looking at it from a narrowed down perspective.

“The SECTIONS Model by Anthony William Bates is licensed under CC-BY-NC

Others may be more difficult to understand like the teaching section. Here we look at the elements of the module that the teacher needs to decide upon and how the elements will be implicated to best facilitate teacher learning. Even looking at the interaction section, educators need to consider how the students will interact with the creation, how the students’ interaction with the teacher will be affected, and how the students’ interactions with each other will be influenced. This relates to the students section which focuses on prior knowledge and student demographics as well as what the needs of the students are. Is this tool going to meet those needs?

One of the things that I found to be very useful while exploring the module is that it is very educational and tests our abilities to understand what is being explained. At the end of each section, there is a task (Extend Activity) that we are supposed to do to give us an interactive way to apply our knowledge. Following the sequence that is designed for us is essential to complete the module as one Extend Activity branches from the previous one. This sequence following idea supports what the model is telling us. Under “Design” in the “Prototype” section, it states that to make and create an effective tool, a sequence is needed for the users to follow and understand what is required of them. Then, after sharing the creation with others such as the students, obtaining feedback is essential to refine the creation to make it as effective as possible

https://drive.google.com/file/d/0BxF8aYjMEXepZlhJYXEtTFgweGc/view

I applied this attained knowledge when creating my Canva. Although it is not necessarily what the module described the final outcome to be, I considered its suggestions and ideas to implement something that I could create. I applied the sections model in my design (specifically the media characteristics) and I continuously refined it until I got a final product that I was proud of.

Making this was a fun new way to express the main idea of something. I added little things in my Canva that may not be noticeable at first, but do help people subconsciously know what I am emphasizing. I bolded and underlined certain elements that I found to be most important and I even slightly changed the colour of some words to make them look slightly brighter. I didn’t want to take about from the flow of my creation, but these little tweaks will stand out more to the reader, even if they do not realize it. I created mini focal points throughout the Canva to reflect on my main focal point: Design Thinking.

I did a lot of thinking about my design. What colour choices should I use? How do they connect together? I always picture technology with neon greens, blues, pinks, and yellows. The colours that coding used to consist of with the dark screen in the back. That was my inspiration in the colour choices, using something that feels familiar to me and will feel familiar to others. A lot of what we create is a reflection of what we know and others appreciate it because of how inviting it is. I used these colours to try and connect with others who are looking to explore and create their own technologies.

I also thought of technology and what makes technology interesting… How else could I reach a bigger audience with this? As time consuming as it was, presentation and representation are really important when trying to connect with a bigger audience.

Being able to connect with others is essential to creating a good technological tool, they need to be able to understand what they are learning and why they are learning it. What it has to do with the curriculum and why it is effective.

Overall, technology is always evolving and as educators, we need to evolve with it. Technology use should not be a seen as a replacement for traditional teaching, but as an innovative expansion on teaching that allows educators to address learning challenges in new ways so that the learners are able to benefit to the best of their abilities.

How To Technology.

We are now in 2020, the age of technology and now more than ever we see teachers trying to integrate it into their classrooms. The key word here is ‘trying’. Not all teachers feel the same about technology, lots do not know how they can use it to better their classrooms. Through this blog post we will take a look into the ”Technologist Module” (https://extend.ecampusontario.ca/technologist-overview/ ) from e-campus Ontario and hopefully open your eyes to navigate the world of technology. 

First we look at Digital Literacies. These are tools we use to “locate, use, summarize, evaluate, create, and communicate information”  when we are using technology. Digital literacies can mean different things to different people. This is important for the teacher to assess before looking for technological tools. It is important to know what you view as a digital literacy before you teach your students. 

Next up is Design Thinking.Design Thinking is all about using resources to make a plan to follow through. There are five key steps to design thinking and these are all human based. First you should start with ‘Learn From People’, ask the people related to your study and collect that information. Next is ‘Find Patterns’, this is looking into the information collected and see if you can gather it into some sort of pattern. Then ‘Design Principles’, this step is figuring out how your information collected can be used in your final piece.  Then ‘Make Tangible’, where you start asking ‘how might we’ questions and begin figuring out what you can do to help. Last we have ‘Iterate’, where you should start looking for a solution. This will most lily involve multiple tries. After following these steps you should finally have a solution. 

When you are looking for a tech tool it is extremely important to empathize with your learners. I know from experience that using technology as a student can be very frustrating and it sometimes can feel that you teacher just does not understand. If you empathize and put yourself in the student and think about how they might feel, it may make the integration of technology easier for your classroom. I believe that no matter what you are doing it is important to think about how your students may feel. 

I think that when planning anything as a teacher it is good to define what kind of students you are working with. In this step you need to analyze how your students learn. Once you know how they learn you will be bale to easily find things that might be a problem with the tool you wish to use. As teacher we always want our students to be successful and tis step is a great way of finding a good fit for your learners. 

After you have a better understand of your students you need to figure out how you may use this tool in your classroom. The module suggests using mind maps to organize your ideas. I think mind maps can be very useful tools when you are dealing with so much information. By making these mind maps you may find ideas that you want to try out, which leads to the next step. 

Prototype is where I think a lot of the learning happens. This is all about making things and trying them. I firmly believe that you learn best by making mistakes and revising works and that is what the prototype section was all about. It mentioned getting feedback to grow, and I think that feedback is also important for our students. 

 When working with technology it needs a purpose. Yes technology can be the new shiny thing everyone wants to use in their classrooms but if it does not make any connections to the curriculum is it even useful? When looking at a technological tool it is important that you can make connections to the curriculum. I am one of the people who think ‘if I can do it in person why do I need to involve technology’, however I think that if a tool makes those connections it gives it a bigger purpose. 

Technology can be seen as such a powerful tool, but it can also seem so overwhelming. Hopefully by reading through this blog post you are more confident in looking for ways to integrate technology in your classrooms. 

More Brains Equal Better Ideas

In an age where the top scientists can reach each other within a matter of seconds and a click of a button, it’s no wonder we as a human species have advanced this far since the development of the world wide web.

The collaborator module synthesizes the benefits of collaboration and makes connections within the context of education. The module checklist includes learning about the benefits of collaboration, signing up for and exploring twitter, engaging with people who share similar professional interests, listing some activities to engage with a personal learning network (PLN), blogging about expanding your PLN, and mapping your own PLN.

In my experience as a student and teacher, using the collaborator module’s masterclass has helped my self-efficacy, competence, emotional stability, and motivation. Throughout this blog post, I will endeavour to connect this module to my own life.

The first question that the module answered was “why collaborate?”. Steven Johnson’s powerful sketchnote gave some insights into the benefits of connecting with people professionally. Personally, I have seen the positive impacts of collaboration in some of my seminar courses during undergrad. One course I took was called “Issues in Physical Education”, where one person each class lead a seminar and opened the discussion for people in the class to express their opinions and reflect on different possible solutions. This class helped me connect professionally with people who face the same issues in their careers, and helped me connect emotionally as well. Sometimes I feel alone in my profession, partly because I am outnumbered by students, and I forget there are other teachers facing similar difficulties. This class helped me connect and learn from my classmates in a professional manner.

The next section the module discussed was the scope of a PLN and how it can help you professionally. It built on the previous section by explaining how PLN’s can be beneficial, especially virtually, because people from all over the world can contribute their ideas instead of just in person face to face, which can be extremely limiting. In my experience as a soccer coach, I was introduced to a PLN for the first time this year. I work at the largest soccer academy in the world, and they have configured a virtual PLN where certified coaches from around the world share their coaching lessons. I have benefitted immensely from this as I am never at a loss for an idea, and people are always willing to help, share, and reflect on each others lesson plans. Perhaps the reason for this academy doing so well is because of its PLN.

I decided to focus the next part of the infographic on the specific type of PLN, a “community of practice” because this is the best way to grow and advance as a professional. This PLN only involves people who are active professionals within the area of interest. This ensures that no outside perspectives are being thrown in by people who have no expertise in the field. If we were to relate this to my experience at the soccer academy, I wouldn’t feel comfortable adopting a lesson from a parent or kid. These people don’t have the necessary training, qualifications, or expertise to make valuable contributions to the PLN.

The module discussed the theory of connectivism in learning and teaching – that giving students the ability to connect, share, and discuss helps them learn and gives them autonomy. It is important that learners know they are never alone, and that humans work best learning as part of a community. I think that this is important, however, there must be some direction in their learning – meaning finding people who are certified and have expertise rather than only people with a shared interest. I believe that students should be able to find a PLN where they can participate but also be exposed to active practitioners. Twitter is a great way to do this, by following active practitioners in the student’s field of interest and engaging thoughtfully and politely with the community.

The last section of the module discusses how to build your own PLN through Howard Rheingold’s framework. He maintains that this framework will help one become a responsible contributor to a PLN. By following the steps listed below, one can become an active member of a PLN and help themselves and their community grow. Personally, I have not refined any of my PLN’s yet, rather I have joined them unknowingly and serendipitously. For example, on Facebook, I have followed a few people who continuously post Physical Education games and workshops on their pages, and often times I use these ideas. I have yet to contribute something of my own to a PLN, but I believe this course is preparing me well.

This infographic coupled with my real-life experiences hopefully gives you a comprehensive outlook on why collaborating as an educator is a positive step forward.

By: Sydney Hector

Change by Design

Technologist Module Design Thinking Process

“We can’t solve problems by using the same kind of thinking we used to create them” – Albert Einstein

Image result for design thinking

My final response is a reflection on  The Design Thinking Process. I chose to go with a mind map as it is short and straight to the point, and serves the broadest range of students with diverse needs.  A mind map is both interacting and engaging and provides multiple means of representation. I thought of the target audience and saw it best to use a simple and straightforward approach that makes the entire idea easy to understand and relate to. 

Mindmiester

I first thought of this idea as I was walking through campus a while back. It is true that a majority of students at any university are average at best, only a few of the students are ever actually brilliant and get all the top grades. The video entitled “The End of Average?! Disrupting the green of education.”   gives an idea of the skewness of the educational system and why so many students are deemed poor and below average. Everyone is different and each of us has a unique learning style. This implies that the learning process should be  personalized to suit individual needs. 

Image result for design thinking

Design thinking is the form of design methodology that is centered on finding solutions to everyday problems. It is specifically useful in solutions to complex and undefined problems that may not have an orthodox solution. This method works by incorporating numerous group brainstorming sessions in an all out, hands on approach geared toward prototype perfection. Understanding the core principles of design thinking could help in complex problem solving in a wide variety of problems and issues. In addition, this process is beneficial to all types of learners.

Empathize is the first step and always entails empathizing with the problem at hand in order to gain a better understanding of the problem. This could be through consulting experts, observation, and engagement to gain a feel of intent and motivation. 

Define stage involves compiling the data from the previous stage. The observations recorded are used to develop a problem statement that defines the core of the problem. 

The brainstorming and ideation stage is vital in the entire process. Here ideas are generated by the collective. At this point, the problem is well defined and the problem statement provides a guideline for idea formulation. These ideas are geared towards solving the problems identified at the earlier stages. This stage is followed by prototyping.  Here, inexpensive and scaled down models of solutions may be developed to test the effectiveness of specific modules. This stage aims at finding the best solution to the problem at hand. 

 The testing phase puts probable solutions in testing and generates working solutions.

Image result for design thinking

I believe that the design thinking process has endless positive gains. It simplifies the learning process making it easier for almost any student to internalize concepts easier and retain them for longer. Instructors using this concept could make their lessons more effective in the long run. 

Collaborator Module: Let’s Talk It Out

Introduction

The collaborator module is a tremendous part of education and is important to evaluate when speaking about Personal Learning Networks. PLN’s are crucial to establishing within the educational system as students can learn from teachers, administrators and peers on a daily basis. The large education system in Ontario uses social interactions to enhance learning environments and create new methods while incorporating technologies such as podcasts and videos as a learning tool. I used Canva to make an infographic to represent the collaborator module and the implications of the PLN’s within the module.

Role of a Personal Learning Network

The cognitive difference between people is important to note, however, by using others as a mediator, the verbal cognitive speaking can be interpreted in different ways. The educational systems had over two million students, thus, this leads me to assume that there are over two million conversations that happen in the school system. Just think about one conversation, how much you can benefit from only one conversation? To think that a regular student has on average 2,900 conversations a year with their teachers alone (Ministry of Education, 2017/18). So much information can be transmitted through verbal conversation, all while improving social-emotional learning and conversation skills which are so crucial in the world today.

See the source image
Personal Learning Network Outreaches

Although technology continues to take over, people must be able to speak clearly sand market themselves to clearly communicate with others. This is a skill that many have noticed missing in many young individuals (Campbell, 2016). The collaborator model along with the conversational style of learning initiated by psychological theorist Vygotsky is crucial to the educational system of today (McLeod, 2018). In summary, PLN’s are enhanced by the collaborator model, therefore, students and all people should continue to practice these life long skills.

Objectives of a PLN

  1. Assess how your educational approach is currently enhanced by your collaborations.
  2. Explore ways to build or augment PLNs.
  3. Identify strategies to extend professional connections beyond your institution or peers.
  4. Experiment with digital tools that may be used to build PLNs.

The Power of Conversation

Power of Conversation

Conversations are so important in a society that is dominated by digital technology. The main way people express themselves and leave first impressions on people is by conversation and impressions by appearance. Conversations are crucial when someone presents themselves and how they transmit information to others. Conversations are used throughout the education system and in the workplace, good communication methods are very important and beneficial for learning. This is proven by psychologists and is focused on the development of kids. Speech can be comprehended at a fast pace and have other cues to pick up on certain information. Many say conversation is the most effective way of learning. Conversations are so powerful and so much can be transmitted through every individual conversation. Conversations happen on all cognitive levels and can include a variety of people amongst one conversation. 

Personal Thoughts

As I examine the collaborator module, I find a great deal of my own educational philosophies embedded in the module. I am a strong ambassador that Personal Learning Networks (PLN) are strong communications that can be established by students’ contributions and enhanced through social interactions. 

See the source image
Personal Thoughts

The social interactions that are established in the collaborator module enhance learning as new ideas can quickly be learned by others and transmitted efficiently through one too many and many to many communication methods. In my opinion, the collaborator module is paramount in the world of education as personal beliefs and information can be provided to students in a variety of ways and discussions in which students can engage and fully submerse themselves in the content. 

As the students can actively participate in social interactions they practice Vygotsky’s methods of learning (McLeod, 2018). Through this psychological lense, the students and teachers clearly communicate and can firmly establish their beliefs. As this approach continues to evolve it creates better communication skills that are useful for all people in life to express and market themselves under various personal circumstances. From a teacher’s point of view, a PLN is beneficial as it can provide a wide range of views and personal biases to enhance education and various views on the subject matter. This approach can also address personal biases and problems which can better the significance of teaching and inclusivity in the classroom. 

Conclusion

In conclusion, I strongly believe that the collaborator module can help in and out of the classroom for a variety of reasons. Not only does it impact the classroom environment, however, everyone involved in the module weather the communicator and or recipient of the information being provided to them. This approach is age-friendly and allows for an informal and formal dialogue to encourage communication between people of all social and cognitive levels. 

Personal Learning Network is forever and very important to the educational systems across the world creating unique opportunities.

See the source image
The End


Four steps to a Personal Learning Network!

Four steps to a lifetime of continuous learning and collaboration!

Many Teachers that have been teaching for a few years have a network that consists of limited professional connections outside of their discipline of teaching. In Ontario Extend the Collaborator module gives four steps that one can follow to create or expand their Personal Learning Network, PLN. 

Working with Powtoon

4 Steps to a Personal Learning Network

I decided to analyze the Collaborator Module of the Ontario Extend in the form of a Powtoon 3 min video. Although I am a visual person and often enjoy presenting information in the form of a presentation, poster or sketch, I was completely out of my comfort zone creating a video to present my ideas. What I found most challenging using the platform was deciding how much time is enough for each element of the video. Even though the Powtoon video is only 3 minutes long, a lot of time went into creating it. I found the platform to be very user friendly. I really enjoyed the process of creating the Powtoon video and found the platform to be a great tool that is creative and interesting. 

Step 1: Explore

In the Explore step of the collaborator module a professional must ask the most important question of all, the “Why?.” Why should anyone go through the trouble of collaborating? Why should you make an active effort to create a personal learning network? Teachers can use their PLN to learn from people that are exploring the teaching profession from a new or experimental perspective. They can get advice and share ideas with one another, and most importantly they can create and collaborate together to build projects that they would not be able to do on their own. The video Where Good Ideas Come From by Steven Johnson explains that networks are needed to develop, spread and explore ideas.

In addition, the idea of communities of practice is also explored in this section. A community within a focused area where individuals learn together while sharing strategies, tools and resources. In my undergraduate years of study learning was a very individualistic endeavour, however this practice of learning is limiting in a real world workplace. In my personal experience, I am always trying to expand and develop my PLN, I think of my PLN has helped me in many areas of my professional life, becoming a teacher, and personal life, becoming a parent. The “Why?” for me is very clear the Extend Ontario module does a good job at answering that question too. 

Step 2: Engage

In Extend Ontario the second step of creating a PLN is to “engage”. Teachers must figure out what their personal interest are, who is an expert in that particular field and must connect and engage with these individuals. The PLN is firmly based and organized around personal or professional learning interests, that are unique to the particular person. The teacher must determine the direction of their own learning and mindfully build the PLN that is most useful to them for personal and professional growth and understanding in an area that interests them. Here the theory of connectivism is also explored. Connectivism states that learning can be a socially connected process where you connect different ideas online, build upon them and add your own perspective while improving and deepening your understanding through the PLN. In my personal experience, I do this all the time through multiple social network platforms like Facebook, Instagram and Twitter. At the beginning of this year I was completely unaware of many resources that are available to teachers. Through my PLN I have discovered and used many wonderful resources that will improve my teaching and help me throughout my career. 

Step 3: Extend

Extending and cultivating your PLN should be an ongoing process. In this section of the module there are two concepts that are explored, one is the importance of connecting with your network in the common gathering place for your discipline and joining conversations there through contributing ideas, engaging with others’ work and giving and receiving feedback.

Filter Bubbels

In addition, this part of the module also explores “filter bubbles” and the importance of connecting with people that are influential but might have an opposite view from yours. It is important to make these connections so that your PLN is diverse, and you encounter ideas that will challenge your thinking. I have experienced the “filter bubble’ before, especially around social issues. I tend to follow very liberal thinkers and I have been often shocked to find out how much support many conservative ideas have around my community. I now consciously make an effort to burst my own filter bubble so I can have a more balanced view of many issues. 

Step 4 Empower

Map your PLN!

Empower yourself by creating a map of your PLN. Creating a map of your PLN will give you a fresh view of your connections and will help set goals regarding the direction you would like to extend your PLN.  Although I have never set down and drawn a map of my PLN, I am constantly seeking and exploring networks based on my professional and personal learning interests. I find many of the questions I have on a topic have been already explored in online communities build around those topics, and my learning exponentially grows once I join a community focused on a topic of interest. 

Tagged ,

Technologist Module

Upon participating in the Technologist Module, I decided to create an info-graphic summarizing the key components listed on the module checklist. This multimedia reflection was more challenging for me because I created a sketchnote last time. I used Canva to design the info-graphic and found it to be very user friendly. However, there were images that I used from websites because the free version of Canva did not have many options. I decided to use the grey/blue colour scheme because that is just what I pictured in my head when going through the Technologist Module.

Shiba Inu Reaction GIF - Find & Share on GIPHY
Dog typing on laptop (giphy.com)

This process reminded me of one of our previous readings where it mentions that technology brings “new problems into our lives, but just watching the creativity behind these tools makes me so excited to live in a time when so many people can actually bring their ideas to life and watch those ideas impact the world” (Gonzalez). I found that I was able to incorporate my creative ideas into this info-graphic, but I also had to make sure the main ideas of the entire module came across clearly. It is quite amazing that there are endless online opportunities, so having to choose one specific platform/media for an assignment can be overwhelming. I felt this way initially because I could not decide what to create or how to create it. Eventually I chose Canva because I was already familiar with it since I used it in my technology-integrated lesson plan.

Napoleon Dynamite Technology GIF - Find & Share on GIPHY
“Yes, I love technology” (giphy.com)

I found that the Technologist Module gave me many online platforms, websites, approaches, and suggestions when using and creating technology for my classroom. I must admit that going through the module for the first time was a little daunting, but the more I read and clicked on the hyper links, the more I understood the concepts in the module. I found that the discussion board posts of certain aspects from the module helped me understand the module as a whole.

Schitts Creek Agree GIF by CBC - Find & Share on GIPHY
“Now this all makes sense” (giphy.com)

I appreciate that the Ideate and Empathize pages of the module offer many opportunities for Universal Designs for Learning. Especially with Ideate, the technological platforms provided demonstrate affective networks, recognition networks, and strategic networks. From MindMup to Coggle and even Prezi, there are multiple means of engagement for teachers to choose from for their students. The variety of platforms provides many ways of representation of content/information as this can also to lead to different ways of how students can learn. I can see myself integrating the Technologist Module into my teaching practice. The brainstorming templates allow for creativity to blossom with any online tool, any age, and any capability. I feel that this module can help me develop my pedagogical technological knowledge for the better.

No End In Sight Fox GIF by MasterChef Junior - Find & Share on GIPHY
“The possibilities are pretty much endless” (giphy.com)

I decided to split up my infographic so that the image is larger and easier to read.

References

Avalos, Joanna. (2019). Transparent Telescope Clipart Black And White – White Telescope Png, Png Download. KindPNG. https://www.kindpng.com/imgv/iRwoiRb_transparent-telescope-clipart-black-and-white-white-telescope/

Bubamara. (2019). Magnifying Glass Print Clipart Pink Background Transparent – Transparent Background Magnifying Glass Png, Png Download. PNGITEM. https://www.pngitem.com/middle/JhmJiw_magnifying-glass-print-clipart-pink-background-transparent-transparent/

Curved Arrow Pointing Right SVG Vector. (n.d). Vimeo. Retrieved February 19, 2020 from https://www.svgrepo.com/svg/123477/curved-arrow-pointing-right

Frame Clipart. (2020). Clipart. Retrieved February 21, 2020 from https://www.clipart.email/clipart/frame-clipart-127.html

Holding hand in heart shape vector. (n.d). Vecteezy. Retrieved February 21, 2020 from https://www.vecteezy.com/vector-art/532505-holding-hand-in-heart-shape-vector

Najera, Viridiana. (2019, July 3). Storyblocks-brain-training-with-dumbbells-and-glasses-vector_rA-6CycLz_thumb. Delaney Delaney &Voorn, LTD. https://www.ddvelderlaw.com/exercise-and-seniors/storyblocks-brain-training-with-dumbbells-and-glasses-vector_ra-6cyclz_thumb/

Network child care services. (2019). Network child care services. Retrieved February 20, 2020 from https://networkchildcare.com/annualreport-2016/community-partner-ontario/

Question Mark Clipart – Image (9353). (2016). Best clip art images. Retrieved February 19, 2020 from http://gclipart.com/question-mark-clipart_9353/

RIMM-Art. (n.d). Green check mark icon checkmark in circle for vector image. VectorStock. https://www.vectorstock.com/royalty-free-vector/green-check-mark-icon-checkmark-in-circle-for-vector-26839334

Smith, Sherry, and freepik.com. (2018, March 12). WHY IT’S TIME TO KILL THE “LEADER” – YOUR PRESS RELEASES DESERVE BETTER. Clarity. https://clarity.pr/news/time-kill-leader-press-releases-deserve-better/

Treasure map Free Icon. (n.d). Freepik. Retrieved February 20, 2020 from https://www.freepik.com/free-icon/treasure-map_814687.htm.

Collaboration for Educational Learning. Ever Heard of It???????

Ontario Extend is a government initiative focused on exploring skills, knowledge, and attributes of good pedagogical practices whilst incorporating new and innovative technological approaches that can transform and extend the learning experience of students. One of the modules within the project is the Collaborator Module, which outlines the importance and foundations of being a collaborative educator. The module focuses on how to become an effective educational collaborator, essentially providing a step-by-step approach. Firstly, discussing the reasoning behind collaboration and the importance of collaboration in general. Next, discussing Personal Learning Networks (PLN) and how the use of your own PLN can contribute to educational collaboration. Lastly, the module discusses how a person is able to develop their own PLN and explore its depths by mapping it out.

Pictured is the infographic I created in response to the Collaborator Module.

Personally, I believe that collaboration is an integral aspect of developing a deep understanding of any topic because it allows the integration of new perspectives that may challenge or add to your pre-existing beliefs and ideas. The issue lies that many people are unaware of how to collaborate, or how to gain a group of people to collaborate with. I think that the Collaborator Module has provided an excellent insight into the necessity of collaboration in professional learning and outlining just how one is able to accomplish such collaboration. It is important to realize that in modern society, technology is a fundamental aspect of our lives, yet I find that some people are stuck in the past when it comes to professional learning. There needs to be some movement in the sense of accepting the validity of online collaboration for professional uses, as opposed to only thinking face-to-face interactions are acceptable. The module provides insight into how one can properly utilize technological platforms, such as twitter, in order to expand one’s PLN, enabling maximization of professional growth. I think that if crafted appropriately, a PLN can become a form of many-to-many communication, where people world-wide are able to extract and contribute information in order to enhance learning within the realm of their subject area.

An effective collaborator is able to connect with people world-wide, obtaining multitudes of different perspectives in order to enhance their learning!

In general, Ontario Extend’s Collaborator module is attempting to prosper the abilities of teachers through an extension of their base of knowledge and resources surrounding teaching. I believe that the act of collaboration is a beneficial way for learning and growth to occur for an individual. Specific to teaching, collaboration allows for the best possible outcomes for both the students and the teachers themselves. Through gaining experience from other educators, teachers are able to extract aspects of lessons, activities or teaching styles that they think would work for them and implement these into their own classroom. Additionally, these teachers are able to recognize certain aspects that they wish to exclude from their teaching practices. The art of being a teacher is all about trial and error, attempting to identify what is effective for yourself and what will work for your specific group of students in your classroom environment. Educational collaboration simply provides a network in order to cultivate your pedagogical mindset, gaining experience and insight through discussion with others who may have already had success with a certain strategy. A good teacher is someone who teaches, but a great teacher, is someone who learns and teaches… what better way to learn than through collaboration with others who already have experience?

Tagged

Integrating Technology. It’s Easy, Right?

By: Alexandra Meloche

I chose to dive into the Technologist Module. Integrating technology can take a lesson to the next level!. But, like many others, I can feel stuck on how to integrate technology in a meaningful way that is not just a substitution, but instead, is a modification or a redefinition. “Integrate technology” sounds simple, but if we want the technology to have a purpose in our classrooms, we need to take steps like the ones outlined in this module to make informed decisions.

I made an infographic using Canva. I spent time exploring the infographic templates and the available editing tools. I found this platform user-friendly. I did not feel restricted on the free version. I enjoyed using Canva and would recommend it!

My infographic below describes the five steps of the Design Thinking approach process. Before introducing the Design Thinking approach, the module provides four different definitions of digital literacies. I created my own definition included at the top of my infographic.

Technologist Module Infographic
“give” is licensed under CC0 1.0 

The first step is to empathize with your students. How might they react? What concerns could they have? In my placement, my students used online music composing platforms to create digital compositions. The older students were familiar with the technology, but many of the grade 9 students, like me, were learning how to use the technology. I found it easy to understand their questions, as I was learning too! Technology can be frustrating, so empathizing with your students will show them that you appreciate and value their feelings and reactions.

“bless you key balance” is licensed under CC0 1.0 

Technology must have a purpose. Determine a challenge in your classroom. For example, are your students having trouble conveying their thoughts through a written response? A possible solution might be a platform like Canva, where students can combine text and visuals But, before you implement a technology, you must consider your context and possible barriers. In my placement, students picked between two music softwares for their project. One student asked to use another software because it allowed him different functions. He completed the assignment using a platform that worked for his style and learning. The technology must be suitable, accessible, and appropriate for the learning. Is the technology helping, or is it another challenge for your students? Technology can be a key to success!

“pendapat” is licensed under CC0 1.0 

I had trouble relating to the prototype step. I do not see myself in a position where I will be creating new technological tools. There are an abundance of tools already available that meet my teaching needs. My take-away is the feedback. Get feedback from your students about the technology tool and apply it, then make sure you can meet curriculum expectations! After this prep work, you must have a game plan that illustrates how students will use the technology as a part of the lesson and learning experience – anticipate problems, consider IEPs, and identify learning curves!

I enjoyed exploring this module! It was informative and has set me up for success when I integrate technology into my classroom.