Monthly Archives: February 2020

Multimedia Reflection 2: Thoughts on the Technologist Module (5332-10)

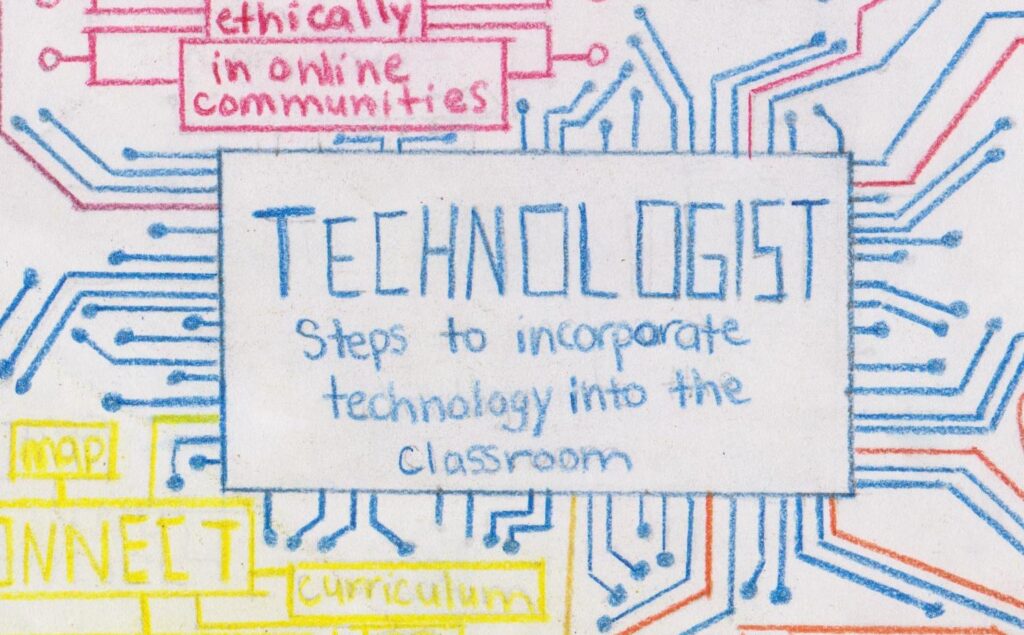
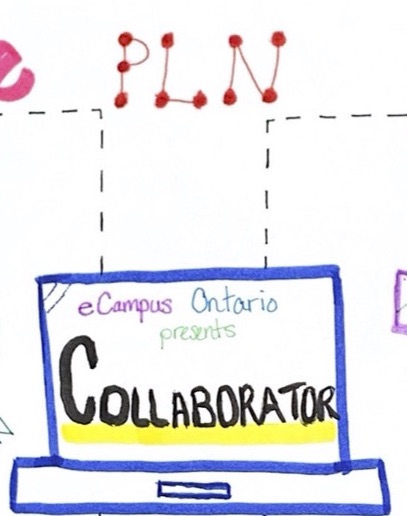
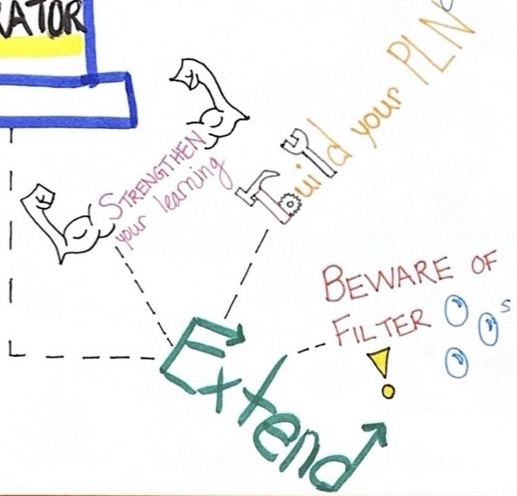
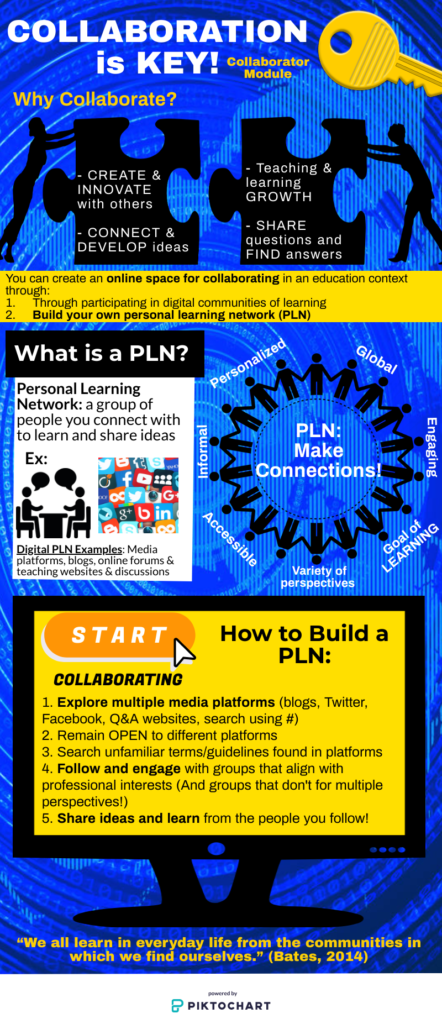
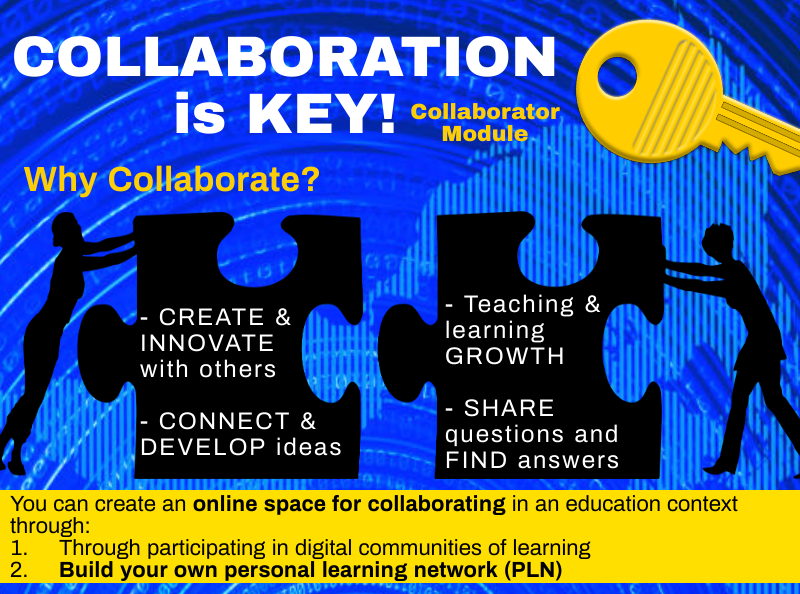
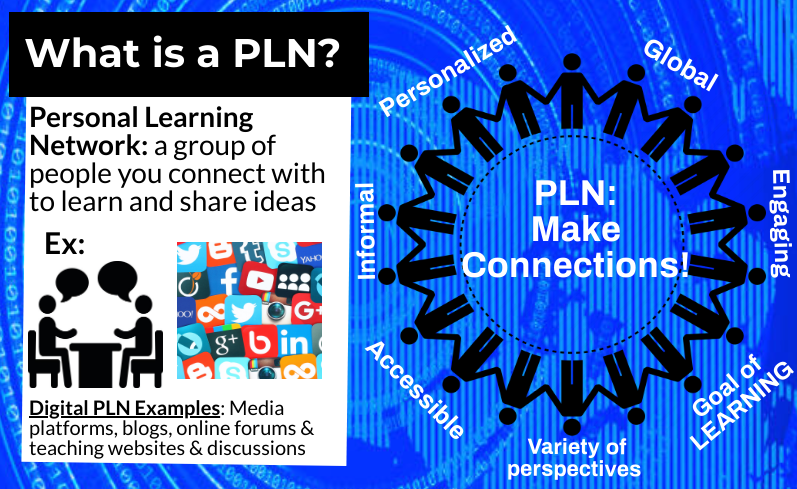
My second multimedia reflection is an infographic based on the Technologist module (https://extend.ecampusontario.ca/technologist-scenario/). In all honesty, part of me enjoyed the challenge of creating something concise that tested my (admittedly limited) design abilities, and I got the hang of Canva quicker than I thought.

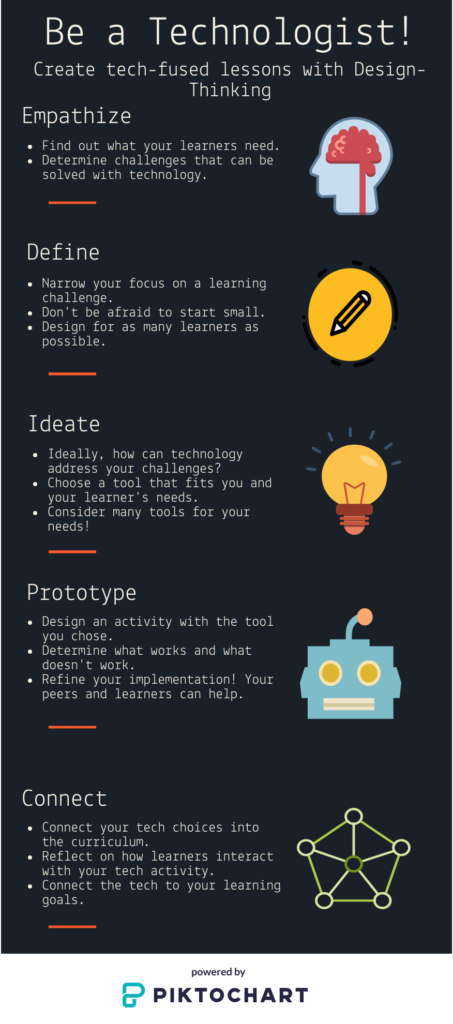
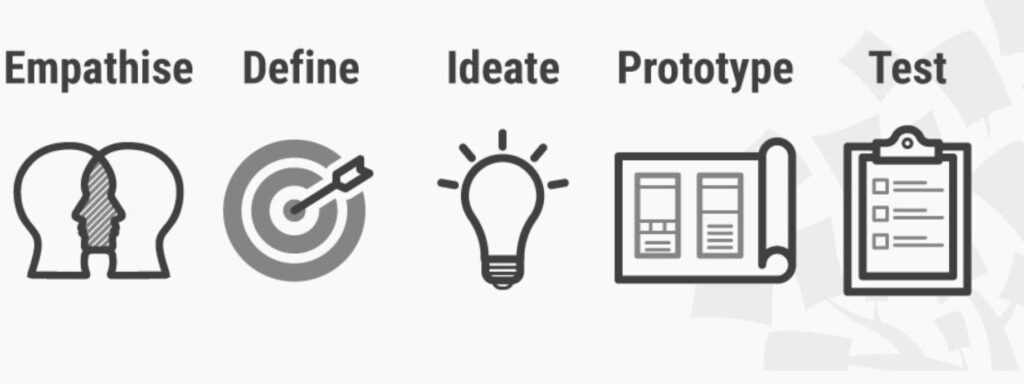
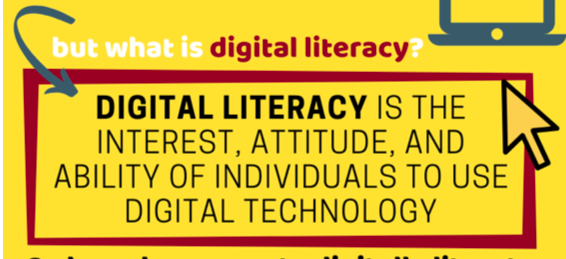
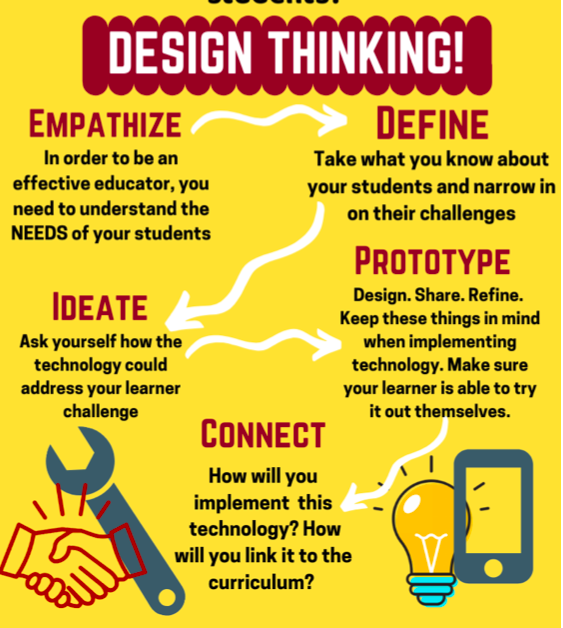
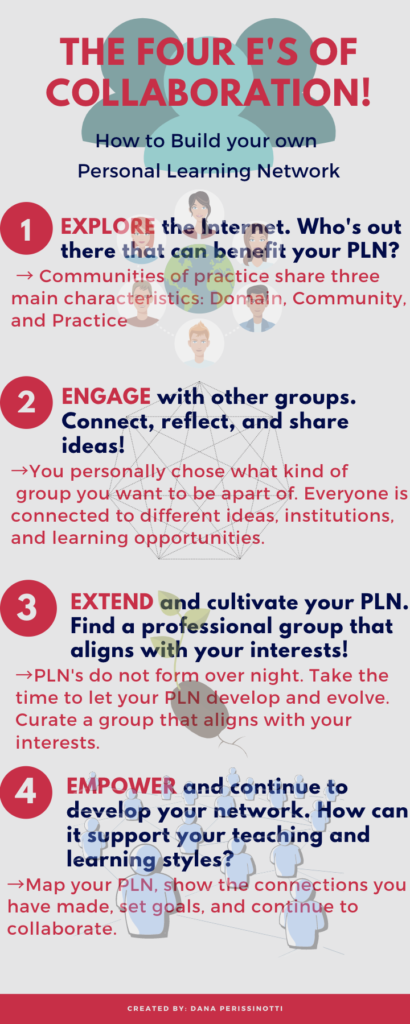
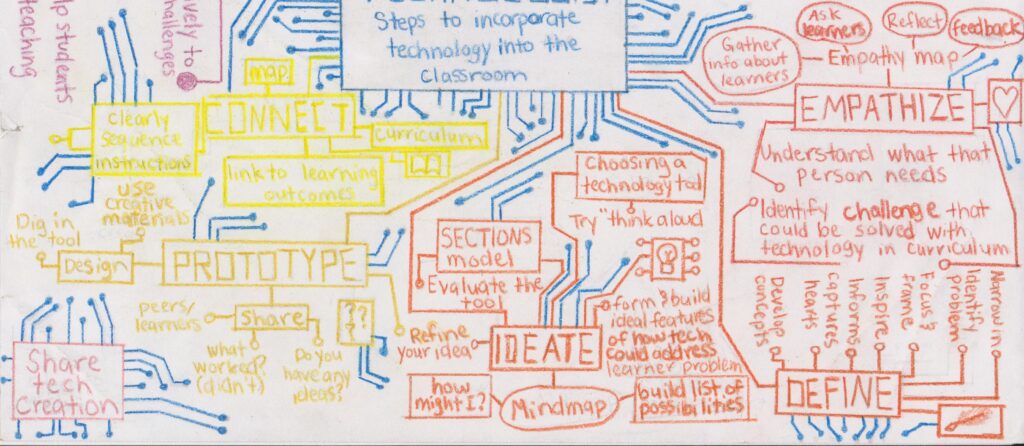
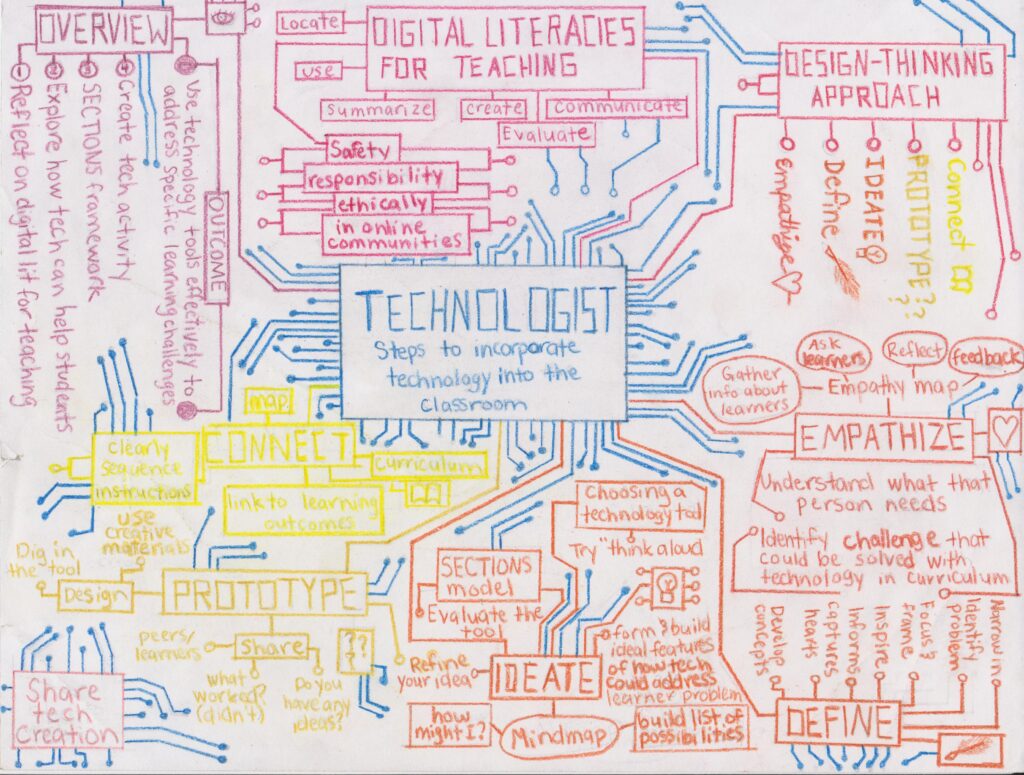
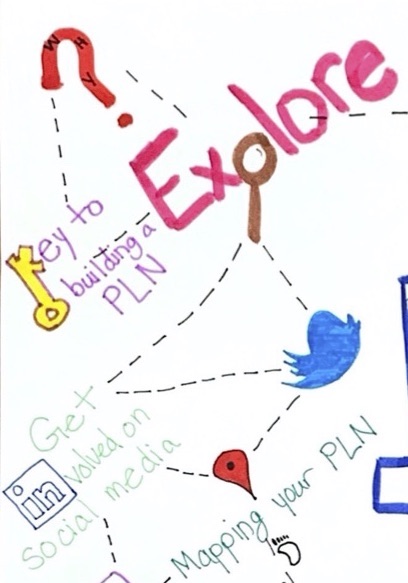
The content of this eCampus Ontario resource for educators begins with a page about digital literacy, which contains several articles with different takes on the topic. The next page is a history and explanation on design thinking. Each subsequent page is one of the five steps in the design thinking process.


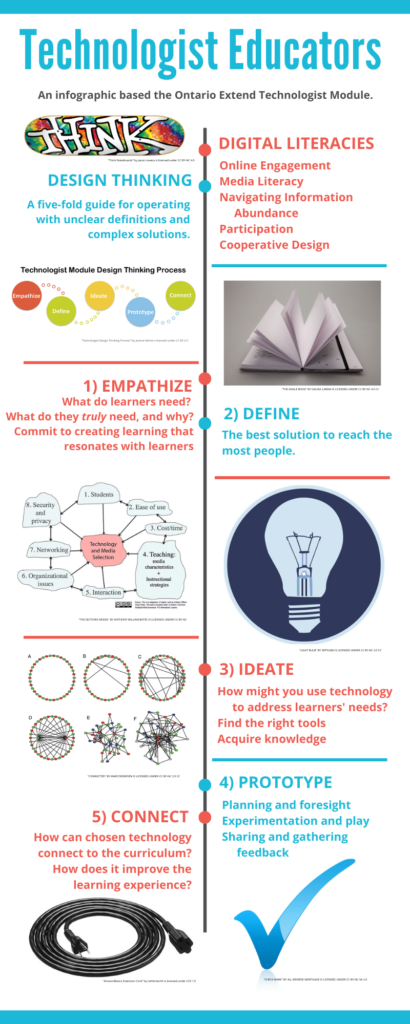
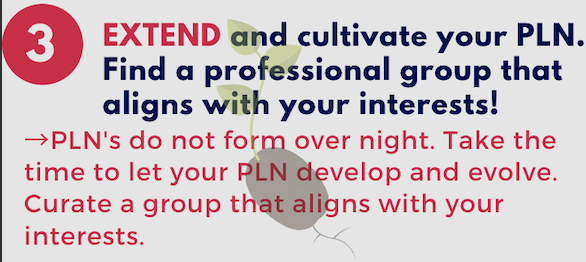
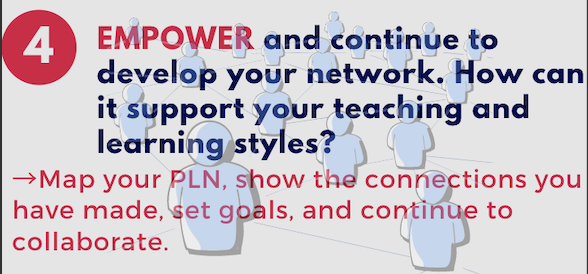
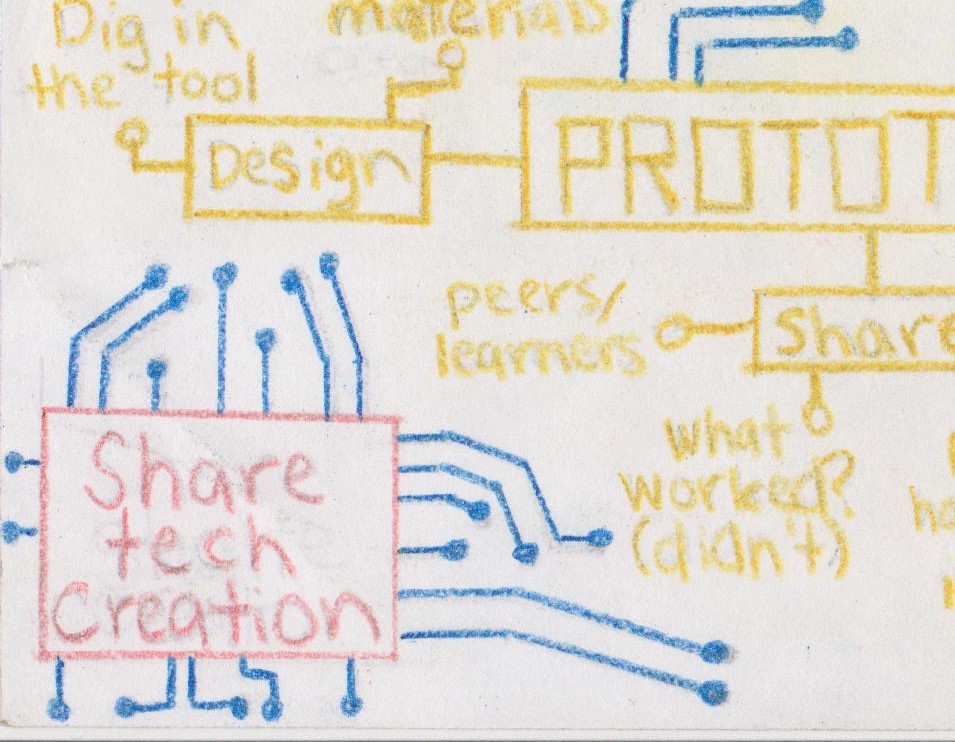
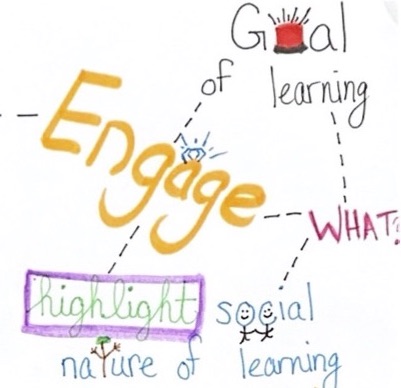
The first step is to empathize, or to ensure that planned activities satisfy a real need. Ideally, a need is satisfied on the audience’s terms in the ways most accessible to all learners. The next step is to draw on knowledge about learners in order to define a challenge or problem to tackle in designing an activity. Step three is to ideate how technology can be part of the solution to the challenge defined. The fourth step is to design a prototype, or to make a trial run using chosen technologies. The final step in the design thinking process is to meaningfully connect technology use to curriculum.

While working on this task, I tried to be aware of my own bias surfacing. I am no expert on using technology: throughout my life I have had little interest, need, or opportunity to engage much with it. However, I do try to keep an open mind.

Technology
Not quite, but not so far off.
“Technology” by Sephko is licensed under CC BY-NC-ND 4.0

I acknowledge technology’s place in today’s classrooms, and I wish that budgets, boards, and administrators could keep technology at the top of their crowded priority lists. That said, I am not opposed to using technology as much as I am wary of using it in applications where simpler methods are more practical, efficient, and friendly for teachers, students, and budgets alike.

classroom 2nd fl
Only thing missing is a class set of Chromebooks.
“classroom 2nd fl” by cayoup is licensed under CC BY-NC-SA 2.0

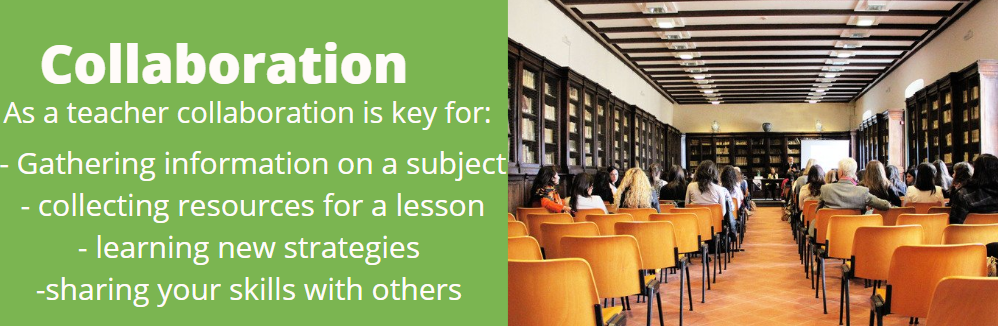
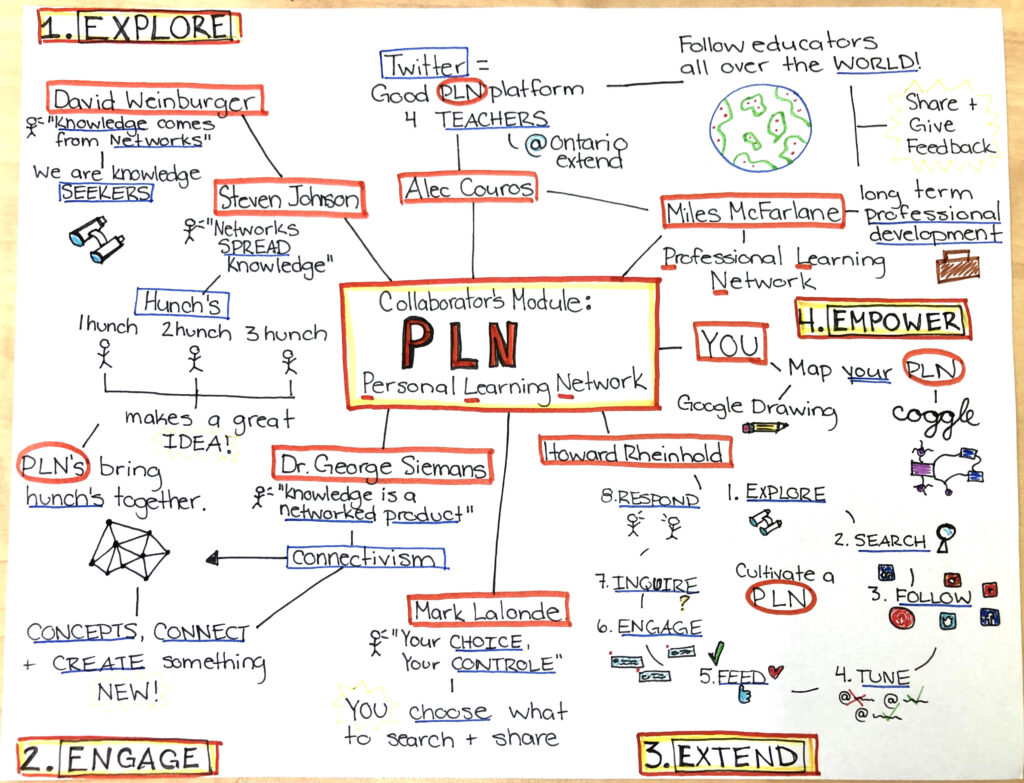
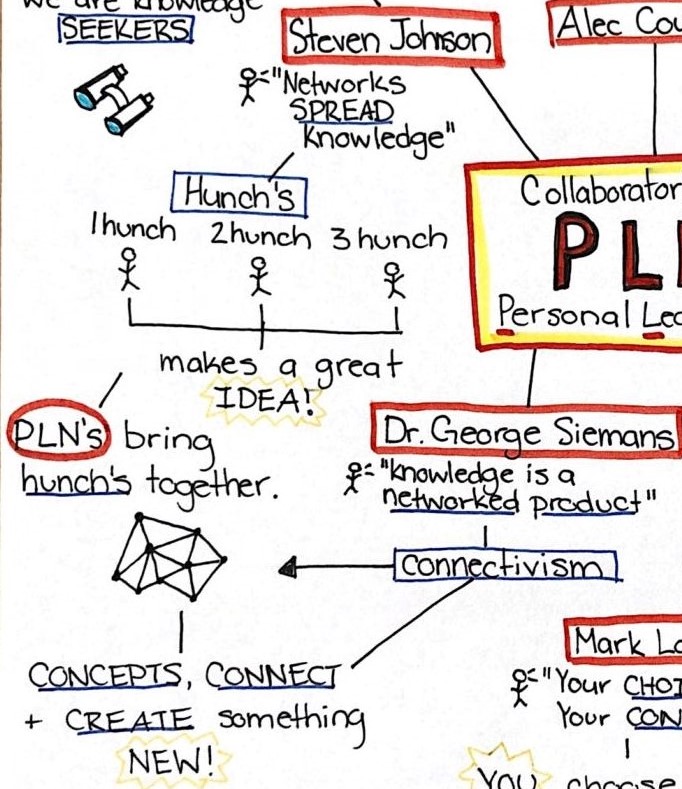
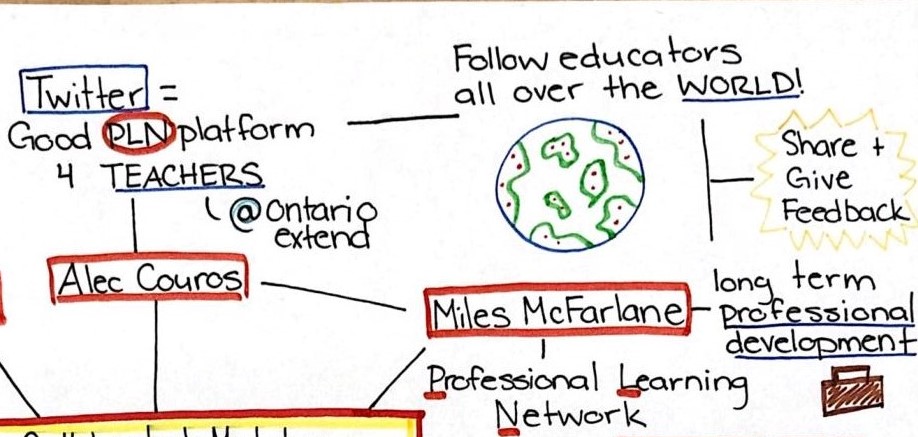
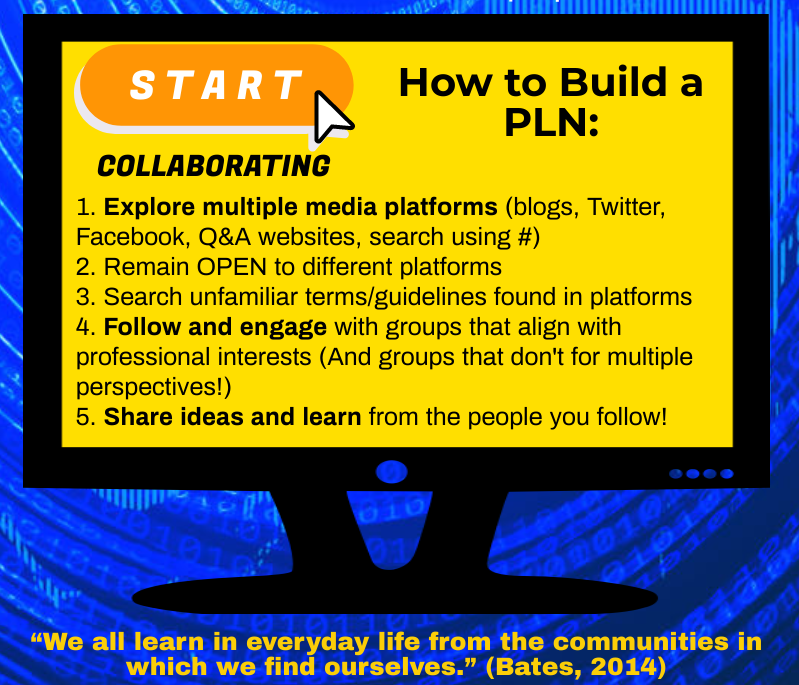
I appreciate this module’s early emphasis on digital literacies. After that point, I enjoyed some of the design concepts and recognized some of them as just being intuitive to good planning. However, I had difficulty resonating with the many rosy buzzwords and somewhat pedantic processes outlined in the design steps. My personal planning and teaching tendencies at this point are more fluid and heavily based on ongoing, candid, comfortable back-and-forth discussions with colleagues and students, and certainly less technology-based. During my time at the Faculty of Education, I have encountered and used several truly helpful technologies that I liked, though each was discovered with guidance from a colleague or mentor. In my experience, fumbling around blindly on the internet looking for new technology to enhance a lesson doesn’t work as well as sharing and networking.

Thanks for reading!

Citations:

Beetham, Sharpe, & Plymouth University. (2014, March 6). Developing digital literacies. Retrieved from https://www.jisc.ac.uk/full-guide/developing-digital-literacies

Sonja. (2019, May 5). Beginner’s Guide to Design Thinking Methodologies. Retrieved from https://www.uxbeginner.com/ux-beginner-guide-understand-design-thinking-approaches/

Technologist: Scenario. (n.d.). Retrieved from https://extend.ecampusontario.ca/technologist-scenario/


Technovate with Technograted Lessons!

Here’s a scenario: you want to implement technology into a lesson, but you find that you’re stuck.

If you’re interested in integrating technology into your lessons, then the Technologist module provided by Ontario Extend may be useful to you. In the module, one technique of technology integration is suggested by way of design thinking.

What is design thinking? I created a simple infographic, with a template thanks to Piktochart, that summarizes the steps of design thinking and how they relate to technology integration in the classroom.

Figure 1. Use design thinking to integrate technology to help your learners.

There are 5 steps in design thinking: empathize, define, ideate, prototype, and connect. You begin with the empathize step by setting out and determining as many learning challenges as you can in the classroom, then look for spaces where technology could help you out. Then you define what you’d like to address and narrow your focus. Ideate by matching a tool to your challenge and begin to prepare an activity. Prototype the activity and put it into practice, then use the experience to assess the activity’s strengths and weaknesses. Finally, after refining your activity, connect it to a broader context in your curriculum. Connect the technology to your learning goals and implement the activity.

Figure 2. If you don’t have end-goals in sight, you might not strike your target.

Giving my own take on this, I think this method is useful but I wouldn’t feel comfortable using it exactly as prescribed. When I think about applying technology into my classroom, I tend to start with learning goals that are in the curriculum or in my lesson – the things that must be covered or the things that I aim to cover- and see how I can modify and enhance them with different representations. In other words, I tend to prefer to set end-goals or clear learning destinations that I then work towards. The method of integration outlined in this module seems to start from an intentionally open and large field, the challenges of the learners, and then incrementally refines that field towards a solution that meets the learners’ goals. The danger that may arise from this method of technology integration is that by not firmly incorporating the connections to the curriculum, there is a risk to miss the mark.

I think one should also be wary of creating a dream-list of ideal features that a digital tool may have – while this is useful to to outline exactly what you’re looking for, there may not be a tool that fits your parameters. In some cases, it may be more efficient to take the inverted approach and start with a tool, asking yourself, “Okay, what can I do with this?”

Figure 3. Choose what works for you! Different problems require different solutions.

However, I don’t mean to imply that there are no strengths here – certainly, when one is thinking about incorporating technology for a lesson, you must make an active effort to meet the learning needs of your students. A hybrid approach where one keeps learning goals in mind along with learning needs can help you reach your students while keeping focus on results. Additionally, the Define and Prototype steps are powerful ideas to incorporate in lesson design.

Ultimately, I think some of this comes down to preference. Some might like to start with end-goals and some might like to start with many ideas, refining them down and seeing where they’re taken. This method of design thinking can address different kinds of problems and open your mind to different solutions in lesson design.

Figure 4. Reach your goals of technological innovation with careful and critical methods.

Sources:
Figure 1: Infographic provided by Piktochart.
Figure 2: Image taken from
https://www.krusecontrolinc.com/study-social-marketers-missing-the-mark-on-consumer-content-preferences/
Figure 3: Image taken from
https://www.liberaldictionary.com/choose/
Figure 4: Image taken from https://commons.wikimedia.org/wiki/File:Checkmark.svg

Technology: Ever Changing, Forever Useful

Students as well as teachers alike live in a modern world where technology is ever changing. Technology is constantly changing the methods that students learn and the methods that teachers teach. Digital literacy is a major skill that is taught to students in the modern day classroom. “These literacies encompass the abilities to locate, use, summarize, evaluate, create, and communicate information while using digital technologies and web-based platforms.” (https://extend.ecampusontario.ca/technologist-digital-literacies/) In order for students to succeed in the workplace once they have finished high school and post-secondary education opportunities they must be digitally literate. Educators are responsible to teach students these skills.

Design Thinking has five different steps to the approach that educators must take into consideration as they are teaching their students. Teachers must empathize with the learning process of their students. Teachers must place themselves in the shoes of their students in order to gain a sense of the information that they will absorb from their lesson. Teachers must also clearly define one problem that they wish to solve in a lesson or with a project. The must only choose one, a broad scale of problems will easily lead to confusion with the teacher and with students. Teachers must then move to the ideate point in the process. This is where an educator should have multiple ideas on how to solve the problem that they have chosen in order that it will work for all of the students inside their classroom. Teachers then must prototype. They must create a product that can be tested in the future. Teachers must create a tool or a lesson in order so that they can test it to see if it solves the problem that they have chosen. Lastly, teachers need to test the prototype that they have created. It is important that they ask for feedback from their colleagues as well as their students after they have tested the prototype in order for them to evaluate what was successful and what needs to change in the future.

Teachers must also be aware about the limitations that technology has on some students within their classrooms. Not all students have access to wifi, not all students have access to a laptop, desktop or mobile device. Teachers must be aware of the resources that students have inside the classroom and give students adequate time to complete the work asked of them within the classroom because it is unfair to assume that each child has access to the internet when they return to their homes.

Digital Literacy and Design Thinking

For my second and final multimedia reflection, I chose to create an infographic that focuses on the Technologist Module. Specifically, I made an infographic about digital literacy and design thinking. I chose to create an infographic because it’s something that’s new to me and I’m always trying to get out of my comfort zone. Honestly, I had a lot of fun making this one as it allowed me to be creative without having to be artistic. Not sure if you remember my sketchnote from my first multimedia reflection, but it was pretty rough. 

Anyway, the government of Ontario has created a website called “Ontario Extend”. This is a capacity building initiative that is grounded in the belief that the impact of learning should be the primary motivator for creating technology-enabled and online learning experiences. Its goal is to empower educators to implement technology in the classroom; and the technologist module goes into detail about how to do this. The module starts with defining digital literacy. This is a term I had honestly never heard of before, but after learning its definition, it’s pretty straightforward.

In order to create digitally literate students, it’s important to implement design thinking into your practice. Design thinking encourages educators to empathize with their students struggles in order to accommodate their needs. Over the course of my first placement, I found myself constantly incorporating technology into my lessons in order to help my students succeed. For example, at the start of a novel study unit I conducted with my grade nine students I found myself having to constantly read answers out loud in order for them to copy the right answers. This ended up taking a lot of class time, so in order to better accommodate their needs, I created PowerPoint presentations with the answers and shared them with all my students. That way, they were able to follow along with my explanation and not be so focused on copying the answers. This technology integration was small, but it really helped my students stay focused on what I was saying, which was more important than copying answers word for word. This demonstrates me empathizing with my students, which consequently led to me to define their struggle and come up with a solution. 

Overall, I believe our government is starting to do their part on incorporating technology into the everyday classroom. Having teachers implement technology in small ways is a great start at making the classroom a tech-friendly place. The Technologist Module is a fantastic tool for educators to use in order to start incorporating technology into the classroom.

This infographic was created using Canva.

The Four E’s of Collaboration

Have you ever had a really good idea? Do you want to share and grow that idea to something even greater? EXPLORE! Take your idea and share it with a community of practice. BOOM. You have created a great idea with the help of people on the Internet! It’s all about collaboration.

What is a community of practice you may ask? Well, a community of practice is a group of people with a shared passion and would like to learn more about it. Communities of practice regularly interact online, even though members may have no personal connection at all. They are tied together by a certain topic with like-minded ideas. Communities of practice have the same focus in terms of domain, community, and practice. Domain means that the group has a knowledge and skill set for a specifically focused area of interest. Community is the individuals that are a part of the group, converging and learning together on a platform such as Twitter, YouTube, or blogs. The group practices exchanging and sharing different ideas, tools, and resources. 

Being a part of the community means you are contributing to something greater than just your own idea. You want to grow your learning and teaching styles through the collaboration of others. Like Steven Johnson says in his video Where Good Ideas Come From, we are in a time and place that makes collaboration super simple. With the power of the Internet, collaboration even on a global scale is not hard. Different platforms allow for educators to come together to share ideas, outlooks, and resources with the click of a button.

ENGAGE using your Personal Learning Network (PLN). A PLN is your own personal way to learn from other’s ideas/connections/reflections. This learning can be done of platforms both formal (like a TED Talk) or informal (such as Twitter or YouTube). Whatever the case, everyone is connected to different ideas, institutions, and learning styles. This helps to enrich the learning process and provide you with the most relevant information. It’s all about collaboration.

You are able to personally chose what kind of group you would like to be in. It is all about choice and what you are looking to gain from the experience. Your learning could be focused on a certain topic, or maybe you are just open to listening to other’s ideas. Whatever the case, there are many different platforms to choose from. Dr. George Siemens talks about in his video Overview of Connectivism how he started blogging in the late 1990’s. From there, he would read other blogs, share ideas, and connect with others. Now in 2020, there are all kinds of networks for teacher to collaborate on. My personal favourite platform for collaboration is Twitter, due to the convenience of hashtags, abundance of users, and of course the use of GIFs. Networking has never been easier or more fun. Like Vygotsky’s theory states, learning is both a social and collaborative activity.

Cultivate your PLN by EXTENDING. Your PLN is not going to develop overnight, odds are you will not find a group you fit in well with your first try. It takes time to comb through and find a group that aligns with your interests and theories.

PLNs are meant to promote growth, development, and understanding. Find a group that does this for you. Strengthen your connections in communities of practice by commenting, sharing, and advising others. Intake information and output your own work to gather feedback. Search. Annotate. Browse. Find what is out there that best benefits your needs. You are not tied to the first group you join, keep extending your online growth. 

EMPOWER your PLN by continually growing and learning. Use your gained knowledge for both personal and professional growth. 

Use digital technologies to build and develop communities of practice. Adapt and elevate both your teaching and learning styles through these communities. Track your growth by mapping out your PLN. Create a diagram that helps you to visually see the people, content, and organizations you have come across. Use your connections to help you set goals, solve problems, and continue to collaborate. 

The Finished Product

Becoming One with Technology: The Technologist Module

The Technologist module is broken up into different sections that explain how to formulate ideas and connections in order to add technology into the classroom while also listening to the needs of the students, and making sure that it fits properly into the curriculum. The model itself focuses on the “Design-Thinking” model which is a breakdown of how to accomplish the integration of technology into the classroom. While looking at the module I was struck with how many times they wanted the teacher to do a mind map in order to brainstorm their new technology integration idea. They do an “empathy map” to identify a “learner challenge” within the classroom, and then another mind map to brainstorm what technology would benefit their students. It made me wonder if there were other ways that they could go about brainstorming without having to make a mind map each time.

Image of mind map

I chose to do a sketch note to summarize the module. My inspiration for it came from the title, as well as the image above. I was struck by how it looked like a circuit board. I thought that this module was much like a circuit board, as it flows fluidly around ideas and thoughts of how to improve the classroom. This was my approach for the sketch note.

I first started with the idea of how we read left to right. I wanted to draw the eye to the top portion of the design first, so I chose darker colours because they stand out much more. I wasn’t originally going to include the “Overview” portion, but I thought it was very important to understand the rest of the module. I wanted to display how the creation of new ideas flow, so I used the bright colours that fade into each other, but all connect back to the main idea of the technology integration. As you can see in the top right, I wanted to connect the Design-Thinking approaches with their colours, so that the sketchnote was even easier to view and comprehend. As a student, I like some of the ideas that it brings to identifying and working through problems. The idea of mind mapping so much is not really of interest to me, but the rest of the process would be helpful for me when creating lessons.

Image of the top portion of my sketchnote
“Design-Thinking Approach” section of my sketchnote.

I wanted my sketchnote to seem very structured, but also a bit like a giant mind map, as this really stuck with me, as I mentioned before. I wanted there to be more images and examples within the actual module, so I added some photos to help connect the ideas to images. For example, I put a feather pen next to define because it reminded me of the dictionary and writing out fancy definitions. Prototype is a collection of question marks because there is still many questions that come with this phase in the process.

Bottom portion of my sketchnote

As I was about to finish, I checked the “Module Checklist” tab and noticed that it mentioned “Share tech creation”, so I wanted this to stand out as a final thought at the very end of the process, and the sketchnote. This is the portion of the module I feel like I would struggle with most. After all the entire process and finally releasing it to the world, I worry that people won’t like it. Much like this post. Whenever you put something out there that you have worked so hard on you always hope that people will also appreciate it. This is why I wanted this section seperate from the rest. It is the portion that has such a different mindset from the rest of the process, and this is why it is disconnected.

“Share tech creation” picture from my sketchnote

I hope you will be able to read my sketch note, and all the colours came up clear within the scanned image.

Image of Sketchnote about Technologist Module

As a teacher, I like the idea of the module and what it is trying to do, but I struggled with having to use it in a classroom. I know that it is to help incorporate more technology into the classroom, but it is lacking examples. I know that within the “scenario” tab it has a video about “Terry” and how he has become stagnant in his creativity with his course. It explains how he went through the technologist model to accomplish a new tech integration into his classroom. However, the module does not touch on some other opportunities that the teacher could take. I like that this could work for some classes and with some teachers. The idea of working through problems using this method is very helpful, but I just need some more examples of what the overall process looks like for some teachers. Maybe some testimonials and real life situations would help me connect to the module more. Overall, I think that this module would work in some classrooms, but not every class or educator would benefit from it.

I Get By With a Little Help From my Friends

The collaborator module is a great showcase of what a personal learning network (PLN) can do for an individual. This module is broken down into 4 sections; Explore, Engage, Extend and Empower, and I go further to outline these sections with my infographic. Since working with this module, I realized I have been utilizing my peers and relatives as a PLN to help my learning and improve my teaching philosophies. Now, because of the collaborator module I have the subject and content knowledge to express myself as to why my PLN helps me learn and teach.  

A personal learning network is a way of describing a group you connect with to learn, by sharing ideas back and forth, to posing questions, and learning from the experiences of others. Face-to-Face connections are great in any network, but the collaboration module specifically focuses on the use social media such as Twitter, Facebook, Youtube, The Educator’s PLN, and so on. These types of online collaboration tools are great sources of information since they are always online and available. As highlighted in the Explore section of the Collaborator module found on https://extend.ecampusontario.ca/collaborator-explore-collaborate/, collaboration is key in the spread of ideas. Furthermore, I have found that I have had success in my academic career and in my short experience as a teacher, by using my PLN of former teachers, peers, and social media as a great source of input, ideas and references.

The Second aspect of the Collaboration module covers Engagement ( https://extend.ecampusontario.ca/collaborator-engage-personal-learning-networks/ ) The major themes of this section involve the proper use of a PLN, as it requires input in order for others to want to collaborate with you. There is a give and take to making social interactions work, and it is no different with a PLN. Making an effective PLN includes: ownership, independence and user self-determination Learning networks should also include trust, openness and integrity. What if you don’t have a PLN? Where should you start: find a professional group that aligns with your interests or profession like ETFO or OSSTF. Use your peer groups, who better to ask a teaching related questions than a fellow teacher! Find others on social media. Strengthen those connections by contributing, either by commenting, sharing or posting to these groups. As a new teacher, I lack a stockpile of lesson plans and ideas. In an attempt to circumvent this problem I have organized with a small peer group who will share lesson plan ideas back and forth, as well as sharing templates over the internet. This module helped me understand the importance of collaboration when working with a group of peers. This example constant engagement in the PLN shows how making strong connections and makes others more inclined to share their ideas, while also benefiting everyone in terms of new resources and classroom tools.

The Extend Module found here: https://extend.ecampusontario.ca/collaborator-extend/, stresses the point that maintaining a a personal learning network takes effort. They require input, and constant adjustment to align with your profession, it is also crucial to involve a wide variety of individuals in order to reduce personal bias. Following only like-minded individuals will narrow someone’s point of view. Without introducing other points of view that challenge and change our thoughts, it is possible to fall into an “incubation chamber of ideas” or filter bubble; where by only following people with like minded views, the views of the individual becomes more biased. Introducing others whose’ beliefs don’t line up %100 with yours is good. Their points of view can lead to new thoughts or ideas, and their methods of learning could be shared, and ultimately your ways of viewing the world could be changed for the better. Collaboration between PLN’s and more specifically teachers is a great way of bettering the classroom and enhancing the lessons we give to our students.

light bulb mind map
retrieved from: https://cdn.pixabay.com/photo/2017/03/07/13/03/mindmap-2123973_960_720.jpg

Empower is the last portion of the Collaboration module, it can be found here : https://extend.ecampusontario.ca/collaborator-empower/. This final module asks the individual who should represent their PLN. For me, My PLN is relativity small and mostly face-to-face. My mother was a teacher for 33 years, so I am using a lot of teaching styles and classroom practice ideas that she has taught me. I even found my self using some of her methods of classroom management during my teaching placement, Furthermore, I also had a great group of peers to ask for ideas and offer mine as well, we shared lessons gave each other feedback on our work, I found it to be very beneficial, as it let me know what is working in my class and what is not. After learning various aspects of digital pedagogy, and the importance of of an online presence in a PLN I will be better suited to grow my PLN in the online community by reaching out and offering my thoughts and ideas to others of search of a collaborative member of a learning network.

Ongoing learning and discovery through PLN’S

The collaborators module was a resource that laid out the important elements for understanding, and creating a successful Personal Learning Network.  The layout of the module, and the ways in which the information is presented was a unique collage of ideas from multiple professionals who have educated opinions, and research on the topic of PLN’s- which in a way makes it in itself a successful PLN. This is why in my Sketchnote, I chose to make the names of the contributors the main subtopics (squared in orange) as I found they were the core of where the information is coming from- collectively they are all their own collection of “hunches” as Steven Johnson mentions in the Collaborators Module

My Sketchnote summary of the Collaborator’s Module by Ontario Extend

 I wanted the viewers of my Sketchnote to see that each one of the contributors hunches are all woven together by their ideas, and contribute to the same topic– the PLN. This is also why certain ideas are interconnected by the black lines, as I found the ideas of multiple contributors link to one another. Such as Dr. George Siemans’ idea of connectivism and Steven Johnson’s idea of hunches. This Sketchnote doesn’t need to be read linearly, you can start anywhere, and easily flow through each contributor’s thoughts and ideas.  

That being said, the information in the module was very helpful in proving the value of Personal Learning Networks for educators.  Both Alec Couros, and Miles McFarlane talk about Professional Learning Networks, and the development of teachers professional knowledge.  As educators we have the ability to access information from all over the world.

I’ve started creating this collaborative experience in my own professional learning while creating french worksheets, and assessment strategies for the credit recovery program at my practicum school. Before I got started, I referred first to Howard Rheinhold’s 8 steps of cultivating a PLN.

So, from there, I explored the web and I found the website Tes, a website created for educators. Within their resources tab, they have educators from all over the world who upload their lesson plans, worksheets, activities etc. There are opportunities to buy, or download these shared resources for free, as well as opportunity to comment and give feedback.  Fellow teachers will kindly point out minor grammar mistakes, ideas for enhancing, or simple words of encouragement and gratitude.

With the help of this network of teachers, I didn’t have to start all my planning from scratch, I downloaded worksheets such as this one. It is a fill in the blank, with picture association and word bank.

I then took this fill in the blank worksheet, and built other lesson’s and resources around “Present Tense Verbs”. In the following picture you can see the resource I created using Canva.

I also created this document to complete the lesson. In this worksheet the students would now write their own personal description paragraph.

My next steps would be to upload my work and continue to contribute to Tes, by following other educators, and responding to users who might comment on my work. The collaborators module by Ontario Extend has empowered me to get kick started, and to take agency over my own learning.

All Right Stop, Collaborate & Listen

Ice is back with a brand new invention.

Now I apologize if my intro got Ice Ice Baby by Vanilla Ice stuck in your head; I know it is stuck in mine.

Now taking a look at eCampus Ontario’s Collaborator module, there are four tabs on the side breaking down the reasons to collaborate and how to effectively build a personal learning network (PLN). These four tabs are as follows:

  1. Explore: Why Collaborate?
  2. Engage: Personal Learning Networks
  3. Extend: Cultivating Your PLN
  4. Empower: Map Your PLN

As stated above, the Collaborator module presents the idea of the importance of building our own PLNs. It outlines some techniques to effectively incorporate a PLN in the world of education and teaching. When thinking of the term network, a few things come to mind. A social network is probably most prominent (and will be touched on later), and also a neural network. That was my aim in drawing out the letters ‘PLN’ above – to depict a network.

1. Explore: Why Collaborate?

The first sentence you read when on the Explore tab of the collaborator module is “Being open to collaboration is a key to building a personal learning network (PLN).” There are a variety of modalities while exploring a PLN. We can use face-to-face, text messages, and even social media. By getting involved on social media, there are many tools available to us fellow educators and students. The “professional” networks such as LinkedIn can intimidate but also cultivate students’ learning, whereas something as simple and popular among students like Twitter, can truly be powerful. Having students explore this tab on their own will guide them in the right direction to start a collaboration process.

2. Engage: Personal Learning Networks

As the weird in-between of being a student and somewhat teacher, or the best of both worlds as “student teacher”, we know all about engaging activities. As a student, we want to be engaged, whereas as a teacher, we want to be engaging. This tab outlines some great resources for the importance of having a PLN. It also introduces the idea and definition of a PLN, as shown in the first video posted on the tab – “What is a PLN?” by Marc-André Lalande. The true goal of learning is to promote growth, development, and understanding. This leads into highlighting the social nature of learning by using Connectivism – which sees learning as a social and collaborative activity.

3. Extend: Cultivating Your PLN

Cultivating a growth mindset is a hot topic within the Faculty of Education here at the University of Windsor. However, with every strength, comes a weakness. Students and teachers can build a PLN that strengthens their learning, but heed one caution: Beware of Filter Bubbles. Letting a PLN flourish to its full potential is great. We want to be able to explore and extend our learning by exasperating every detail we possibly can. We are able to do this by constructing a great professional PLN. However, filter bubbles can pop up during our online searches. Algorithms and online biases will hinder our exploration – so being aware that these exist can also strengthen our PLN.

4. Map Your PLN

Empowering students and educators provides insight to their PLNs. At first glance, a PLN may be seen as informal. However, this tab encourages students and teachers to map out their PLN and draw connections (as I have depicted above). The power of social media builds and draws connections without the user realizing it! The term mapping can also refer to a geographical context within a PLN. With social media, we are able to connect to other professionals and colleagues across the globe and continue to cultivate our teaching AND learning. This draws (literally and figuratively) a huge connection to the power of Twitter and other social networking websites.

Final Sketch-note showing networks

Now seeing the sketch-note pieced together fully makes more sense than the cropped images. The black slotted lines represent networks and also show the different connections through the tabs outlined by the collaborator module. There are a multitude of commonalties throughout the module, and I thought it would be a creative touch to portray a network while introducing networks! Thanks for taking the time to explore my multimedia reflection – as you can probably tell artwork is not my strong suit.

Collaboration is Key!

Hello!

I chose to create an infographic using Piktochart for my artifact summarizing the collaborator module. To take a look at the module itself, please click this link: https://extend.ecampusontario.ca/collaborator-explore-collaborate/

The first part of my infographic includes the title and the first section of the module, explaining why we should collaborate with others. I read that “Being open to collaboration is a key to building a personal learning network (PLN)” on this page and that immediately stood out to me as a potential title for this artifact. I narrowed the many reasons to collaborate down to 4 main points: to create and innovate with others, to connect and develop ideas, for teaching and learning growth and to share questions and find answers. I chose to use these points as they have a lot of action buzz words and they stood out as key reasons why I, as a student and teacher, would be drawn to.

The next main section outlined in my infographic is the definition of a personal learning network, as well as features and types of connections a personal can make by creating and maintaining a PLN. I tried to use single words to describe the features/perks of a PLN so I didn’t overwhelm the eye but felt like I had to include a bit of text in the explanation of the PLN, as this concept needs to be very clear in order to understand the module.

Lastly, the bottom of my infographic is a list written over the image of a computer, which I thought was fitting for the section about building a PLN online. This section discusses some tips on researching and opening yourself up to a variety of platforms and opinions to enrich your learning and teaching.

I tried to use visuals that represented unity and togetherness. The puzzle pieces and circle around the “PLN: Make Connections” section both have images of people connecting in order to create the picture. The puzzle pieces are being pushed together by two people, as is the circle made up of people holding hands. I wanted to use these specific images because, when it comes down to it, the collaborator module is providing us with information on how to build a community of people that we can work with, whether it be face to face, through email or several online platforms.

Ironically, I chose the collaborator module but didn’t collaborate with any other minds because instead of choosing a template to build upon, I decided I wanted to start from scratch and use a blank template on Piktochart. As a student and teacher, I find that I am always trying to reinvent the wheel. I want all of my resources to be completely made by me, using my own knowledge and experiences to guide my choices. It is a huge waste of time. There is a part of me that feels so accomplished when I create something ‘from scratch’, which is never completely the case anyway, but I like to think it is. This bleeds into my other jobs and hobbies as a choreographer, drama teacher, etc. I refuse to use someone else’s ideas and resources online and I actually watch dance videos of a song I’m choreographing and make note of which moves are being used so I DON’T use them.

This module has reinforced my realization that my previous way of thinking is ridiculous! When there is information and resources created and accessible to me, I should be using them. I am limiting myself by trying to be ‘independent’. I am one person who has had one set of experiences and it is wrong of me to only draw from these experiences as my students are all unique and have all lived through different things. I need to expand my knowledge and work with others to create more accessible and inclusive lessons that incorporate ideas of both my own and others!

Tagged