For my second multimedia reflection, I decided to do an infographic on The Technologist Module using Canva. I enjoyed making the infographic as a first time Canva user, because this website was very user friendly and easy to navigate. Although, I did prefer making the sketch note for my first multimedia reflection, since I could more freely express my creative side. I found with Canva I was still able to add creative elements, but I would much rather draw than work online.
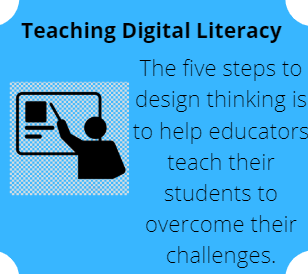
The technologist Module is a great resource created by the Ontario government for educators to enlarge their knowledge on digital literacy and design thinking to better assist their students in this technology filled world we live in.
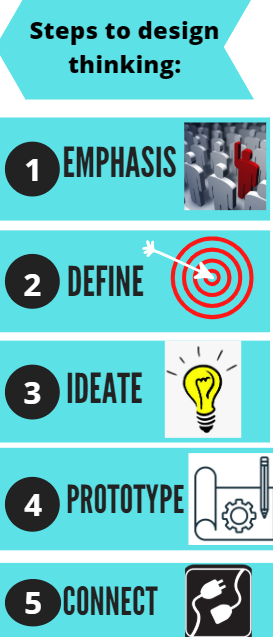
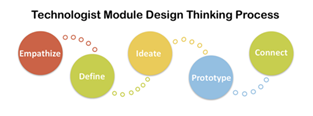
Design Thinking is broken up into 5 easy steps to help learners with any challenges they face with technology. The first step is putting emphasis on understanding the learners needs to be able to assist them properly. The second step is define, which is for identify the problems or challenges the learner is having based on the needs you just discovered. The third step is ideate, which is for brainstorming solutions to your learners problem or challenge. This can be done by asking yourself questions such as “How might I?”. The Fourth step is prototype, which is where you would try out your solution to fixing the problem or challenge according to the learners needs and addressing feedback. Lastly the fifth step is connect, meaning connect your integrated technology to the curriculum content.
This design thinking strategy plan should be used in all classrooms to improve the digital literacy of educators as well as students. By incorporating this into classrooms, it will get learners more familiar with digital literacy and higher their level on the SAMR scale.
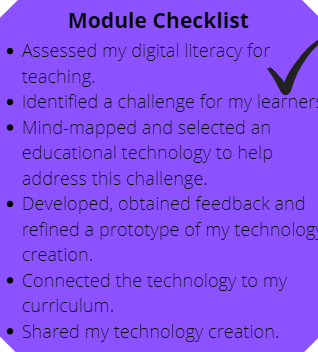
After following the five step plan for design thinking, here is a checklist to see if you as an educators are using the technologist module approach accordingly. If you can not check everything off this list, those are areas to improve on and put into your feedback.
Overall, I found the technologist module approach very educational and I look forward to integrating more technology during my second practicum.
For our second multimedia reflection I decided to look at the Technologist Module and create an Infographic (attached here). At first glance the module seems straight forward with little information, but multiple hyperlinks embedded in the module lead to an abundance of information to be discovered. After sifting through all the information, the main take away was how to properly incorporate technology into your classroom by using a design thinking approach
The design thinking approach encourages the educator to first see through their student’s eyes to identify where they are having problems. From this understanding it is a step by step approach allowing the educator to modify and incorporate technology into their lesson which addresses their students needs. It is important to approach every lesson with this open minded approach as it allows for differentiation in an educators teaching, which is a key part of my pedagogy. Once the students are known you are able to make specific adjustments based on their needs. Having particular needs should not penalize a student but as teachers we should embrace their unique perspectives and attempt to nurture them.
Differentiation looks at the variety of differences and allows for adaptability where it is necessary. In theory this sounds relatively easy, but it is much more difficult to execute properly in practice. Looking back at my first practicum I realize that using design thinking for differentiation is something that I did not achieve. Incorporating technology into my lessons was something I found hard to do as my extent to this was PowerPoint slides. My main goal during my first placement was to ensure I am relaying information to my students. This was defiantly a more teacher centered approach, not fully out of chose but simply because of the novelty of my teaching experience. As I mature in my career my goal is to adapt a more human centered approach using design thinking and technology to present information to my students in ways that will reach all of them.
When it came to technology I never pictured it being a core appendix to my teaching. I believe this is due to many of my own high school teachers, who in SAMR terms used technology as a substitute. I saw no functional purpose for technology when it was used this way and because of that I never imaged myself using much technology in my own teaching. The more time I’ve spent in the Digital Technology class and exploring the technologist module, I’ve realized that if it is used correctly technology can greatly enhance lessons.
Each day technology becomes more core to our everyday life, as educators we are given the opportunity to create lessons that were not even imaginable fifteen years ago.
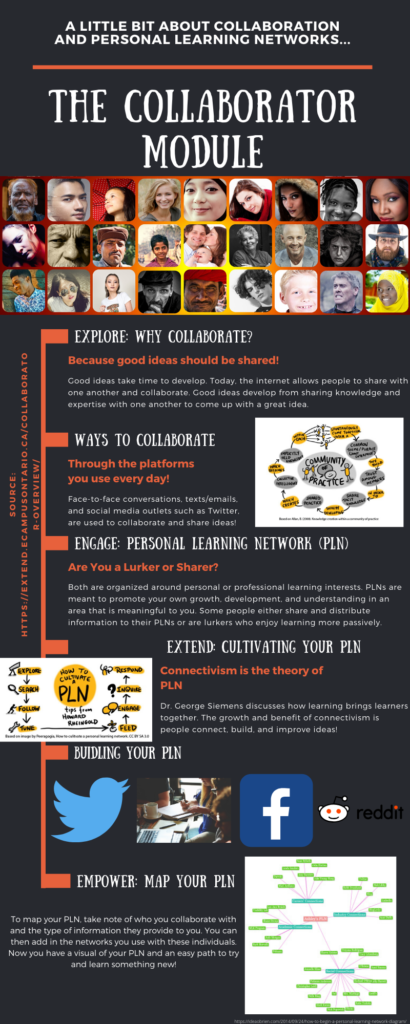
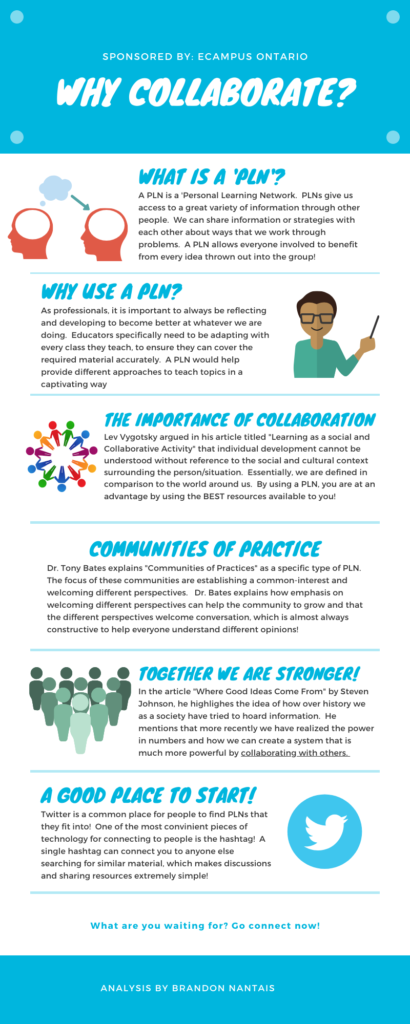
For my Reflection, I decided to design an infographic to summarize the collaborator module we were tasked with exploring! This is only one of the modules presented by Extend Ontario ELearning where you can check out the other modules surrounding elearning! Keep scrolling if you want to read more about the collaborator module and a reflection that goes along with my infographic.
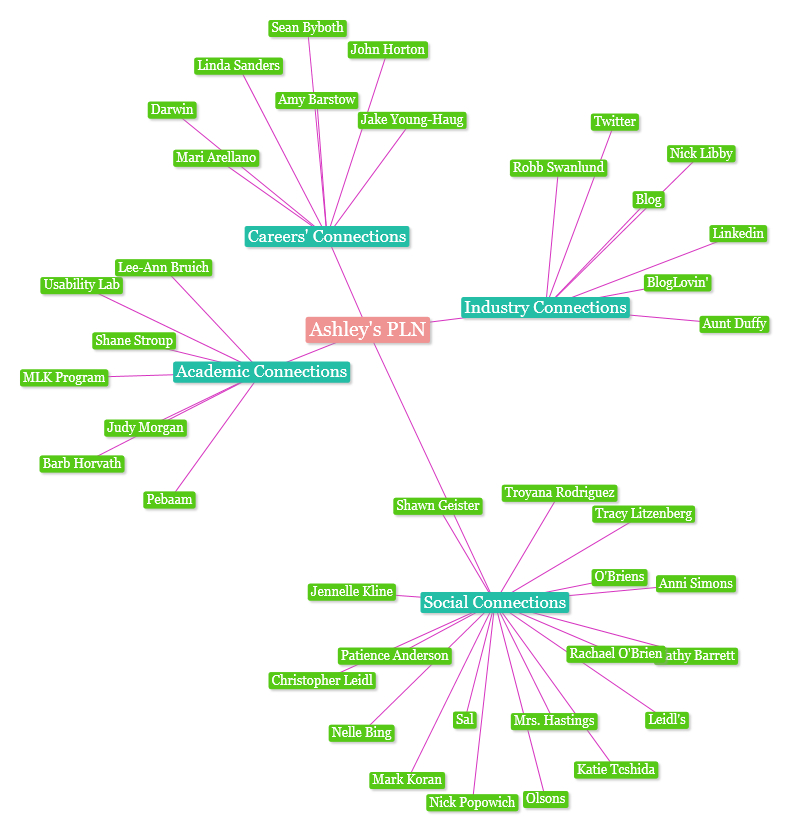
I decided to organize my infographic in this way because I believed it would be easy to follow and summarize the key points of the module so others can get the main idea without browsing through the entire module themselves. Here, I add some photos from both the module itself and an extra picture to try and visually represent what a completed Personal or Professional Learning Network (PLN) map would look like. Let’s dive a little deeper into it!
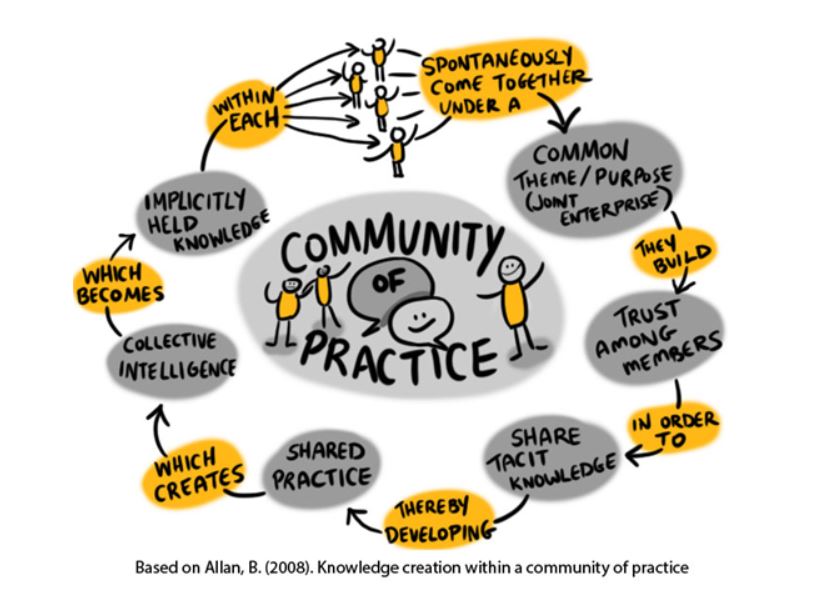
The first photo I added is about community practice from the Explore: Why Collaborate module. It shows the way that a learning community or PLN comes to develop. People with similar learning interests share with each other to create a thread of information for others to either follow or participate in. I decided to place this diagram into my infographic as it can help readers see the development of a community with the same interests, both professionally and/or personally!
The second picture from the collaborator module comes from the Extend: Cultivate a PLN section. It shows that there is a process to follow when cultivating your own PLN. You can explore what is already out there concerning your learning interest and then how to start participating in different PLNs! I thought it would be good to add this picture since it would be simple to follow and hopefully one could understand what goes into the making of a PLN.
The final picture I added was from an outside source that is a blog about A Technical Writer’s Guide to the Galaxy by Ashley Idea O’Brien. I thought their picture perfectly represented the type of idea they were going for in the Empower: Map Your PLN section. It includes an activity where they ask you to create your own personal map of your PLN so you could have a visual representation of where and who you get information from!
Feel free to leave a comment and let me know if you have any questions or constructive feedback!
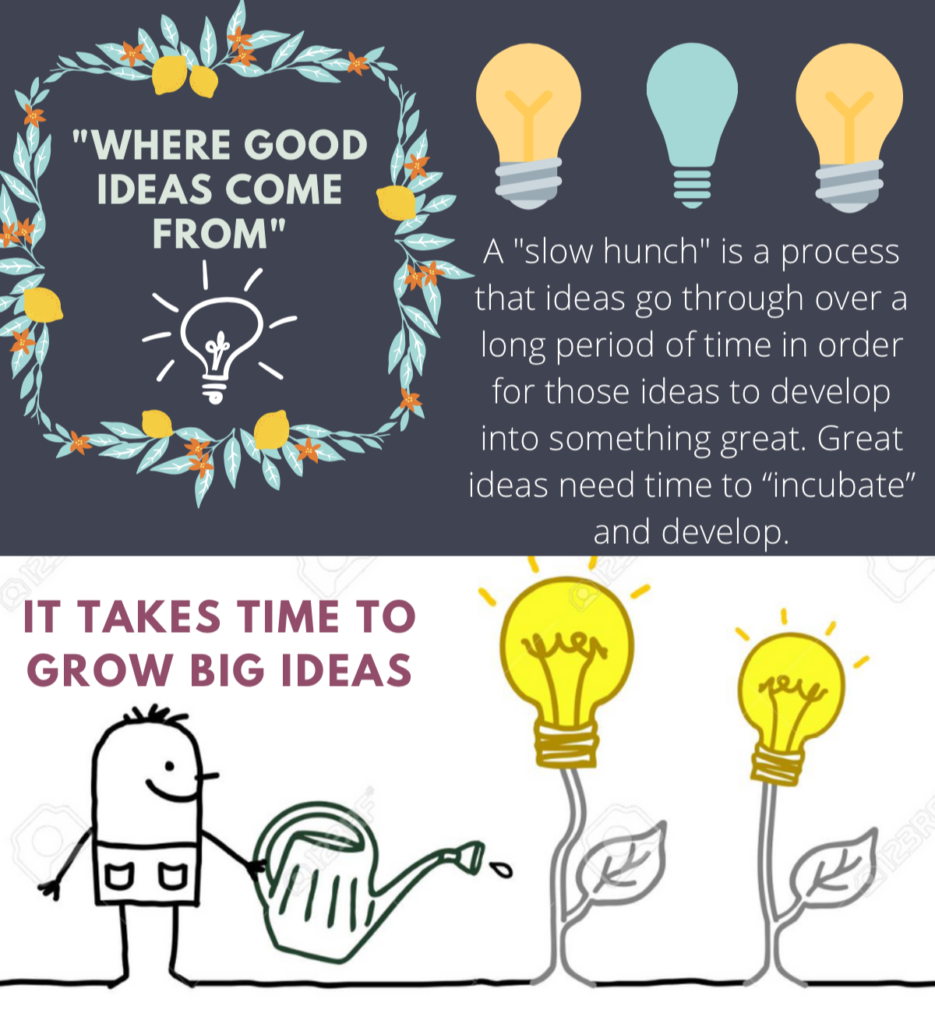
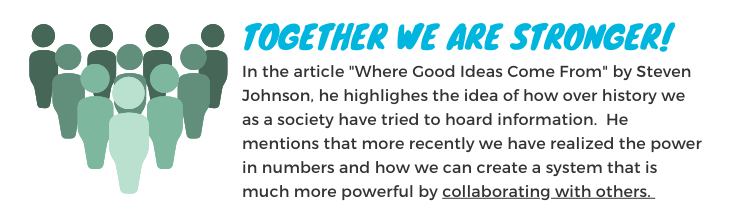
For my blog post, I decided to create an infographic using Canva to support and summarize the ideas presented in Steven Johnson’s video “Where Good Ideas Come From”. The first main idea in his video that caught my attention was when he said that there are patterns that can be observed when creating environments that support innovation. I thought this was interesting and I wanted to keep listening to the video and learn about these patterns and how I could possibly implement similar strategies into my classroom that would support the same kind of innovation and creativity. In the video, Steven describes the concept of a “slow hunch” which he says is a process that ideas go through over a long period of time in order for those ideas to develop into something great. Great ideas need time to “incubate” and develop. He also talks about how sometimes one “hunch” or idea needs another “hunch” to come together and create something better. The collision of these hunches creates collaboration among individuals who all have great ideas who come together to share ideas and have breakthroughs.
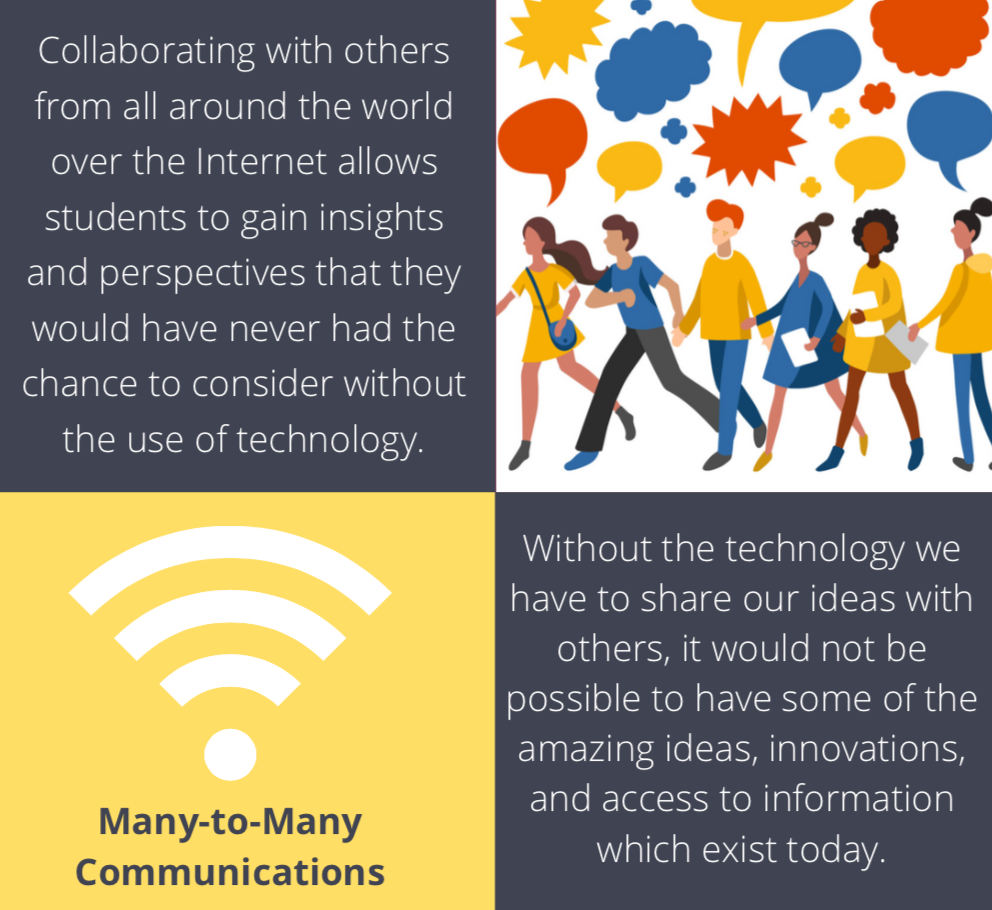
Modern technology has allowed us to connect and collaborate with other people that we would have previously not had the chance to communicate with which has the potential to create such breakthroughs. Without the technology we have to share our ideas with others, it would not be possible to have some of the amazing ideas, innovations, and access to information which exist today.
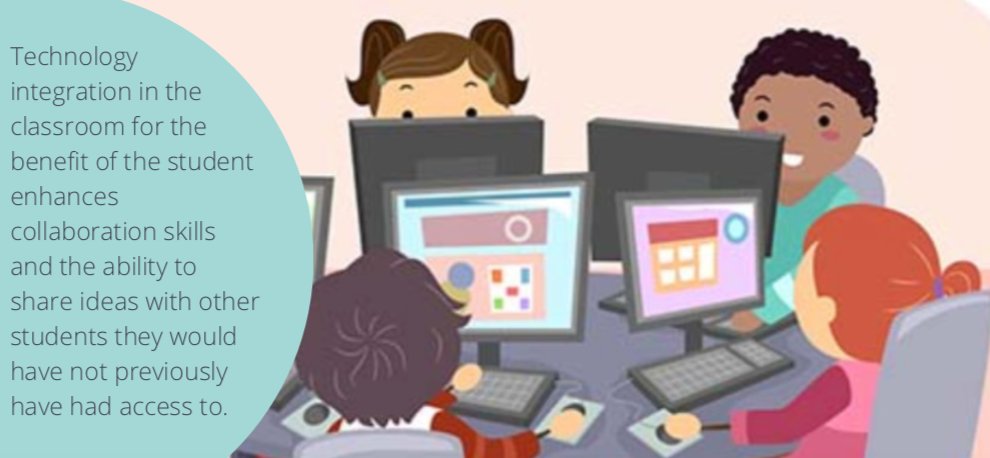
This type of collaboration is essential to our education system. I want my students to feel supported in taking time to develop their great ideas and going through multiple steps in the process to develop meaningful ideas that they can go on and share with others and connect or collaborate with others to further develop those ideas. Collaboration amongst peers in the classroom is beneficial, but collaborating with others from all around the world over the Internet allows students to gain insights and perspectives that they would have never had the chance to consider without the use of technology. This video was a great example of how collaboration can lead to the development of great ideas and is a great video for educators to consider in relation to technology integration in the classroom for the benefit of the student.
Being a teacher can be hard at any time. No matter the era. I imagine teachers had difficulties long before the modern public education system and today is no different. There is much disagreement and opinions on bringing digital tech into the classroom. I think we need to look out how we bring tech into the classroom. Simply, allowing device time as a reward is not the way to go. Lucky for us educators, there is a system set in place if your classroom is being left behind in this digital society. The Technologist Module can help!
I decided on creating a Twitter essay which was more difficult than I planned. I wrote out what I wanted to say but ended up changing the entire work to accommodate Twitter standards. I never use Twitter and only made an account for this class. Since then, I’ve only checked for what’s trending. For this artifact, I began by introducing the Technologist Module and breaking down the steps of the module. As I continued, my artifact had took a new route with almost every Tweet to try to stay within the character count. As I progressed I seen the advantages and some disadvantages of this format. Nevertheless, I am eager to try this approach in my classroom. I hope you enjoy.
1. In a society that is dependent on Technology it is imperative, as educators, that we prepare students so they can thrive in the digital society after school. How do we accomplish this?? By using the Design-Thinking approach in the Technologist module set out by @ontarioextendpic.twitter.com/9Zkn7bxw66
In the evolving field of education, technology is playing an increasingly significant role for teachers and students in the classroom. New technologies are constantly being created to enhance student’s learning #UWinDig#OntarioExtendpic.twitter.com/HA8YEx4hVi
While new and experienced teachers are constantly being told to embrace educational technologies, the sheer amount of choice and complexity in these technologies can make this a rather daunting task. Educational technologies must be reviewed for their ease of access, terms of service, and level of modification to the classroom. These technological resources require the teacher, as well as the students, to have some prior digital skills and literacies. This can cause issues if not all students (let alone the teacher) have a similar level of digital literacy. The Ontario Extend Technologist Module looks to alleviate some of these issues by offering a wealth of digital teaching resources. These resources help to improve and expand teacher’s digital pedagogies, as well as develop student-oriented framework for them to learn as well.
For this reflection, I decided to summarize the technologist module in the form of a Twitter essay. Twitter is a platform I use daily in my personal life, so I wanted to try using it in in an educational capacity. In the Twitter thread, I first summarize the sections and main resources in the module. I then connect to the module to topics we have discussed in class, such as Bloom’s taxonomy and the Cynefin Framework. The technologist module connects to Bloom’s taxonomy by utilizing the cognitive skills of analysis, evaluation, and creation in the design-thinking approach. These are the most significant skills for student learning, as they require the most student agency. The module also related to the Cynefin framework by falling under the complex and complicated domains. I hope you enjoy my Twitter essay, feel free to log into the platform if you wish to share or provide feedback!
By familiarizing themselves with the technologist module, new and experienced teachers can improve the quality of students education and address unique issues that may have previously been ignored. #UWinDig#OntarioExtendhttps://t.co/852mOsQi20
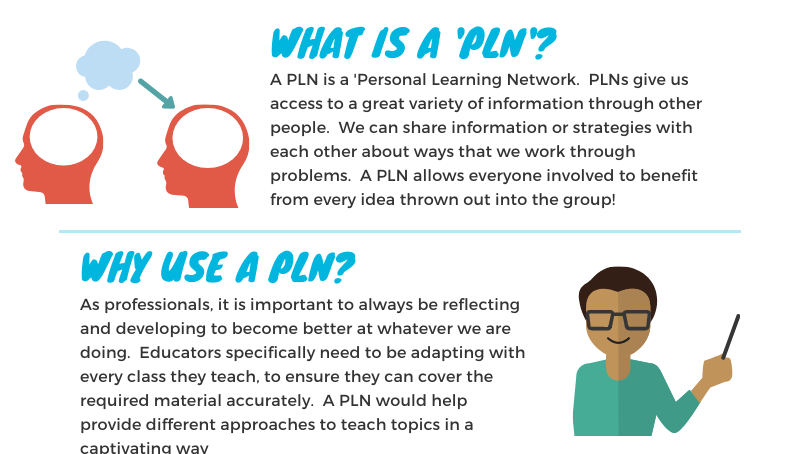
I chose to reflect/analyze the Collaborator Module created by Ontario Extend. While reading through the resources, the articles and videos selected really sold the idea of collaborating to be better prepared. As a future-educator I really picked through this module and tried to understand everything that was being thrown in my direction. While talking about things like why to collaborate, they mention a lot of things that we already tend to do, like asking coworkers for resources for the class we are teaching. There will always be people with experience in the topics we want to teach and by accessing the PLNs (Personal Learning Networks) online, we can have access to tons of people who have tried and true resources they might be willing to share!
One of the first modules we can dive into talks about the important of collaboration and why we want to collaborate! The video “Where Good Ideas Come From” by Steven Johnson really sums it up well!
The next few parts of the module focus on the specifics of what defines a PLN and what makes them so special. Some aspects of this module that I really connected with spoke about how we adapt as professionals and how we can reflect together. This really resonated with me because as teachers it is vitally important to reflect when things don’t go as well as we wanted them too.
Looking back at the process, I really enjoyed how simple Canva was to work with! I chose the free trial and was able to organize my thoughts into a variety of available free templates. I was able to insert a few simple pictures to enhance my presentation, with more unique or expressive pictures needing me to upgrade to a “Pro” version. Everything I did on Canva was free and I didn’t need to insert any personal information, just a sign-in email and password! I found the interface I was working with very user-friendly and as an educator I would encourage my students to attempt to use this program for future assignments!
Digital tools can be a boon to any classroom, but a teacher shouldn’t just select an app they stumbled upon, give it to their students and expect miracles. There is a lot of work that must be done before and during (and after) the implementation if the tool is going to be of any use.
Ontario Extend’s Technologist Module explains one procedure teachers can use when selecting digital tools to enhance a lesson. I decided a quick video would be an interesting way to summarize the module. It’s also completely different from the sketchnote that I completed last year! Please enjoy.
Note: This thumbnail was the only one Youtube selected that didn’t feature my completely open mouth. So flattering…
Interestingly, the module doesn’t start with selecting the technology or with anything to do with implementation, but with several definitions of digital literacy. Some of these definitions were rather wordy, so here’s a boiled down version: a person is digitally literate if they can effectively navigate, communicate and create information using digital platforms. The module explains (and I agree) that a teacher who understands how literate their students are will select an appropriate tool for the benefit of all their students.
As a physics and math teacher, I’ll be entering a field that complements with tech pretty well. However, understanding and interpreting what digital literacy means in regards to students and their abilities must be considered before handing any tech to them. If a student doesn’t have the capability to use it yet, they will gain little from it.
This module goes into great detail while discussing a process called design thinking. It lists five steps an educator should consider when attempting to implement tech into their classroom.
Empathy
The first step is to empathize with your students which (to be honest) is something all teachers should be doing already. Empathy is something outlined in the OCT’s Ethical Standards.
Video Snippet: Empathy. It’s in the Ethical Standards for Teachers.
The module suggests building an empathy map to help organize how to students are responding to your current lessons by noting their feelings and reactions while in your classroom. I believe this is a harder activity to complete accurately than it sounds. Some of the pieces of the map might be very difficult for a teacher to decipher on their own. I think I would show students my completed empathy map and allow the students to give their feedback on what they believe is missing to get a more accurate picture.
Define and Ideate
Video Snippet: The ideal educational tool
The next two steps in design thinking are to first define what parts of your lessons could be changed or improved with a digital tool and then to decide what features of a tool would be ideal for your classroom. These two steps will use the empathy map (or whatever was used to collect information). The goal is to narrow down what you need and what you want in order to make your search for the tool as efficient and effective as possible.
Something I did not mention in my video is the use of the SECTIONS approach when selecting a digital tool… Four minutes just isn’t a lot of time to discuss something as robust as this technologist module! Luckily, there is an excellent resource by Anthony William Bates that explains everything you could ever want to know about the approach. It narrows down eight elements to consider when selecting a new tool for students to use; all conveniently organized in a delightful acronym.
Prototype
Video Snippet: Check out this cool thing I found!
Time to implement the tool! By making a prototype or a test run of the tool for their students to play with, a teacher can observe what the tool enhances and where it may fall flat. By making changes to how the tool is used, these new iterations should become more and more effective, resulting in (hopefully) improved learning. A successful implementation should always be shared with others. Don’t keep your digital creation a secret; I don’t intend to!
Connect
The final element of design thinking was a no-brainer: connect the use of the tool to the curriculum. I found it very strange that this step is at the end. I believe that it would be better placed in between the defining stage and the ideating stage. To put all this time and energy into implementing a tool only to reflect back on its usage and find that it does not help in teaching the curriculum would be very frustrating. So frustrating in fact that I don’t believe any teacher would fall victim to this oversight.
Though I agree with many of the steps outlined in design thinking, I do not agree with the order in which they are presented. As I said earlier, I think it would be foolish to wait until the implementation is nearly done to check if your technology-driven lesson addresses the curriculum properly. This problem shouldn’t even really arise if the define and ideate phases of the implementation were done correctly.
One final note: I believe that having the end goal in mind at the very beginning would be beneficial to the project in the long run. To blindly rush headlong into a problem with no solid aim to work towards seems like it could waste a lot of time and resources. The idea of asking “What do I want the students to be able to do” is absent in design thinking’s protocol. It asks this question of the technology, but not the students and that is a tremendous omission.
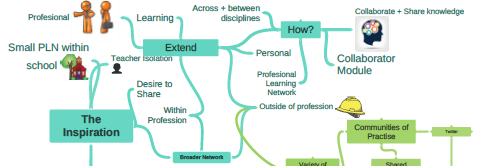
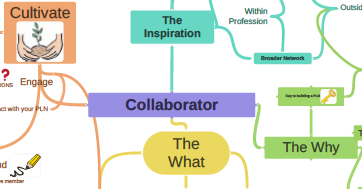
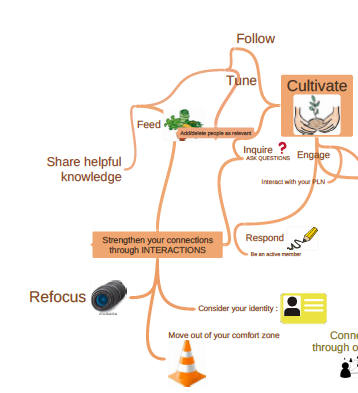
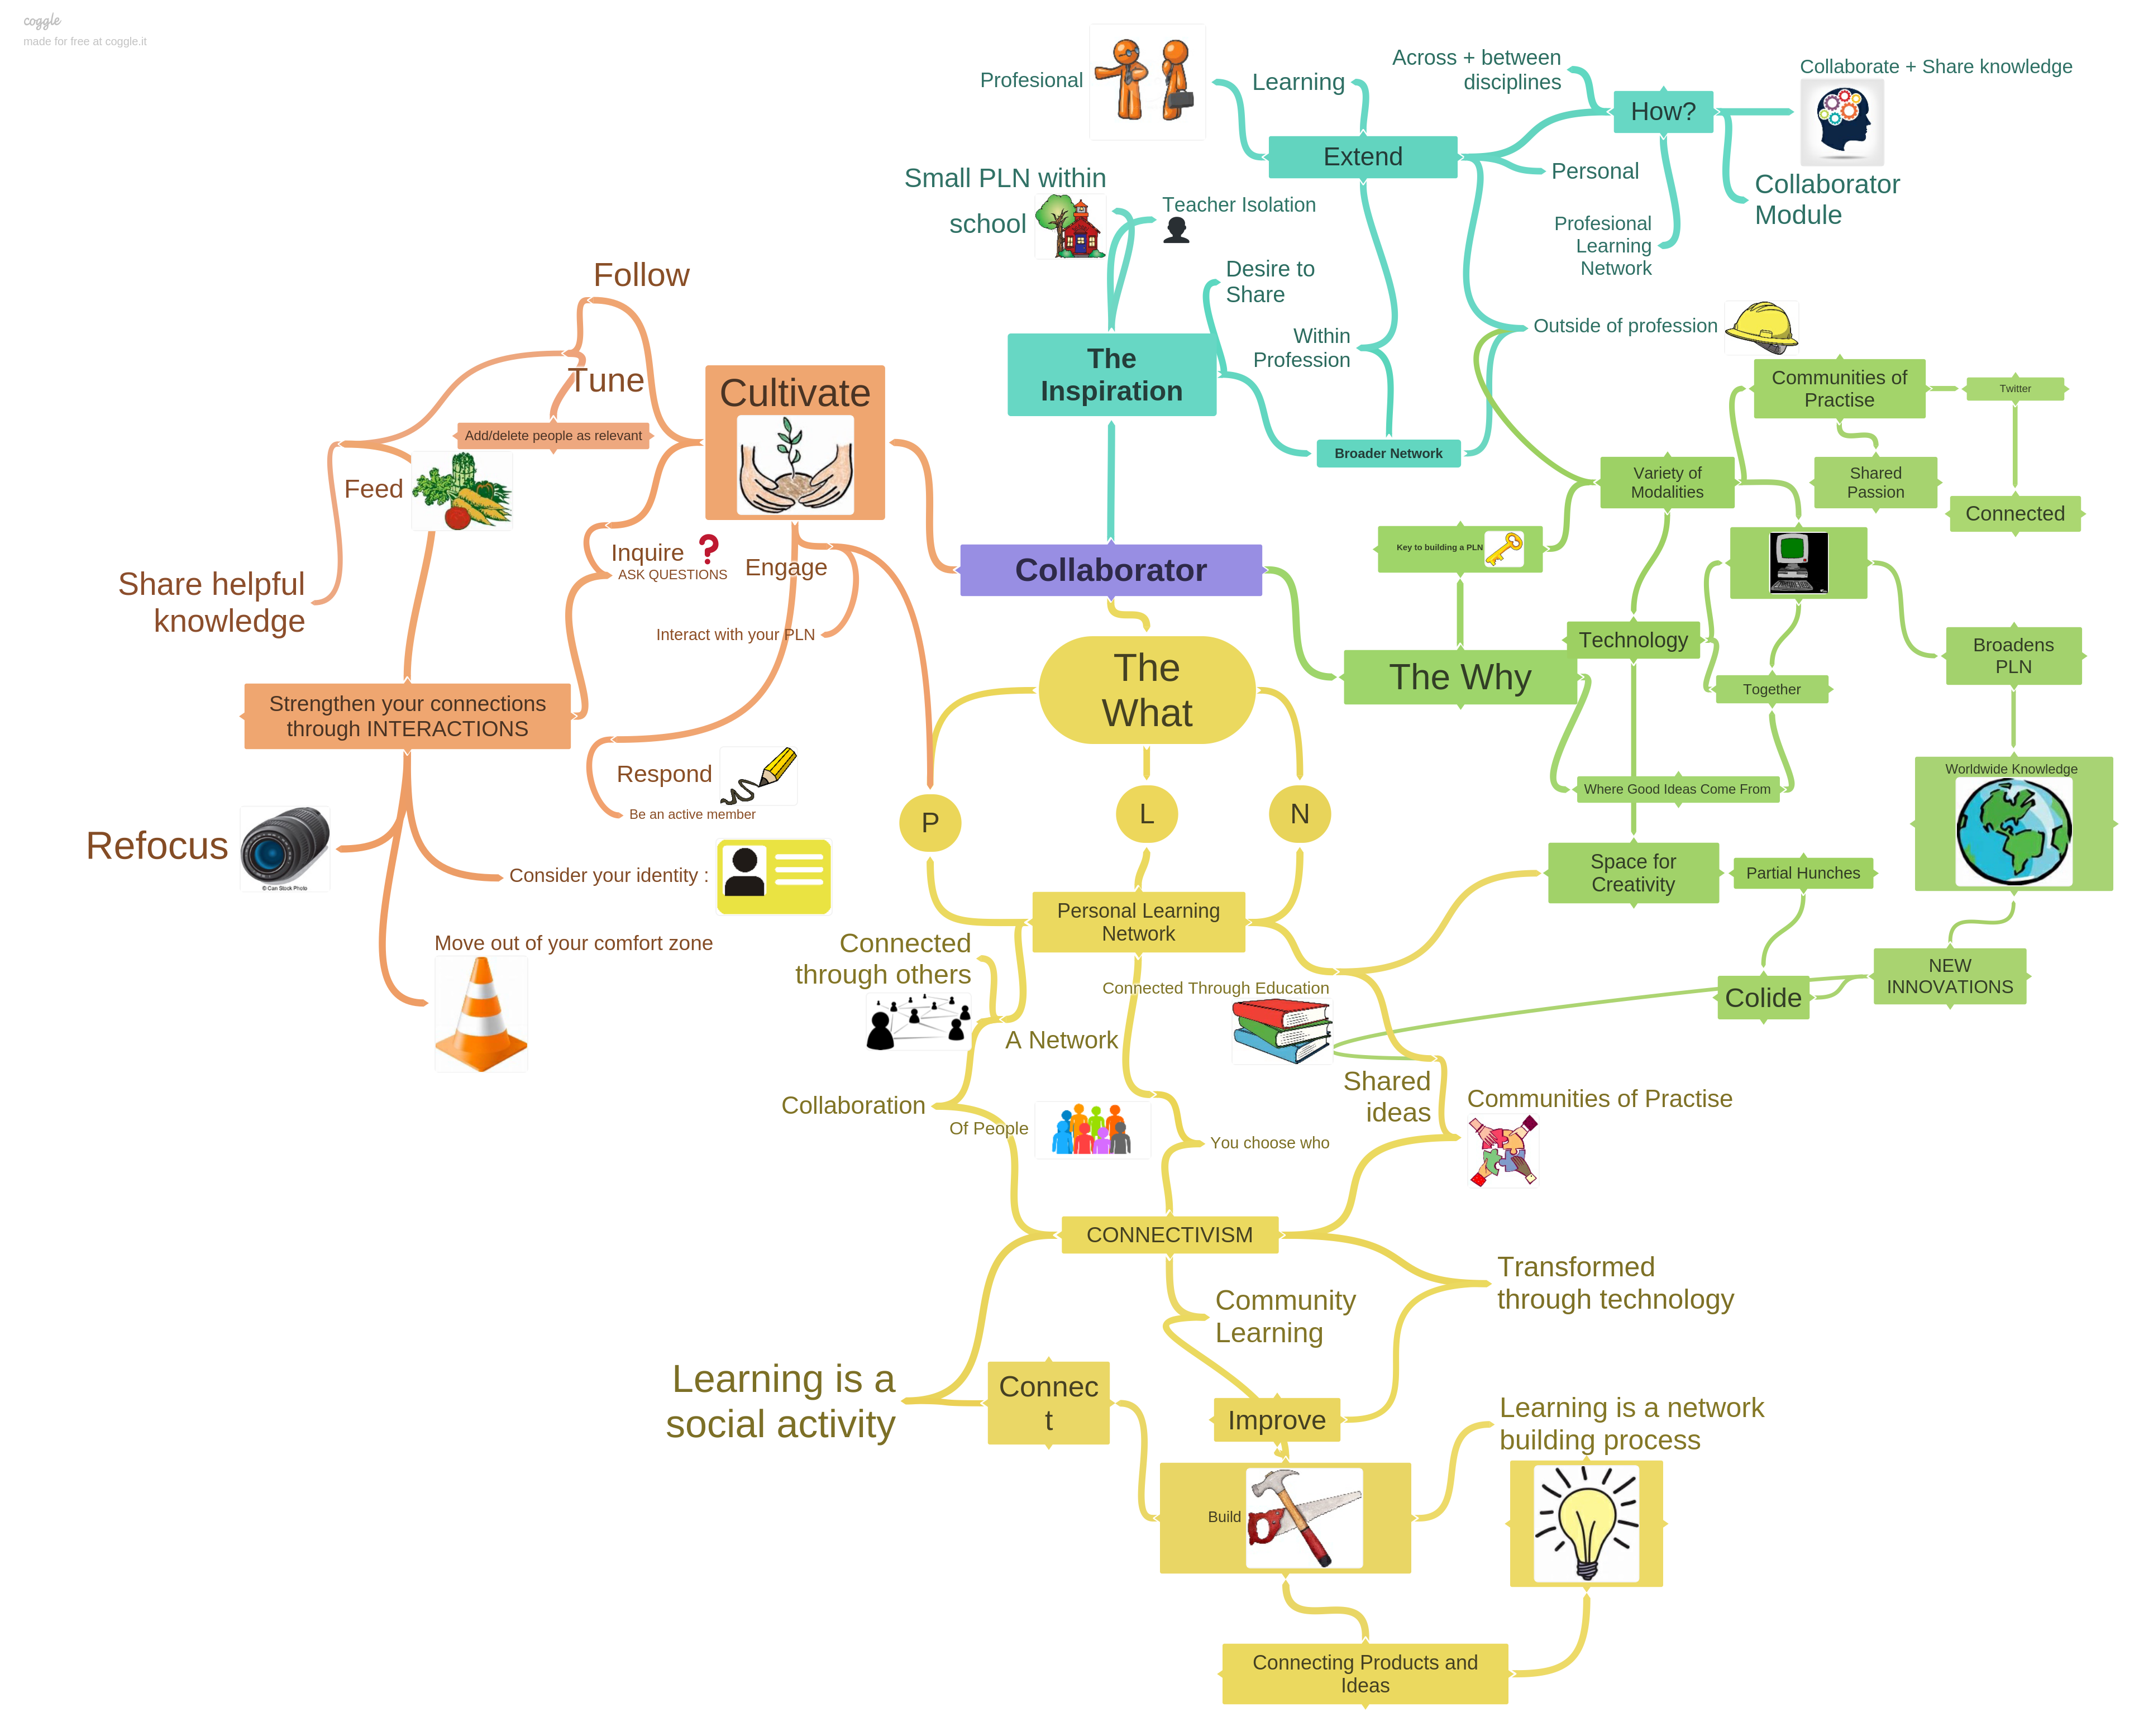
For this assignment I chose to explore the Collaboration Module. This module explores different aspects of collaboration ranging from what collaboration is to the different way’s individuals can now collaborate in different spaces. The main purpose of this module is to encourage collaboration between educators and explain how online collaboration can cultivate new innovations. To summarize the module I decided to make a sketch-note/mind-map using Coggle.
I thought this module was very easy to navigate, as you scroll through the side bars the information is set up in almost a chronological order. Starting with the inspiration behind collaboration, then why it is important to collaborate, which leads to what collaboration looks like and finally how to cultivate collaboration. As someone who is fairly new to online collaboration, I found this module very user friendly and after looking through it I feel I have a good grasp on what online collaboration is and the avenues available to begin collaborating.
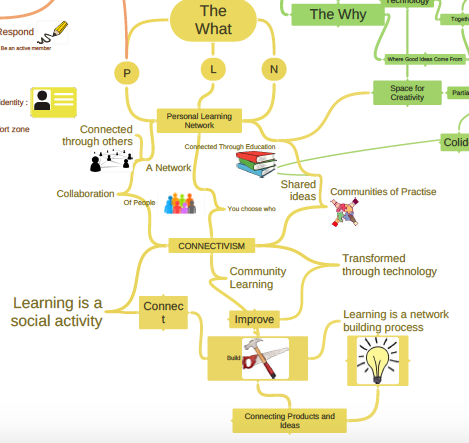
From an educator standpoint this module touches on the way’s collaboration can be helpful to educators. A key component of this module is explaining what a personal learning network (PLN) is and how to cultivate one. This part of the module is key for educators, it is important for teachers to be connected to other educators to learn and grow in their teaching. I believe having a PLN allows you to be connected on a deeper level and creates new innovations that help students and teachers. It allows ideas and innovations to grow and develop. Having a PLN is also important because of the support it provides for educators. Teaching is not an easy job and having a network of support is crucial to being a successful teacher. I have learned through my teaching placements that having other educators to reassure you in your teaching and to offer suggestions is imperative. This module offers useful ways to grow and maintain your PLN.
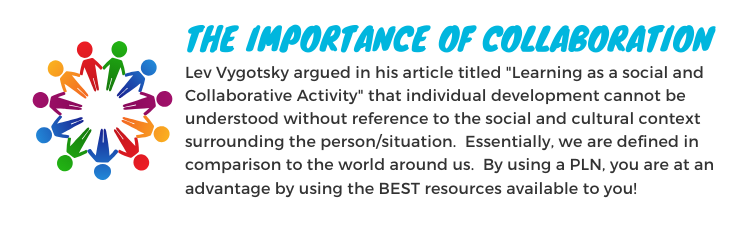
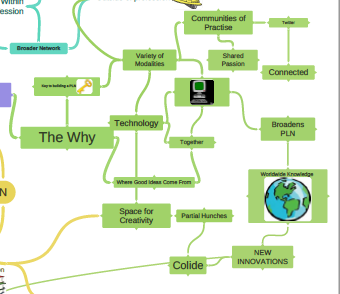
The idea of connectivism is also talked about, this is the idea that the context of your learning is provided by your network. A key part of connectivism is the idea that learning is a social and collaborative activity, in order to learn to the best of your ability you must be connected to others. The idea of a PLN is to create a collaborative space online, the module not only talks about the importance of collaboration and a PLN but gives strategies of how to cultivate your PLN. I believe this is a very important aspect of the module. It not only says to collaborate but gives practical strategies to help people who are beginning to collaborate online. We do not learn in isolation and therefor we should not teach in isolation, being active and connected to other educators creates a community of learning which is transformed through technology.
I believe this module was is a very useful resource, it offers a lot of information and relays the information using many different mediums. It is very accessible and easy to navigate. A key component of this module is that it offers not only why collaboration is important but it gives practical strategies of how to collaborate. I personally have experienced how helpful online collaboration can be. Connecting with other educators I have been able to grow in my teaching and develop strategies and ideas for my future classroom.
Collaboration is key to furthering the education of future generations. We must share ideas and offer support to one another in order to continue to thrive in the classroom. This module gives meaningful suggestions and ideas about why collaboration is important as well as practical suggestions regarding how to collaborate online.
Please click on the link below to see a full size image of the mind map
I chose to read through the Collaborator Module by Ontario Extend. The module is divided into four (4) main components: EXPLORE, ENGAGE, EXPAND, EMPOWER. Each of these sections delve into the importance of creating and strengthening connections with like-minded individuals in order to create your own personalized learning network. These networks allow an individual to stretch out their ideas and thoughts into an open space where others can view and engage with them, even possibly adding or altering to those ideas. Alternatively, individuals can join these spaces to gain knowledge on an interest through discussions and collaborating with other individuals in a similar field. To summarize this module, I chose to create a twitter essay. You can view it here.
EXPLORE
The explore tab focused heavily on explaining why someone might want to collaborate with others through a PLN and the many benefits that come along with it! In a technologically dense society, it’s only natural that the sources of knowledge have shifted and evolved. In this, David Weinberger proposes that knowledge has shifted from traditional methods (i.e.: textbooks) to online networks. In the internet age, knowledge and the ability to communicate with multiple perspectives knows no boundaries. I connected immensely with this as a student, but also a teacher candidate and future educator. As a student, there have been countless instances where I’ve checked Google and discussed concepts with my colleagues using media platforms before or after consulting a textbook or article.
As a future educator, I have collected many resources from other educators online for inspiration on lesson plans and ways to present material to students that are engaging and effective. Steven Johnson contributes to this discussion in his video ‘Where Good Ideas Come From.’ In this, Johnson attributes networks to creative spaces that allow for the best ideas. Networks allow individuals with an idea (or a slow hunch) to be shared with a wide audience. This idea can be liked, commented on or shared until it is transformed into something bigger than it would have been on its own. Two hunches put together create one great idea, and that’s what collaboration within a network promotes. I’ve always found that my best lesson plans and activities were the ones created as a group with my colleagues, or an idea that I bounced off of a classmate. They provide another perspective to an idea that I had not thought of and help me sort through what is really important for my students.
The Explore component makes it a point to discuss the growth of online communities, with networks evolving from The WELL (Whole Earth ‘Lectronic Link’ in 1985 to the various social platforms we may choose from today. I had never heard of The WELL and found this article interesting as it was the first collaborative online space for people of various interests and backgrounds to join and share their knowledge with each other. What shocked me was that members payed a monthly fee, and some loyal members still continue to do so. I attributed this to Blackboard in that students are not provided this information for free, or even digital texts that are blocked behind a paywall. While information shared and learned through traditional institutions is valuable, there is also value in Open Educational Resources (OER).
Networks allow open and self-directed learning by hosting what Wenger terms ‘Communities of Practice’. In order to strengthen these communities of like-minded individuals, choosing the appropriate platform to host these networks are essential! For example, Twitter hashtags might be the perfect tool to gather dialogue from individuals both in and outside of your community network. This could be perfect for teachers looking to connect with others who may teach similar subjects (i.e.: #geography). #OntarioExtend has already connected my own twitter response of the collaborator module with a community of other twitter users- and some that might just be lurking.
ENGAGE
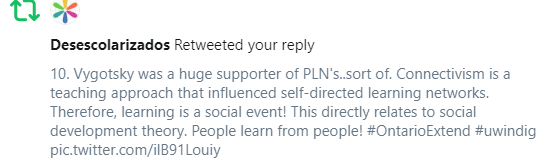
Marc-Andre Lalande’s video ‘What is a PLN’ separates a PLN into three: personal in that you choose your connections and your engagement level, learning in that you are gaining and sharing knowledge through discussions, and network in that these collaborations are hosted through technology. PLN’s emerged from the theory of Connectivism (Dr. George Siemens), the idea that your networks do not automatically provide you with what you need to learn. You decide the context of your own learning, while networks use that context to create a social learning environment. Saul McLeod makes a connection to connectivism with Vygotsky’s social development theory in that people tend to learn better through social interactions, especially with those at a slightly higher knowledge level than us (i.e.: tutors or mentors). The idea surrounding the zone of proximal development closely resonates with my own learning experiences.
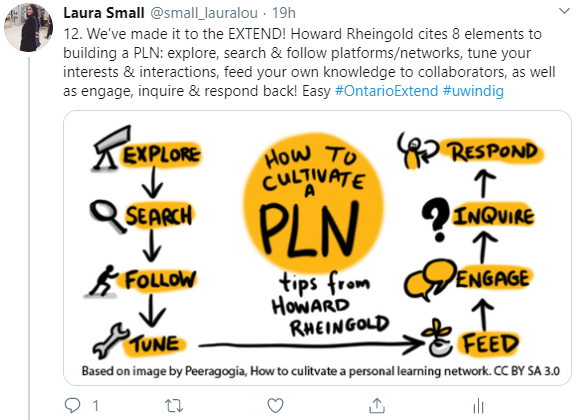
EXTEND
Extend is focused on helping individuals build their learning networks through Howard Rheingold’s eight (8) elements, as well as encouraging PLN creators to make connections outside of their usual circle. I’ve always held onto the belief that growth is not possible unless you step outside of your comfort zone. Personally, I have always had a difficult time presenting or speaking in front of an audience, it is one of my weaknesses that irritates me the most. However, it is a skill that must be learned and cultivated for my career choice as an educator. I will not grow as an individual until I step outside of my comfort zone. This program forces me to do that, especially this course! These multimedia assignments have forced me to make connections with others and use digital tools and technology that I am unfamiliar with. However, I find myself using these tools more often in my profession.
Another reason one may want to reach outside of their comfort level is the danger of filter bubbles! Eli Parser warns against algorithms and the risk of being shown one-sided or biased information, rather than diverse perspectives.
EMPOWER
We’ve made it to the last component, and I apologize for this lengthy reflection. When I chose this module, I thought it was going to be self explanatory and that choosing a twitter essay would be easy (as I have my own personal twitter that I use regularly). It was a lot more work than I originally thought, and trying to summarize my thoughts into less than 140 characters (due to the two hashtags) was immensely frustrating at times. However, when I was able to condense my thoughts it was incredibly rewarding, and the gifs helped make it fun.
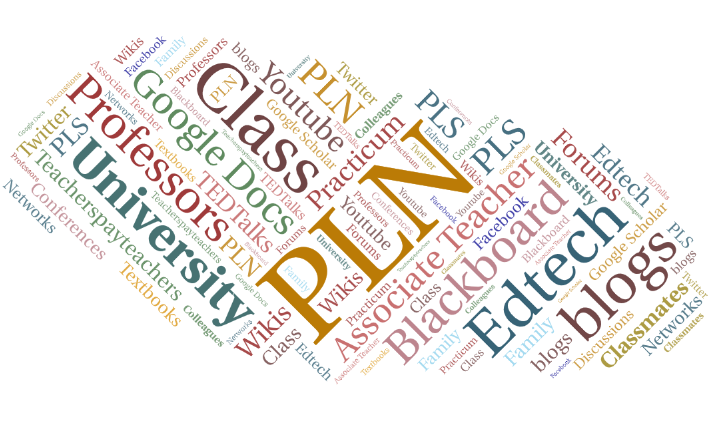
This component encourages PLN creators to be reflective of their networks and to map out their PLN in order to visually see the areas and potential for growth. PLN’s and the digital tools used to build these networks are made to promote professional growth. I decided to create my own PLN using a word cloud!
Having gone through this module, I am definitely more aware of my connections with others and the networks that are possible to strengthen and enhance my learning!