Everyone knows that collaboration is king, but I opted to look at Ontario Extend’s Technologist Module instead of learning more about how to co-operate with colleagues (which is a skill we should all have by now, considering the unending wave of group projects sent our way, some of which have their teams randomly built). I want to expand my understanding and practice of digital and technological tools or concepts as much as I can, as the world will (obviously) entrench itself further and further into this current Information/Digital Age. I want to be prepared to excel exceedingly well, and I’d much rather be the one explaining how to use technology tools than be the one struggling to catch up.
The Technologist Module gives us lots of guidance in terms of which processes to follow when implementing a tech tool, and provides a plain and clear series of steps (Empathize, Define, Ideate, Prototype, Connect) to adhere to if seeking success. I’m no fan of being overly-regulated or heavily restricted when it comes to thinking and acting creatively for academic purposes, but it is important to realize that these are loosely defined guidelines for us to follow in the footsteps of, and shouldn’t be thought of as a fence barring us from acting as we wish with whatever digital or tech tools we find ourselves using.
The main basis of this module is centred on reflection, careful consideration, comparisons, and trial and error, of which all are meant to stop us from acting wildly or over-eagerly with tech tools. One step of the process is meant to lead into the other, beginning first with “Empathize”, where you take into account all of the wants and needs of your learner(s). Gathering this information leads you to planning and then acting accordingly, hopefully leading to less bumps in the road for you and faster, finalized successes.
I can say that during my placement, I may have opted for Chromebook usages on several occasions, but having acted prematurely and without actual consideration for how best to use those Chromebooks (having been convinced they would be beyond helpful regardless of purpose solely because they were *CHROMEBOOKS*), those devices were little more than substitution rather than augmentation, or even modification. If anything, using Chromebooks for the lessons I had in the works for those classes, the devices were more of a handicap than anything, adding unseen challenges to what should have been easy tasks of research and mapmaking.
It may sound lame to follow some third-party’s checklist, keeping in mind every little thing the module makes note of, or sound like a lot of unnecessary work to do recon on your learner(s) needs, and the hypothetical making of many mindmaps seems daunting to some, but in reality, these procedures really will (or should) lead you to craft better lessons with properly thought-out tech tools. You don’t want to use a device or software solely due to “cool” factor or assumed effectiveness, but due to your own proper reasoning skills.
In the end, it really is all about working within the needs of your learner(s), but you should also work for their wants, trying for some dual effort of making your tech implementation effective but also engaging. If you want further insight, you should definitely check out my Twitter essay for more information, or go right to the source itself.
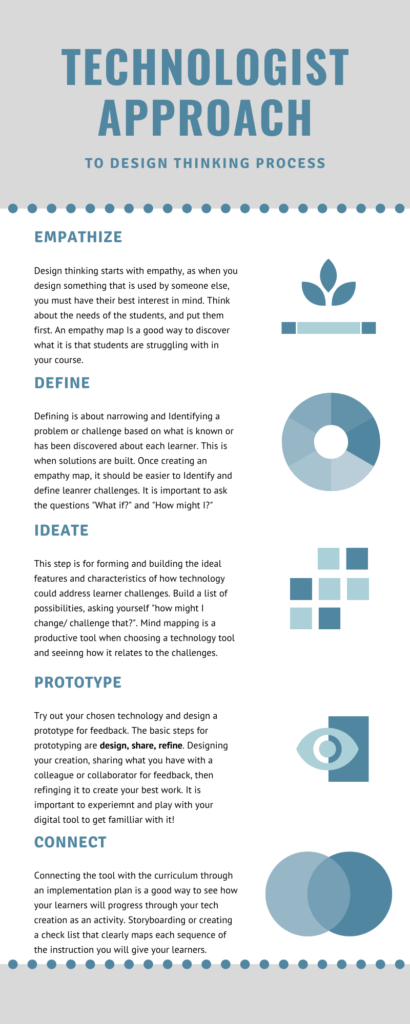
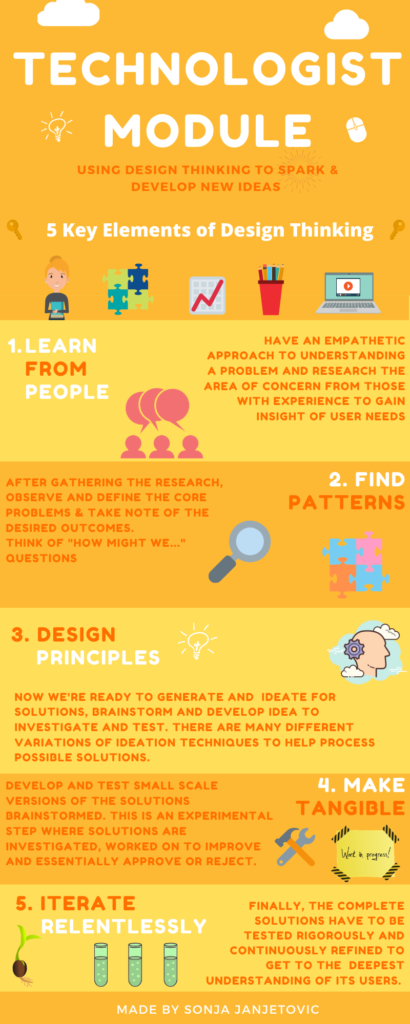
For the second multi-media reflection, I chose to focus on the technologist approach to design thinking in digital literacies. The article (which can be found here https://extend.ecampusontario.ca/technologist-digital-literacies/) talks about the 5 steps of the design thinking process: Empathize, Define, Ideate, Prototype, and Connect. I chose to create an infographic that describes these steps, which can be found here.
The article at first sight seems to be quite simple. It has a quick over view of the article as a whole, and then branches out into separate pages that describe each method in little detail. What is very interesting, though, is that there are hyperlinks to other articles and lessons throughout. There is so much more information that meets the eye, which makes for quite the interactive experience. The main idea of the article, though, is about the design thinking process.
The design thinking process is five steps that ensures educators to be successful when designing their own digital tool to use in the classroom. Each step scaffolds from the one before, as it allows for change and revision from the work that has previously been done, but the ability to move on is limiting unless the task is complete. One of the most interesting and, in my opinion, important steps is empathize. This is the first step in the process, and the article calls for an activity called an empathy map. The empathy map is to help the educator get to know the challenges that students are facing right off the bat. This allows for the teacher to keep in mind what it is they do that isn’t working for the class, and to look for new and innovating alternatives. It is such an easy and inclusive way of getting to know your students, and it encourages to ask questions that cater to the student’s individual needs. No student should face consequences for having specific needs, and this way everyone is included in the creative process through catering to those needs.
Technology is a very inclusive tool. It allows for students of every walk of life to experience an abundance of knowledge, supportive tools, and so much more that couldn’t be accomplished analogically. Software such as talk-to-text, voice dictation, video modules, translation, etc cater to students with learning challenges in ground breaking ways. Allowing a deaf child to do presentations, a blind child to read homework chapters, or an international student to answer a question in class are just some of the ways that technology has allowed schools to be more inclusive to those who are not within the majority. By following the design thinking approach, it allows teachers to be held accountable to use their chosen technological tool to be inclusive to all within their classroom, no matter what challenges they do or don’t have to face on a daily basis. The technology acts as the even playing field, making the classroom a safe and inclusive environment for the unique set of minds that the teacher has in their hands.
I want to follow this approach when integrating technology into my classroom. There are so many different platforms that I haven’t even had the chance to explore yet, but through these 5 steps, I will be given the opportunity to challenge myself to do research into different programs and softwares that will improve my classroom environment. The collaborative approach is also something that I admire. Asking my colleagues for feedback opens so many doors to new ideas that I may have never thought of, which only benefits the students. This model is set up to be student focused, as the teacher is continuously asked to challenge themself to think how they can adjust or improve what they are working on to benefit the students. Being a teacher means putting aside your own personal feelings towards something if it means the student will benefit, which is something that is not easy but is extremely meaningful. Luckily, this model keeps both teacher and student engaged, which is something I find very intriguing and I look forward to implementing in my future practice.
For my second Multimedia reflection, I chose to explore the Technologist Module by Ontario Extend, and specifically take a look at the Design Thinking process. For this process, I chose to create an infographic using the website Canva. I was initially worried at first for this project because after the Twitter essay that I created last semester, I was unknowledgeable with any of the other technological options that were available to me. However, Canva won me over by being easy-to-use, and also by providing templates I could use to modify my infographic into exactly what I need.
.
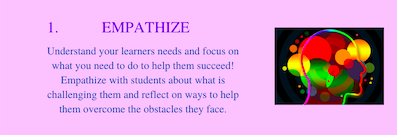
In terms of discovering moments of technological integration in the classroom, I looked at Design Thinking as a possible option to do so. It consists of 5 steps: empathize, define, ideate, prototype, and connect. Firstly, teachers must empathize with their students learning process and focus on student needs. When structuring a lesson for students it’s important to consider what the student will need in order to achieve the expectations the teacher places on them. By putting the students and their need first you can help to discover the obstacles that students may face.
For the second step, “Define”, teachers have to identify what kinds of learners they are working with and figure what best suits their needs for learning. By finding this out teachers can uncover the specific learner challenge of students and choose a technology that can better aid their learners. The teacher can also ask themselves how their chosen technology will help to inspire their student’s further to embrace the lesson being taught to them.
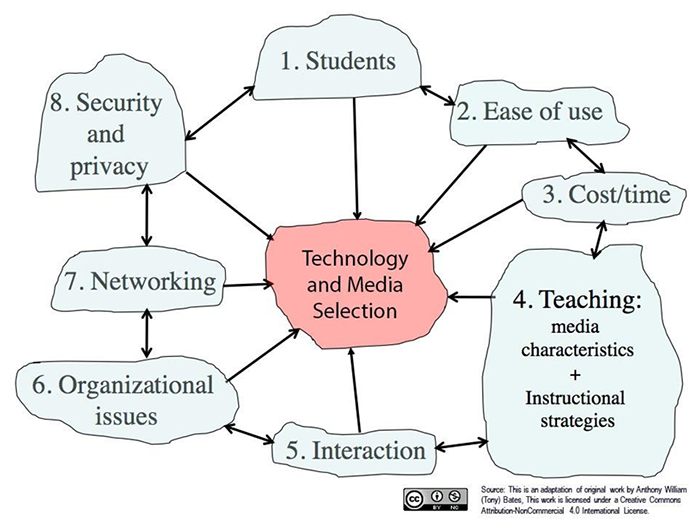
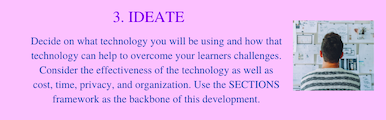
Next, the teacher must create approaches for their technology and how it could address the learner challenges of their students. Will the technology help to elevate the learning experience, and it will be a good fit for the students? The “Ideate” step also makes use of the SECTIONS framework that allows for multiple ideas to help choose a technology for a lesson.
“The SECTIONS Model” by Anthony William Bates is licensed under CC-BY-NC
It provides specific considerations to determine what learners need in order to strengthen their digital literacies such as ease of use, networking, privacy, etc. It helps to provide a roadmap into selecting the most appropriate tool to use for the learners who will be using it. Many of these suggestions are broad and would have to be narrowed down, but it still provides an excellent basis to start out on.
The “Prototype” section allows for the observation of the chosen technology and if it can be successful for the intended learners. Feedback can also be received to better manage the technology and improve upon it over time. Using everything learned in the prior steps the teacher can design an activity for their learners, share it with them, and make improvements based on how they interact with the given lesson and technology.
Finally, connecting the technology with the curriculum will help to link the activity with your learning outcomes. Create clear instructions for learners to follow and make connections between the curriculum and technology that helps to benefit all learners. Ask questions on how the chosen technology improves your learning experience, and if the technology even needed to be introduced in the first place.
There are a number of choices that have to be made when implementing technology into a classroom. Take caution in making sure the technology you introduce is not only effective, but also having the ability to elevate the work of the students by designing it around their learning needs.
It is fair to say that digital technology is the new tool used most in today’s average classroom, from the use of SMART boards, taking attendance on Edsby, and if you’re lucky, even a whole class set of iPads or laptops. This brings on a new opportunity of teaching and integrating technology into the classroom is a developing technique of teaching that many educators want to welcome. Though many educators have access to so many various technological tools, it does not mean the digital literacy comes with it. That brings us to the very handy tool that is the Technologist Module, which is an online educational tool to help introduce the various topics of starting into the world of incorporating technology into lessons.
“Ontario Extend” Technologist Scenario video
While the module explores and discusses multiple cases of technological points, one aspect of the appeal is that of “design thinking”. A 5-step process that allows creators and educators to approach a system of how to develop a plan to resolve challenges and issues. The Technologist Module links to a great educational video from Daylight that breaks down the idea of design thinking. The video uses an example of their own to help illustrate the process and benefits of this methodology. The company was on a mission to help kids in America to move more and prevent childhood obesity and found it a difficult issue to challenge and present an effective solution. That is when they breakdown the 5 steps:
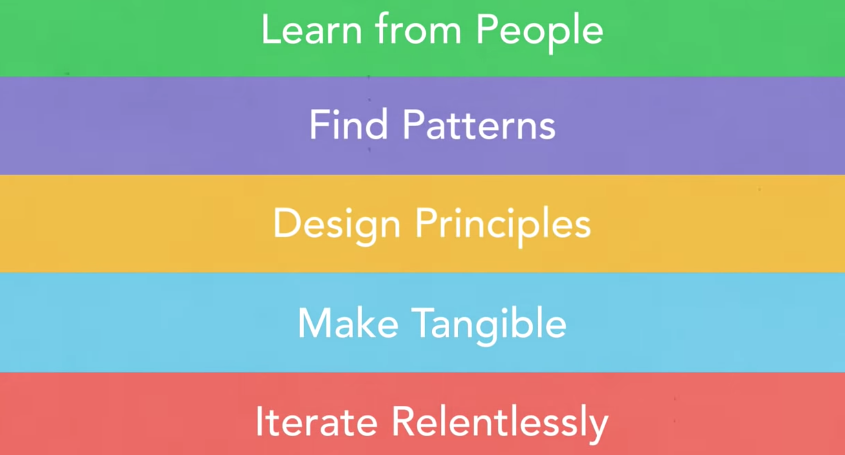
5 Steps of Design Thinking
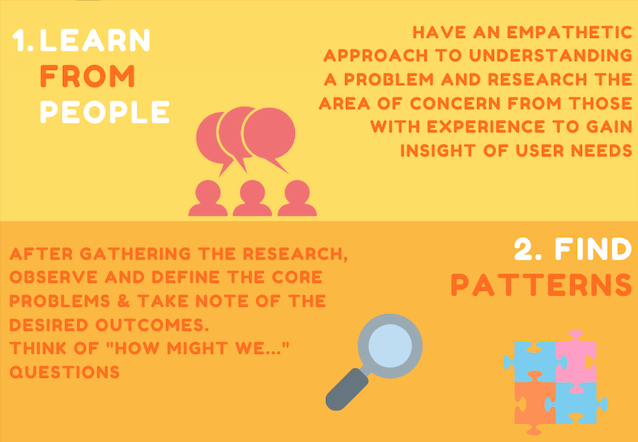
In other words, the process comes down to empathize, define, ideate, prototype, and test. Let’s take a deeper look into each category and understand the importance of each step.
Steps 1 & 2: Empathize & Define
Before we can jump into solving any sort of problem, we have to gain a good, deep, and empathetic understanding of the issues and challenges surrounding the targeted audience. The best way to do so is to connect, observe, engage, and learn from the people with experience and analyze the different issues brought up. Once a substantial amount of research has been developed to get the feel of desired needs from users and the flow of possible solutions initially start to be discussed, we can approach the next step: find and define patterns and problems.
During this stage, creators and educators can break down the information gathered and analyze observations to start creating correspondence of what sort of features, needs, and concerns need to be addressed in the solution. Once a good understanding of the resolution approach is developed, we can start to progress to the third stage and start asking “how might we…” questions to encourage the brainstorming process ahead of us.
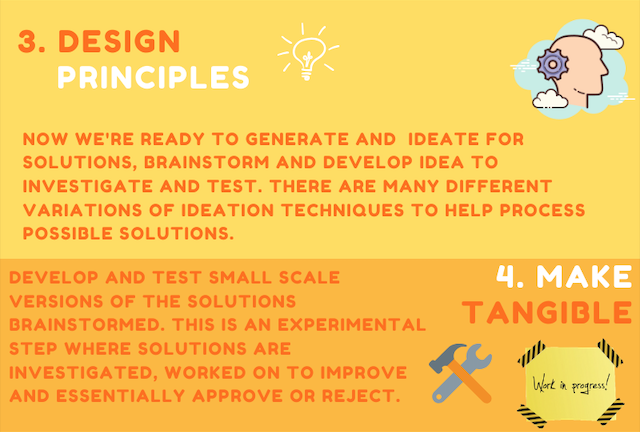
Steps 3 & 4: Ideate & Prototype
Starting to generate ideas, having solid background information collected, the brainstorming process is in effect. There are many variations to ideation techniques to aid in identifying new solutions to the problem statement. It is best to generate as many ideas at the beginning of this phase as possible to ensure many options to develop further in stage 4.
To make the developed ideas tangible, creators and educators will develop and test small scale prototypes of each possible solution to experiment on and identify the best possible solution to cater to the challenges identified in the first few steps. After testing each, investigating the pros and cons and attempting to improve the prototypes, one by one will be decided to either be approved or rejected to narrow down the final options.
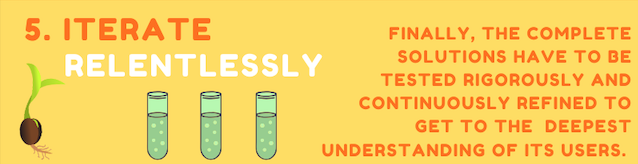
Final Step: Test
Finally, the decided solution has to be iterated relentlessly and revised constantly to keep it running smoothly and fix any smaller issues within itself for its users. Constant alterations and refinements are made in this stage to continually develop and improve to keep users engaged and the outcome fully functioning.
It is important to state that though the process of design thinking is ordered by steps, it can essentially be executed in a non-linear and flexible manner. Going back and forth through each step in different orders to continuously improve and investigate until the finished product is confidently providing its purpose. Design thinking can be adapted in many ways for many reasons to produce answers and resolutions for varying factors and challenges, whether in the classroom or an entrepreneurial environment. Its use has no limit and is a repeated cycle for a fool proof module.
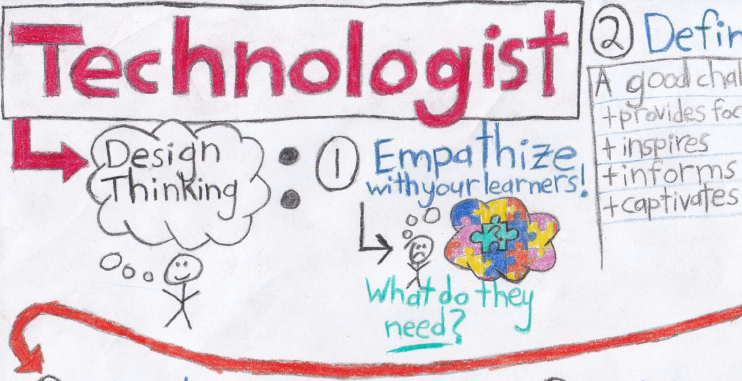
The Technologist Module provided by Ontario Extend claims that it will help its users to “[u]se technology tools effectively to address specific learning challenges,” outlining the process of “design-thinking” that should lead to a successful use of technology in the classroom. While the process described in this module could certainly be helpful in the integration of technology into some lessons or activities, the module does have a few flaws and seems to describe a complicated plan (design-thinking) to solve a complex problem (using a tech tool to aid learning), like trying to use a circle to fill a square-shaped hole. This module describes design-thinking as the following series of steps, illustrated by Kate Golden in the artifact attached below, for selecting and integrating a technological tool into a lesson or activity: i) empathize with your learners; ii) define your learner challenge; iii) ideate; iv) prototype; and v) connect to your curriculum.
Empathize with your learners: what do they need?
The first step in design-thinking is to empathize with your learners: one must think about what their learners need and how you would like to use a tech tool to help the learners achieve. I believe that it is important that this be the first step when one wants to integrate technology into the classroom as it helps to focus one’s efforts on meeting the students’ needs rather than using technology.
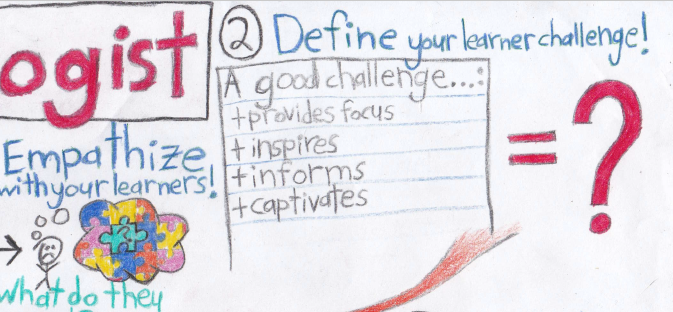
Define your learner challenge
The second step in the design-thinking process is to define the challenge you want to put to the students. The module describes a good “learner challenge” as one that: provides focus, inspires, informs, captivates, and meets the needs of the many. While not mentioned in this section of the module, I believe that it is at this point where one should start connecting the challenge to the curriculum; when defining the learner challenge, once must consider how the challenge relates to and integrates with the curriculum so that the learners will get the most benefit from it.
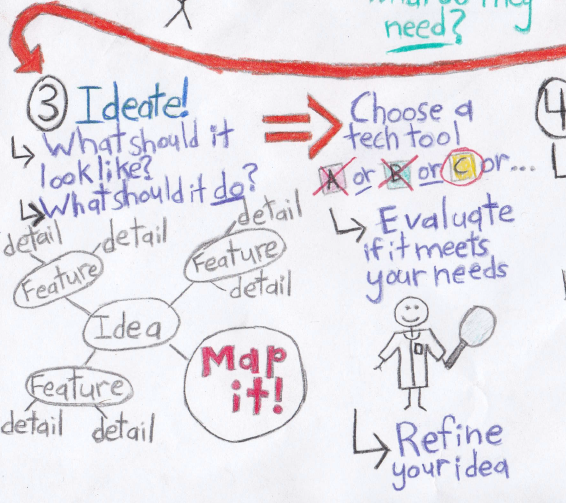
Ideate: what should it look like? what should it do?
The third step in design-thinking is to ideate; to come up with ideas on how technology could be used to address the learner challenge. The module suggests that one use a mind map to formulate and plan out their ideas. The module contains a helpful example of a mind map, one which demonstrates the different aspects of mind maps and how they can be used. The “ideate” step in the module goes on to list sub-steps which should aid in ideation: i) choose a technology tool: find a tech tool that could be used to complete the learner challenge; ii) evaluate the tool: use the “SECTIONS” model (Students – Ease of use – Cost – Teaching – Interaction – Organizational issues – Networking – Security and privacy) to assess the pros and cons of the tool; iii) refine your idea: based on the SECTIONS evaluation, make any necessary changes to your idea or try a different tech tool. I believe that the idearation step in this module, like the former steps outlined, is also very valuable in classroom tech integration. However, similarly to the “define” step, I believe that this step would be vastly more useful if it emphasized outlining/deciding how the tech tool could be used to help achieve the curriculum expectations.
Prototype: design it, share it, refine it
The fourth step in this module is to make a prototype. At this point in the process, one should have enough information on the chosen tool and a sufficiently formed plan such that they can make a functioning prototype of their tech-integrated lesson or activity. Next, the prototype should be shared with one’s peers and/or the learners so that they can evaluate it and provide feedback. Then, using this feedback, one should go about refining the prototype to form the final product that will be used in the classroom.
Connect to your curriculum: plan how to integrate it
The module’s fifth and final step before implementing the selected technology into the classroom is to connect it to one’s curriculum. The module states that this last step should be to think about how the technology will be integrated with the curriculum and to design an “implementation plan” as to how the learners will work with the tech-integrated product as an activity. I think it’s a rather poor idea to wait until the end of the design process to consider how the tech creation will integrate with the curriculum as the whole point of this module was to design a tech-integrated activity for the classroom. By leaving the curriculum connections until the last step, it seems clear that the Technologist Module considers how the technological tools can aid in meeting curriculum expectations. Before one decides to bring new technology into the classroom one should identify the need for a new technological tool in the classroom, otherwise one may simply be directly substituting one tool for a new one, creating more work for no additional benefit.
Overall, the Technologist Module could be a useful resource to aid in integrating new technological tools into the classroom. However, the module would provide greater benefit if the user maintains a focus on bringing more to the classroom rather than bringing technology to the classroom.
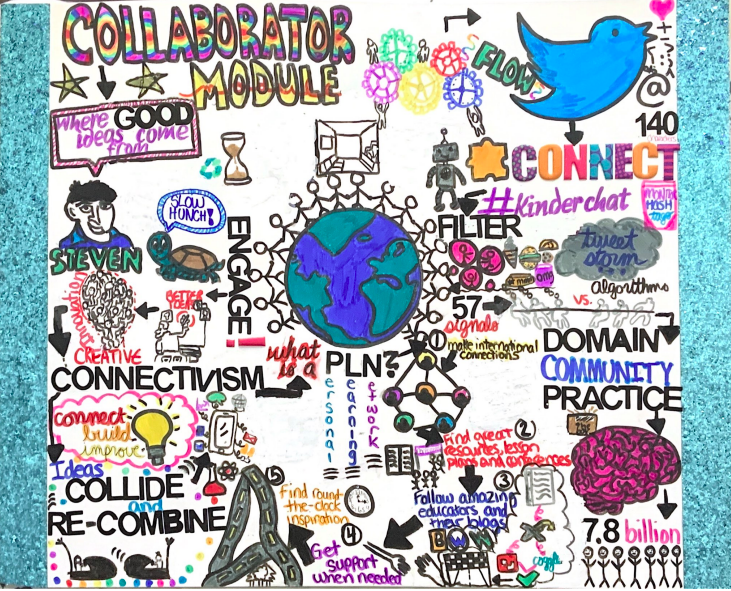
For the second multimedia reflection, I decided to create a visibly complex sketch note based on the collaborator module. This was my first time attempting anything drawing-related, nonetheless, it was a fun experience to be able to think outside the box and transfer my thoughts onto paper. I really enjoyed using vibrant colours, bubble letters, and sketches to bring the collaborator module together as one artifact. Although the principles of the collaborator module may seem simple at first glance, it is in fact more complicated than one might think to build a PLN and know exactly where and when to start. Once educated, you will begin to build trust, honesty, and openness with the network. Throughout the creation of this sketch note, I found the easiest way to comprehend and grasp the information that was being articulated was by watching the videos, listening to the TedTalks, and reading the articles on the collaborator website. It was also very helpful to go back and read my classmates perspectives on specific points in the discussion board. These learning tools are definitely something I can bring to my future classrooms to enhance a new learning experience for all. I also want to encourage students to step outside of their comfort zone such as I did with this assignment. It is important not be afraid to take risks or make mistakes because mistakes are what lead to success. In relation to that statement, when I first attempted this multimedia reflection, my entire sketch note was based on the Power of Twitter video, until further realizing it was supposed to summarize the entire collaborator unit. This mistake pushed me to work harder and create something bigger and better. Although it was a major setback and downfall to my academic progression, I did in fact learn from my errors and overall, I am happier with these results.
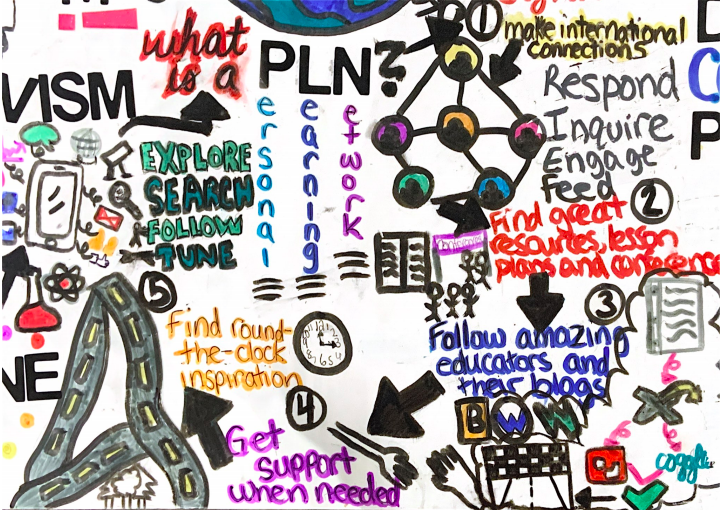
At first glance, this sketch note may seem overwhelming; however, the purpose of this visual aid is to direct the viewers attention to the title, the world, the twitter logo, and the brain. The title was tie-dyed to grasp the viewers attention, the world is to represent all individuals coming together from different countries in order to create and expand on ideas, the brain illustrates what humans could be capable of if we use all 7.8 BILLION brains that God has put on Earth. With that being said, every single person has something to bring to the table likewise to students in a classroom. No mind is alike, and whether the student needs differentiated learning, or an alternative strategy, we are all capable of accomplishing great things. Every single person in the videos, and articles shared a different opinion and perspective on digital tech and collaboration. With that being said, there is no right or wrong answer, and I want to push my students to think creatively.
If the reader follows the arrows from the title, they will notice the fluency -the left side is one section, the middle (PLN) is its own section following steps one through five, and the right side is one section.
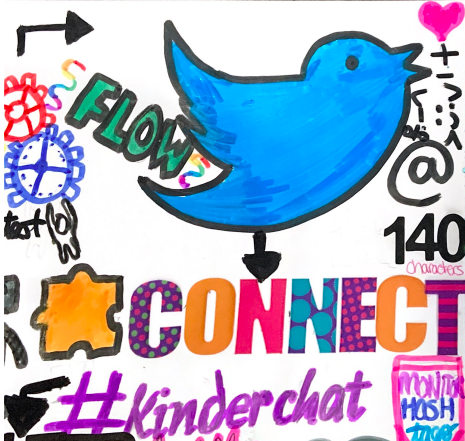
The Power of Twitter
The relevancy of twitter for educational purposes has a lot of controversy on whether or not it is an effective platform to use in modern classrooms. Some think it serves a digital purposes, while others tend to focus their opinions around the fact that technology is a distraction. In my case, I believe twitter to be an excellent tool if used properly. With that being said, teachers must begin by building a PLN (personal learning network) by following admins, educators, and users giving out interesting facts/ information pertinent to their daily lives. Twitter allows you to have 140 characters, which may seem like a downfall at first; however, there is a lot of richness in this. It may lead you to different paths, opportunities, or hashtags. Two of the most popular hashtags as educators are #KinderChat and #EdChat. Furthermore, it is very important to monitor hashtags and filter your feed. In 140 characters, it allows you to quickly read summarized texts about something that interests you in a specific area or discipline. Twitter is a platform that allows you to connect with some of the brightest educators in the world, allowing you to build off their ideas, resources, and thoughts. In my classroom, I would encourage the use of social media platforms -primarily Twitter in this case because I like to think of it as a modern way to follow the news. Users are always active, and providing updates from around the world, allowing us to build off each other. It is a never-ending learning cycle while giving students the freedom to be independent learners. Twitter would also allow my students to learn how to collaborate, research, and build off of others.
Filter Bubbles
There is something called “Filter Bubbles”. In Eli Pariser’s TedTalk “Ideas Worth Spreading”, he says that “A squirrel dying in front of your house may be more relevant to your interests right now than people dying in Africa”. There is a shift in how education is flowing online meaning what we are clicking and posting. For example, Facebook and Google. If multiple people were to search the same thing, they would all get different results because of our tailored inquiry results. We are unaware that the combinations of algorithms are creating filter bubbles based off of 57 signals. Signals include the type of computer, type of browser etc… I drew people having a tug of war to represent what the web THINKS they want us to see but not necessarily what we NEED to see as continuous learners. One does not actually control what is put in these filter bubbles, and one is not able to see or decide what gets edited out. Instead of a balanced diet of news that make us happy, sad, uncomfortable etc… we are surrounded by filter junk food hence why I drew different types of food. Algorithms are curating the world and do not have the same power as editors. This text relates to my future classrooms because it will be important to show students ways on how they can escape filter bubbles and becoming more aware of what is happening behind screens. Making sure students are researching diverse perspectives and parts of the stories that are purposely left out in order to build a controlled and more democratic society through the aid of these filters.
Community of Practices
In this section, I focused on the communities of practice which divides itself into three keys sections: DOMAIN, COMMUNITY and PRACTICE. Domain is a shared knowledge or skill within a specific area, the community are individuals converging and learning together, and practice is the sharing of strategies, tools, resources, and examples through a knowledge exchange. “The Role of Communities of Practice in a Digital Age” by Dr. Tony Bates describes how technology provides a wide range of tools that can support communities of practice. In my sketch note, those three key words are followed by a drawing of box that demonstrates how my students should THINK OUTSIDE THE BOX in the classroom. Furthermore, this text relates to my teaching and learning because I will further be able to educate my students on their online presence, their contributions to the better good of the community and motivate them to be willing to share their strategies. The drawing of the brain is that there are 7.8 billion people in the world so why would you only use one brain, if you had the opportunity to work with others?? Throughout this assignment, I have learnt that the more people you collaborate with, the better the ideas because everyone has an important element to add to your learning and understanding or a particular subject-matter. In classrooms, I know group work is not always encouraged or a personal favourite; however, I believe every once in awhile it expands learning and creates a favorable opportunity to build off of each other.
As a teacher candidate, I find it is crucial to continuously be outsourcing and researching diverse topics to build pedagogical practice.
One might ask… What is PLN?? I am here to tell you that a PLN is a personal learning network to help better understand what you are teaching or learning. It is a group of people that you will essentially learn from and connect with over the years. It is personal because it is ultimately up to your discretion to decide if you want to participate, collaborate, and who you want to be apart of your PLN. This will be useful fr my classroom because I can engage and follow educational pedagogies to expand my professional development to assure that I am bringing various perspectives to the table. It is not limited to global connections, but it is what makes it special. Additionally, the learning aspect is a constant cycle that connects people with similar interests which enriches your media activity on a device. The network includes platforms such as Youtube, Twitter, and the educator’s PLN. In my sketch note, I have included 5 steps to cultivate a PLN: make international connections, find great resources, lesson plans and conferences, follow amazing educators and their blogs (Word Press), get support when needed, and find round-the-clock inspiration. I have also included roads… essentially representing that your online presence can lead you to all sorts of learning opportunities and paths. I can apply this to my teaching in a way to express that the final destination is not what is important, but primarily the route, the scenery and the learning that you gained along the way.
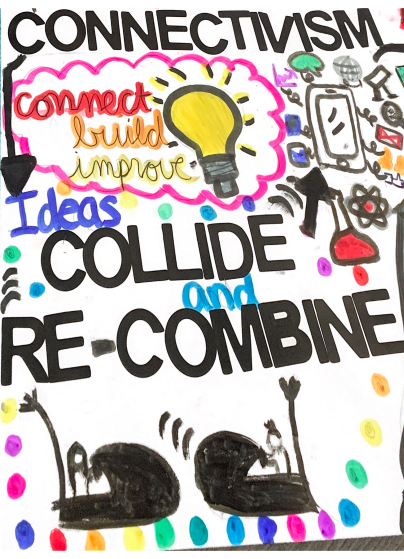
In the video “Overview of Connectivism”, Dr. George Siemens explains the importance of collaborating. In my sketch note, I drew bumper cars to enhance the idea that ideas collide and re-combine. They bounce off of each other and take those ideas in new directions. As a teacher candidate, I will take ideas/lesson plans/resources from my fellow educators and personalize them into my own version. Similarly to the notion of science in which we connect knowledge and build to allow for large societal advancements. This analogy is why I drew an Erlenmeyer to represent that science and technology can coincide.
You’re still reading??? We made it this far. One more point, I promise.
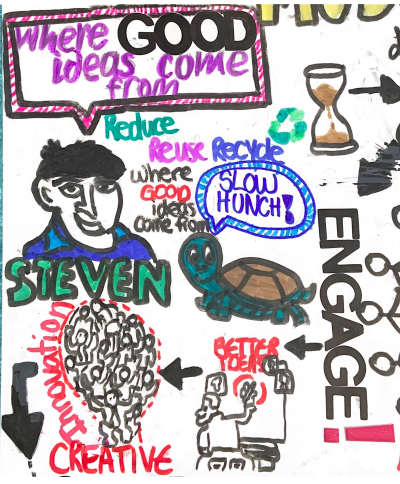
The video “Where Good Ideas Come From” by Steven Johnson really put creativity into perspective for me. From an environmentalist perspective, he explores the recurrent patterns that are continuously occurring to be innovative. The reason I drew a turtle is because he discusses the importances of hunches that remain dormant for years to come. Over time, this information will become relevant and the hunches will begin to collide. The reason I wrote “Reduce, Reuse, Recycle” is to reinforce the idea that you will condense your thoughts, you will reuse ideas or re-formulate others ideas, and recycle them to create something better. You must ENGAGE in a system that allows these systems to multiply the formation of hunches hence why the word engage is highlighted. In my classroom, I will teach the effect that the Internet has on our brain, as well as the importance of exchanging and borrowing other peoples hunches to create something new and innovative hence why there is a lightbulb full of people. Also, the importance of finding the proper study spot, and correct strategies that work for each individual can really increase creativity. Sitting in an isolated, dark room will not be effective for all hence why I drew the empty living room. Finally, I want to make an analogy to the turtle and the hare race. The hare thought he was too good for the turtle and could have easily rushed to the finish line with his speed; however, by the turtle taking his time, he really got to learn and ended up winning the race. Ideas take time to develop, similarly to how the turtle took time to complete the race at a slower pace.
(Sorry I couldn’t figure out how to embed my powtoon) I chose to create a powtoon because I thought it could be more enjoyable than my other options and because it allowed me to promote my thoughts in an interesting way that I was not used to at all. With that being said I definitely could use some practice with the app because I ended up uploading it with some things not how I wanted it at all. I still really enjoyed it but I think the full version was way better than the free version, and I wish they would have gave a little more tools to work with.
I chose to talk about the collaborator module in my powtoon because I liked it more than the other module. It was also easier to understand in my opinion. One of the biggest determining factors was that it was split up into four compact parts which made it a real treat to explore and summarize during my reflection.
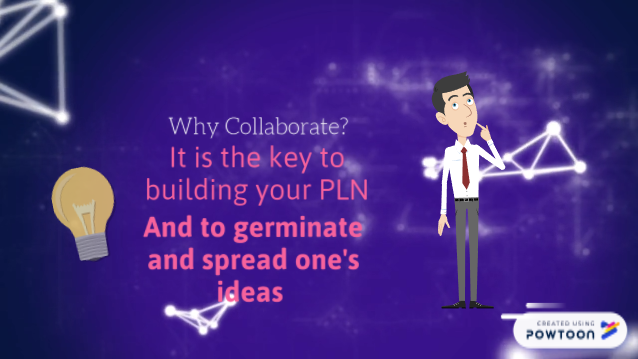
The first talking point was the EXPLORE portion of the module. Here the question of “why collaborate?” is proposed. This is in my opinion the most important part of the whole module (next to how to cultivate your PLN). I think it was very important that people understood the importance of collaborating with their peers, and how helpful it could be in your life as a whole. With that being said, I tried to keep my slides pretty minimal because I know too many words isn’t exactly aesthetically pleasing…
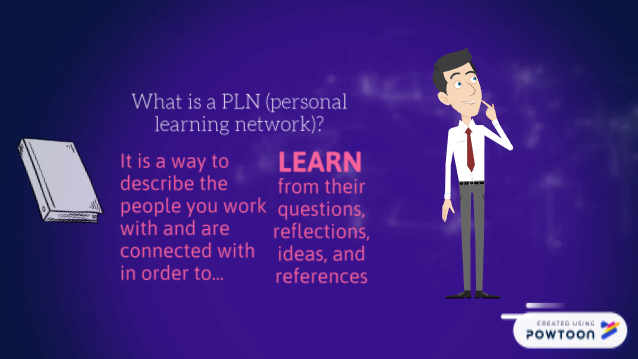
Next, the ENGAGE portion of the module focused on defining PLNs. For this part of my powtoon I really utilized Marc-André Lalande’s video “What is a PLN”. In the following slides I took time to explain why PLNs are personal in the first place. Letting people know that the user is in full control of the way they use and nurture their PLN. This shouldn’t be intimidating at all, in fact it’s very empowering knowing that you get out what you put into your PLN. Then I also talked about what makes it a “network” and how one can learn from it, but I think the most important thing is the fact that it is personal!
there used to be more on the slide but during uploading the app took away all of the things that were only for the “Pro version” I guess 🙁
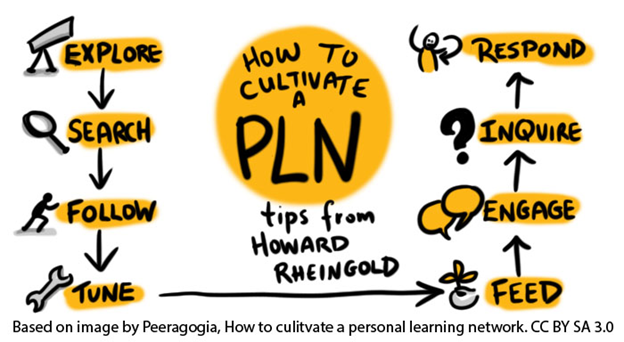
For the next part, I took basically all of the main points that Howard Rheignold talks about in his article. I thought the way he used key words such as Explore, Follow, Tune, Feed, Engage, Inquire, and Respond to explain his personal tips for creating the best PLN that you can possibly have was very helpful. I basically re-explained the image that was shown on the module….
The same thing happened to this slide too :/
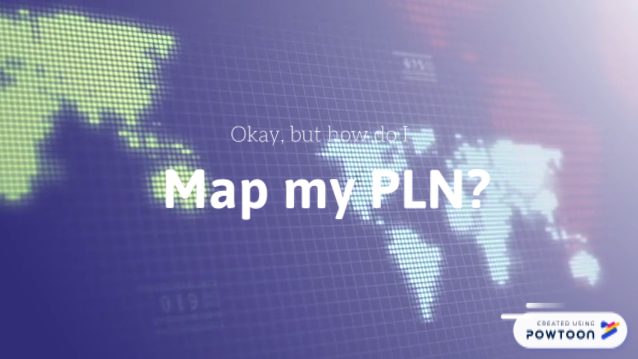
Although I think that the EMPOWER section of the module was the weakest, I still believe that there is something to be said about the how helpful mapping one’s PLN could be. I think the main way that it helps people is by being able to really pinpoint what is important in you particular PLN and what it is that you want to get out of it. Mapping doesn’t only help you mentally recognize the reasons why your PLN is the way that it is, but it also give you a visual representation of worth and meaning within the PLN.
For the second multimedia reflection I responded to the Technologist Module of Ontario Extend’s website using the format of a Twitter essay. I am not a frequent Twitter user so this format was somewhat new to me outside of the limited experience I had during class. On the whole I found the experience to be fairly painless — despite the spotty Internet connection I experienced throughout creating the thread — and I enjoyed the fact that I could dig fairly deeply into the module itself.
One of the key points from my Twitter essay
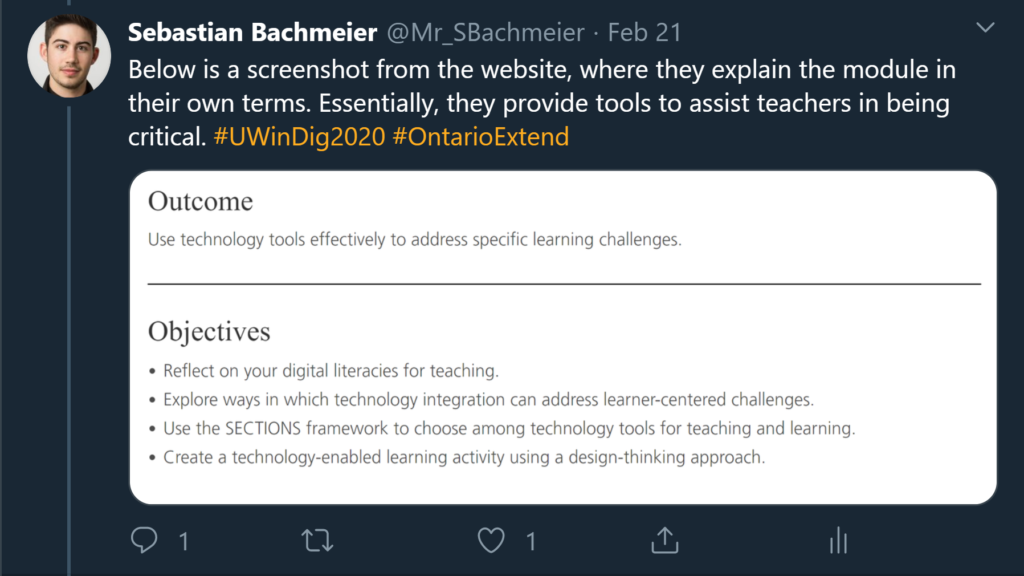
Ontario Extend lists their outcome and objectives at the beginning of the module as a guide to keep in mind as one reads through the various sections. This I found to be a helpful lens through which to view the content, and having these outcomes in the back of my mind as I digested the material helped me synthesize the main ideas of the module as a whole. The entire idea is to provide resources for teachers to help them use technology more meaningfully in the classroom, as well as a system that can be used to help even the most technologically-inexperienced educator find ways in which tech can solve problems for learners in there classroom.
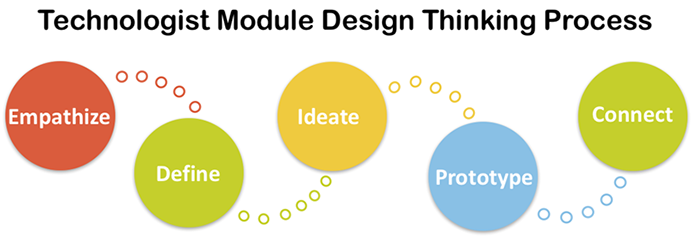
The system which the Technologist module uses is the Design Thinking Process. It has several stages which are easy to remember and flow extremely logically from one to the next. It is an excellent way to assess what the true challenges are in the classroom, and takes a very student-centered approach to finding or creating technology which addresses these challenges.
The 5 stages of the Design Thinking Process
The biggest strength for Ontario Extend’s module is that they link to a number of valuable and concise resources to help teachers follow the Design Thinking Process. For example, in the “empathize” section, the site provides a handy Empathy Map for teachers to print and use (as well as an example of a completed version). Throughout the other sections they also give suggestions for various tech tools one might use to help them along the process, as shown below from the “ideate” section. These links and downloadable documents ensure that there are no barriers to the successful application of their module.
A screenshot from Ontario Extend’s website showing their abundance of suggestions for tech tools
All in all, I think that the Technologist module is an extremely valuable resource for all educators in the 21st Century. Technology is an inescapable part of modern life, and it is our responsibility as educators to incorporate it into the lessons we teach in truly meaningful ways. It is very easy to use tools on a surface level, but few have unlocked the true potential that technology has in the modern classroom. This module is the perfect starting place to begin the journey of meaningfully integrating technology in lessons, and is a very clear step-by-step guide to achieve that end by asking the right questions and always keeping the students in mind.
I chose to further explore the Collaborator Module for this assignment. This module stood out to me because learning through connecting with others piqued my interest. I have also heard the term PLN before in classes and online and wanted to dive deeper into the topic. The four main groups that this module is divided into are explore, engage, expand and empower. Each of these topics looks at the importance of connecting with others who are interested in learning similar topics and creating personal learning networks.
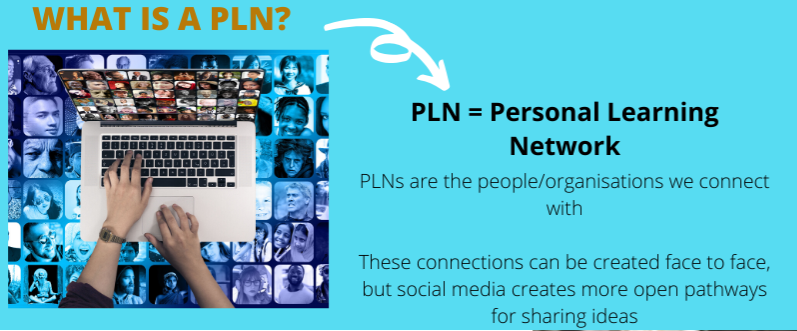
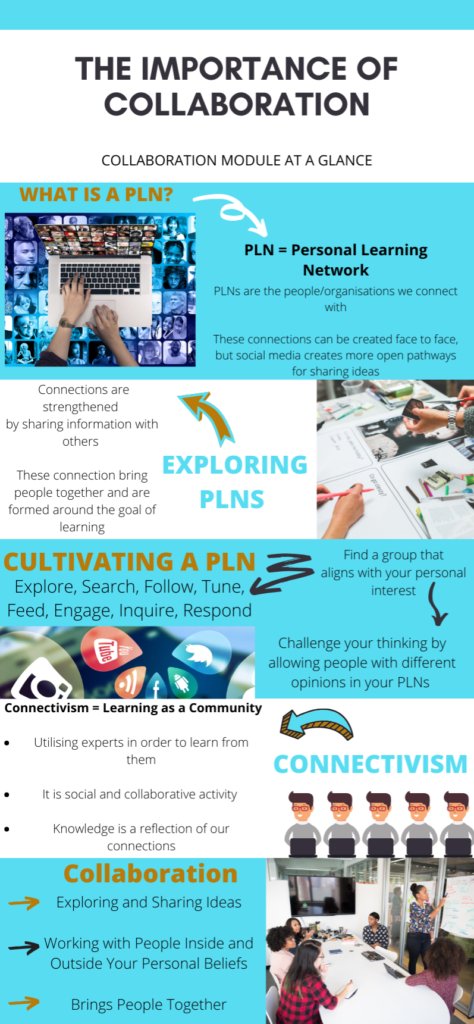
Before we dive deep into this Collaborator Module, it is key to understand what a PLN is.
A PLN, also known as a personal learning network is the people and organizations we connect ourselves with. Marc-Andre Lalande helps us to better understand what a PLN is in this module. He mentions that not all personal learning networks are online, but the online aspect is what makes them special. Using social media outlets such as Twitter create spaces for people to engage, explore and learn from one another. What you chose to learn and how you engage in learning can be personalized and created to fit your own personal needs and interests. So, in simple terms, PLNS is created for the goal of learning and bringing people together.
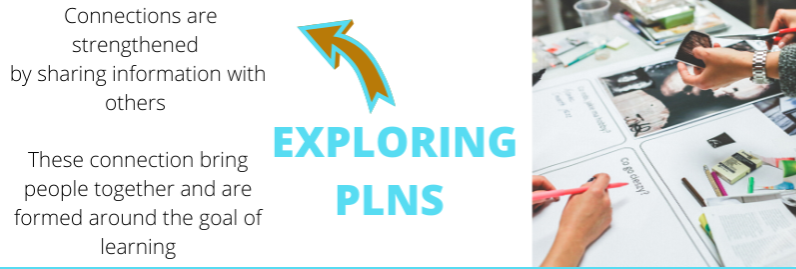
Let us take a better look into what PLNS are all about. Like I mentioned above, PLNS are created around the goal of learning. Connections between the people that want to learn are strengthened by sharing information amongst themselves. Dr. George Veletsianos pointed out that being part of a PLN creates long term effects that will help to improve the skills you are looking to learn. For example, when I was in my first placement this year I used my Twitter and Instagram accounts to follow different educators. Although I may have not engaged to the fullest extent I could have to reap the full benefits of these PLNs, I definitely used these platforms to create networks of learning that helped me to succeed in my first placement. These tools I learned through these communities will also help me in my next placement as well.
CULTIVATING A PLN (infographic) created using:
When cultivating a PLN it is important to remember the eight steps laid out in this module: explore, expand, follow, tune, feed, engage, inquire, and respond. In order to get everything you can out of a PLN it is important to FULLY engage in it. In my example above I have only explored, expanded, and tuned. If I were to engage with other educators, I would have gotten more out of the learning I did. It is also important to be aware of filter bubbles. It is important to allow people with challenging opinions into your learning groups as this can help us to learn and challenge our own thinking.
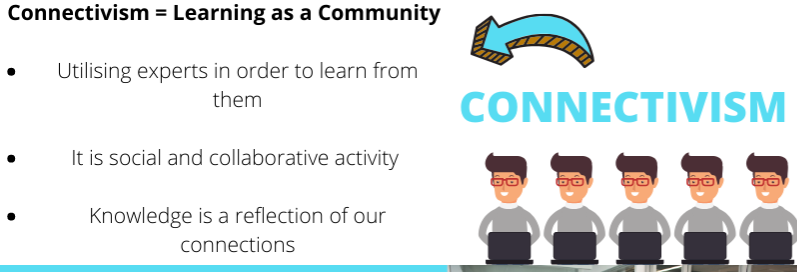
Connectivism means to learn as a community. Dr. George Siemens talks about how knowledge is a reflection of our connections. This is a social and collaborative activity that focuses more on the context of our learning rather than the content. This theory recognizes that we learners learn better as a group/community rather than individually. Connectivism, I believe, is important in a classroom setting. As teachers, we should be open to learning from one another on our staff and in our classroom with the students rather than taking on everything by ourselves.
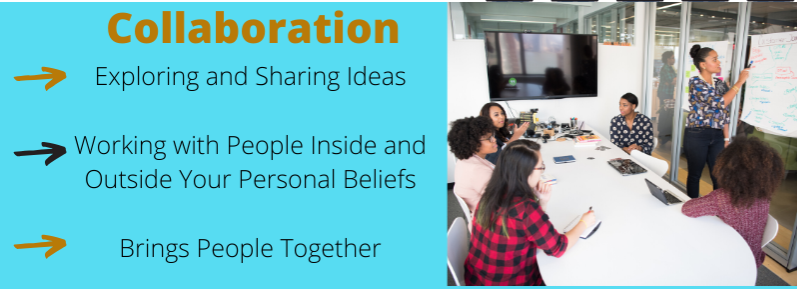
Collaboration looks at exploring and sharing ideas with one another. Communities of practice are a great example of what effective collaboration can look like. They are groups of people who can share passions, concerns, goals with others who share similar interests and they can all work towards learning how to further improve. There are three characteristics that make communities of practice effective. Having others to bounce ideas off of or gain new information is a great and important way to learn. All in all, collaborations bring people together and help individuals to grow as learners.
THE IMPORTANCE OF COLLABORATION ( finished infographic) created using: https://www.canva.com/
This module was helpful in exploring the importance of learning through collaboration. Even when creating this infographic and working on this assignment I collaborated by reading others post in from the previous assignment and reaching out to others who did and infographic for their first assignment in order to know how to execute it properly. I am glad I chose the Collaborator Module since I was able to dive deep into topics such as PLNs which I have heard before, but never fully grasped.
I decided to read and explore the Collaborator Module from eCampus Ontario. This is a Twitter essay that I made that sums up the module in a visually and attention stimulating way. Essentially, this module aims to help you build a network of experts using some type of social media or tool– Twitter in particular is mentioned numerous times. I really enjoyed this module as it resonates with something that I practice currently, without ever having really given it much thought, or even a name at that. I generally use Youtube as a personal learning network to develop my knowledge on various topics that interest me. After having read this module, it has opened my eyes to even more ways that I could extend and connect through my learning network.
2. By the end of this thread, you'll be ready to share knowledge and collaborate with your peers within, across, and between disciplines. It's easy, just assess what you're doing right already, find new strategies, build and extend your connections online. #uwindig#ontarioextendpic.twitter.com/Y9rtjk3dQP
4. How to collaborate? Virtual communities have been around since 1985! In your collaborative community, you should seek within and around your domain, find people that CARE, and be open to sharing strategies, tools, & resources through knowledge exchange! #uwindig#ontarioextendpic.twitter.com/A7hPLkHYyJ
It is very important that people understand that just because there may not be many like minded people that surround them physically, there is a whole WORLD of people they can connect with online. These are people that think exactly like you or I do, #relatable. Personally, I have very deep philosophical thoughts that my brain STARVES to have or listen to conversations about, and unfortunately I haven’t met people that can hold those kind of conversations with me. Online communities, such as Youtube holds plenty of experts in this field. In addition to that, the comment section is filled with people that think the way I do, so it is great to see that. I’ve also noticed that not many people exercise the way I do, so a lot of my information comes from Youtube and Instagram. So the idea of a “virtual community” is very important when you are trying to build your knowledge about a topic.
6. You can structure your PLN based on personal or professional content, make it distinctive to YOU! Ultimately, this network should help you learn more about yourself & how you can improve your expertise. Your social interactions help you grow & develop. #uwindig#ontarioextend
8a. It takes time & effort to develop your PLN. Explore various forms of media and find the experts in your discipline! Hit the "follow" or "subscribe" button to receive their content. Don't be afraid to add or remove candidates from your PLN either. #uwindig#ontarioextendpic.twitter.com/Bz24liF9Al
8c. If you really want to get the conversation started, ask tough questions that capture your followers. Listen to what others say as if they know something you don't! Above all, respond to questions directed to you. You're a contributor, so be reciprocal. #uwindig#ontarioextendpic.twitter.com/EtNgIMMHMU
This is one area I could improve in my collaboration strategy. I tend to watch and learn, rather than participate actively in the conversation. However, I tend to do that in real life as well. I would like to increase my knowledge and confidence before I go posting my own content and tough questions! This is something I can see myself pushing my limits in as I gain more experience in my fields of interest.
10. In order to always be building your PLN, it is important to continue extending the conversation. You may not need technology to do this, but it helps. If you visit a conference, one way to extend that is to meet others & follow their socials! #uwindig#ontarioextendpic.twitter.com/TejOtQnKBi
13. If you found this thread useful, consider retweeting me to help me, help others! Again, this Collaborator Module is brought to you by @eCampusOntario, make sure you let them know you found it useful as well. Good luck with your PLN, teacher! pic.twitter.com/s1LaCbbHrC
Overall, I thought the Collaborator Module was very insightful, especially in a time where social media and the internet allow us to access information so easily. This module is more than just how to collaborate well, but I think it teaches us how to use social media responsibly and professionally. Something as a teacher I could go on to teach my students about. Incidentally, I found the Twitter essay much harder than I thought it would be. With the word limit I had to plan out exactly what I wanted to say, what section I wanted to cover, and in how many tweets I could do it correctly. I enjoyed the world limit because it challenged me to get straight to the point on a lot of ideas. Furthermore, the gifs and images added the extra context and dry humour necessary to keep the reader’s attention. Overall, this was a valuable experience that is sure to make me a better teacher moving forward.